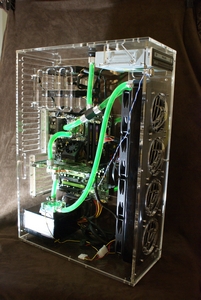
Today we take a look at a very unique case, the Danger Den Tower 26. Not your average full tower, think waterblocks and BIG radiators.
INTRODUCTION
Today we take a look at another vital part of every computer, the case. It’s what holds it all together. In days gone by, a case has been a matter of function over form. As time goes by however, more and more people get involved in modifying or “modding” their computer cases; some for looks, some for performance gains. Manufacturers have certainly taken notice and it seems that every day we see another new case enter the market. LED’s, side windows, and front panel cutouts have all seen increases in popularity. One of the primary concerns of modern computer enthusiasts is, and will likely remain, heat and the ways to deal with it efficiently.
One of Danger Den’s latest entries into the market is their new Tower 26. This is not your average case. It is completely acrylic, HUGE, and will accomodate the largest liquid-cooling radiator on the market, the Black Ice GTX480, without any modification. That’s a radiator just over 120mm x 480mm. For those involved in water-cooling their systems, that is a very large radiator capable of removing a lot of heat. For those that don’t want liquid anywhere near their system, that still allows for 4 fans mounted on the front of the case.
ABOUT DANGER DEN
Danger Den is a company headquartered in Astoria, Oregon. Their primary market is the PC enthusiasts that are into liquid-cooling their systems. To this end, they have delivered and they have happy customers all around the world. When I first began looking into watercooling my system, Danger Den was a name that came up on every forum in every discussion I could find about watercooling. The reason is simple. They have earned a reputation as a company that offers quality products at a fair price and excellent customer service. They also offer several computer cases that are comprised of all acrylic, with the watercooling system in mind. They offer waterblocks for everything from CPU’s to GPU’s, even motherboard chipsets. They continue to research and produce new products for the latest computer equipment. I believe Danger Den will be around for some time to come. Now lets see if they’ve got a winner in the Tower 26!
FEATURES AND SPECIFICATIONS
In my opinion, this is a great looking case. I have always enjoyed having a side window on any case that I own. Since the Danger Den has completely acrylic design it’s great way to show off your system. Within the enthusiast community, people enjoy showing off all their gear and this case will allow you to do so.
|
DD Tower 26 Specifications |
|
|
Size
|
26.19″ Tall x 7.75″ Wide x 18.25″ Deep
|
|
Form Factor
|
Standard ATX and Extended ATX
|
|
Internal Expansion Bays
|
5 x 3.5″ HDD bays |
|
External Drive Bays
|
1 x 5.25″ Drive bay (2 x 5.25″ optional upgrade)
|
|
Maximum Radiator Size
|
120mm x 480mm
|
|
Air Cooling Options
|
Approx 7″ (17.7cm) clearance for CPU cooler
|
|
Construction
|
Strong and Durable Acrylic construction
|
|
Colors Available
|
Standard is clear; UV Green, Black, and UV Yellow are optional
|
|
Other Options
|
Laser Engraving available
|
PACKAGING
This is perhaps my very favorite part of reviews. I have to have a visual representation of something I am reading about, so here you go:
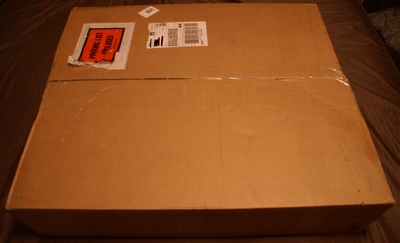
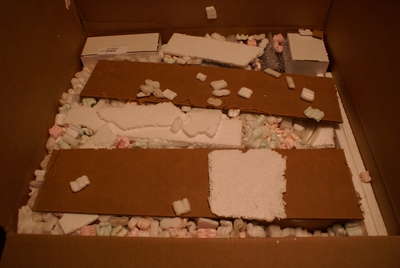
We’ll look at the packaging first. This is how the box arrived – with no indication other than the shipping label as to the goodies it contains. In the bottom photo you can see how everything was packaged together. Notice all the other goodies that Danger Den provided us with it as well. That review is soon to be released, so more details on that later.
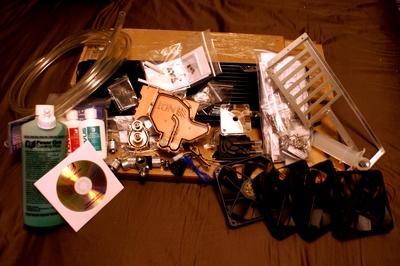
Here’s a brief look at everything that was inside the box. The cardboard colored flat surface is actually the case. All the acrylic pieces were covered with brown contact paper, which did an excellent job keeping them from getting all scratched up.
A CLOSER LOOK
Have you ever had one of those moments when you really get into something, so involved in something, that you forget everything else you’re supposed to be doing? Well, that happened to me. So unfortunately, I don’t have twelve pictures of the process of peeling all the contact paper off. I don’t have any pictures of cleaning the acrylic, and I don’t even have any pictures of the case being assembled. The camera was right there the whole time, too! I know, it happens to the best of us. Truth is, this case went together extremely quickly. Having put together my share of furniture that is all pre-drilled at the factory, the kind where all the hardware is in one or two bags, I expected the worst. Assembly could not have been smoother. With the exception of one hole in the optical drive mount all the holes were dead on, and hardware threaded easily. The one hole in the optical mount was just a little off and it was fixed in just a couple of minutes with a little coaxing. Before I could think to pick up the camera, the case was together and wouldn’t you know it, the motherboard was in. Hmmm.
I think my favorite thing about the way this case was packed and shipped was the way they packed the hardware. The large bag on the right in the picture below contains all the hardware for the case. All the different types of screws are packaged separately from each other, and labeled according to what they are used for. Not a size x length measurement to be found here. How about something like “Side panel screws” and “optional GTX480 radiator screws?” It’s the most clearly labeled hardware pack I’ve ever seen. They even throw in a pair of cotton gloves to keep your greasy paws from marking up the case. They also included a DVD for assembly, which I have yet to watch. The paper instructions they’ve included in this package are large and very clear, with each step having its own page. Also pictured is the all-important cleaning kit. It helps protect against fingerprints and more importantly, is used to buff out scratches.
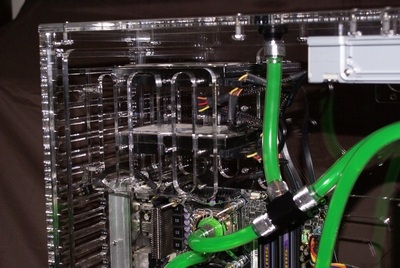
Without further ado, some pictures of the finished product with everything installed. One of the things that becomes evident here, and one of the few drawbacks of this case, is the lack of any cable management space. I was able to run the ATX, CPU, SATA, and Molex power cables underneath the motherboard to their locations. However, a motherboard tray with space behind it would have been far preferable. Also, notice the lack of front panel inputs. Not a deal-breaker, but it would’ve been convenient as a full tower that is also full of water can be a real pain to move around on carpet so you can get behind it.
Here is a good look at the hard disk rack. It has the capacity to hold four drives on this rack and one directly underneath the optical drive. If you look closely, you can see the cutouts that are on the motherboard tray. This does allow the installation and removal of CPU and chipset heatsinks, unless you have a 780i, as I do. This is not something that I can blame on DD, though. Not all motherboards are setup the same way, and one cannot expect that all makes and models to be accommodated. It’s great idea nonetheless. It eliminates cutting, as that was something that I had to do to my Antec 900 with a Dremel. As mentioned before however, a 1/2″ space between the motherboard tray and the side panel would’ve been very nice.
TEST SETUP
Typically, there are not many tests to run on a case. It doesn’t move and it doesn’t actually DO anything other than keep everything in place and keep it safe. Right? Kind of. One of the biggest factors in the success or failure of cases is in their ability to provide adequate airflow to remove all the heat generated by today’s latest and hottest (literally) technology. So today we’ll look at the temperatures generated by one of the hottest processors on the market, the Intel Q6600. Not only that, but we’re going to push the processor beyond its voltage limit and see if this case is up to the task. It’s more than the case, obviously, but without this case we would not have the Black Ice GTX480. I have not seen any other case that will accommodate this radiator without serious modification. This case seems to have been designed around it. So let’s have a look at the setup.
| TEST SETUP | |
|
Case
|
Danger Den Tower 26 |
|
Processor
|
Intel Q6600
|
|
Motherboard
|
EVGA 780i Tri-SLI
|
|
GPU
|
EVGA 8800GT SC
|
|
Memory
|
2 x 1GB Corsair XMS2 5-5-5-15
|
|
HDD
|
2 x Western Digital Caviar SE 160GB in RAID 0
|
|
Radiator
|
Black Ice GTX480
|
|
Pump
|
DD / Laing DDC 12V 18W w/ acrylic top
|
| CPU Waterblock |
MC-TDX 775
|
|
GPU Waterblock
|
Ione GPU Full coverage block
|
|
Fans
|
4 x Yate Loon Low speed fan
|
|
TIM
|
Arctic Silver Ceramique
|
TEST RESULTS
For the testing, I have chosen to run the Q6600 at an extreme voltage. What this will show is the cooling efficiency of the whole system, including the case. One great thing about this case is the rear ventilation. All the air drawn over the radiator is going to be fairly warm and has to have somewhere to go, this is where all the cutouts in the back panel come in handy. It should also be noted that for the purposes of heat testing, GPU load was determined after running the F@H GPU client for twenty minutes, the CPU was run on Prime95 for twenty minutes as well. Here are the results!
|
COMPONENT |
IDLE |
LOAD |
| INTEL Q6600 1.544V (voltage taken at full load) |
37°C
|
61°C
|
| EVGA 8800 GT SC |
37°C
|
42°C
|
| INTEL Q6600 installed in Antec 900 at 1.44V (voltage taken at full load) | 42oC | 62oC |
I had a hard time believing that those temps were possible at that voltage. It really emphasizes just how much heat this radiator can handle. By comparison, I previously had a Swiftech 240 radiator installed outside of an Antec 900 with a Dtek FuZion CPU block without a GPU block and I couldn’t get anywhere near that high of a voltage without cooking the processor. I was able to get the processor to 1.44 volts with the same load temp (and a higher idle temp!). And this setup with four fans is still quieter than the two medium-speed Yate Loons I was running on the other setup.
While my specific processor won’t run stable at anything higher than 3.4Ghz, this test does a great job of demonstrating the reason for liquid-cooling your system in the first place. When you have the ability to push voltages higher, yet still keep your processor within safe ranges, you can really push the limits of overclocking your hardware.
*Disclaimer* Neither bjorn3D.com, or Danger Den recommend running voltages higher than the manufacturer has deemed acceptable (though we do have lots of fun doing it!)
CONCLUSION
As some are aware, computer cases have gone from one of the most overlooked items during a new build to one of the most critical. Many people are no longer content to just buy the cheapest case available and stuff it in a cabinet. We all want to show it off. People mod their cases for bragging rights at the next LAN party. I’ve seen modded cases go for over $1000. The price of this case, by comparison, is a steal at $219.95 direct from Danger Den. Many people feel that is a lot to spend for a case, and it is. However, when you factor in the out-of-the-box setup and the capability to install some pretty extreme cooling solutions, it quickly becomes a better deal. Nowhere else can you find a case that will accommodate the insanely large Black Ice GTX480 without modification. All that and don’t forget to consider that this is a full tower. It is in the same size range as the ThermalTake Armor and the Cooler Master Stacker 830. In addition to all that they do, for an additional cost, Danger Den offers laser engraving with any image you send them.
Overall, I was extremely pleased with this case. From the ease of putting it together, to the installation of components, it was obvious that Danger Den took their time on this case. It has been well thought out and implemented. It does have a few shortcomings, though. The biggest problem for me is the lack of space for cable management. In addition, for those like me that do not have a modular power supply, there is no space to hide extra cables. Also, the lack of a front panel is disappointing. The reason for not having one is fairly obvious. It would interfere with hard drive mount number five. Personally, I would give that up for a front panel but I do understand that you can’t please everybody and there are probably just as many people that want the extra hard drive mount. Another drawback that I have noted is one that is common to many cases, which is the lack of any sort of filter for the front intake. Dust kills computers, plain and simple. When you have a radiator mounted on the front of your case, it does an *okay* job of keeping dust out of the inside at the cost of degraded performance over time until you actually take everything apart to clean it out. And the final problem to note is simply aesthetic, fingerprints. Being acrylic, the case takes fingerprints very well. The cleaning kit available from Danger Den comes highly recommended, as it works very well and includes a scratch repair system.
On a positive note, I was quite pleased with the mounting for the power supply. Having had two different Antec cases, I have become used to bottom-mounted power supplies. This one is a little different however, instead of mounting with the fan facing up into the case, Danger Den has elevated the PSU approximately 3/4″ off the bottom of the case and layed out the mounting location to have the fan face-down, giving the case a cleaner look.
Pros:
+ Unique look
+ Accomodates largest radiator on the market
+ Ease of assembly
+ High airflow capability
+ Roomy inside
+ Bragging rights
+ Price is well in line with competition
Cons:
– No front panel inputs
– Cable management is difficult, at best
– No filtration to keep dust out
In the end, I have been extremely pleased with my first experience with Danger Den. They have been a top name in watercooling for some time now and the Tower 26 is no different. It is designed for enthusiasts by enthusiasts. Sometimes it’s the little details that count; things like the DD logos cut into the front panel and the pre-drilled hole in the top for the fillport. For a different look and a strong solid case, I highly recommend the DD Tower 26. With all of these things in mind it has earned:
Final Score of 9.0 out of 10 and the Bjorn3D.com Golden Bear Award.
 Bjorn3D.com Bjorn3d.com – Satisfying Your Daily Tech Cravings Since 1996
.jpg)
