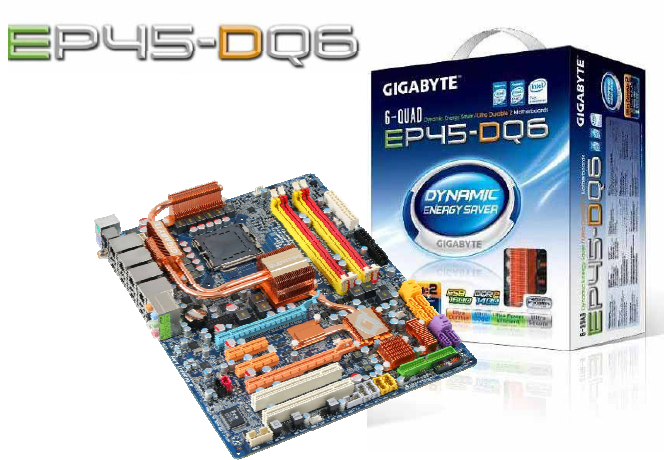
The Gigabyte EP45-DQ6 is a Premium, Feature rich Over Clocker Friendly Motherboard that offers many of the same features as more expensive boards.
INTRODUCTION
Since Intel embraced the Overclocker community a proliferation of Motherboards targeted at the LGA 775 socket based CPU’s have hit the market in a big way. Most with an extremely premium price attached to them. Many enthusiasts held on to the quickly aging P35 chip set boards as a viable alternative to the more expensive X38/X48 offerings.
With the introduction of the P45 Eagle Lake chip set end users were offered a different alternative to the P35 chipset that offers more features. In the rush of the now common X38/X48 chipset it’s easily overlooked in the technology stampede that we’ve all become accustomed to. Unfortunately the X38/X48 chipset came with a premium price that makes it hard to justify any performance increase from a bang for buck standpoint.
Enter the P45 Eagle Lake chipset which offers many of the same features as the more expensive highbrow cousins at a more Pocket Friendly price. Our friends over at Gigabyte were nice enough to send us a Gigabyte EP45-DQ6 P45 Eagle Lake Chipset to run past our battery of tests. Then an idea of epic proportions was born. Take the newer P45 and put it against a P35 in a direct head to head fashion and see what shakes out of the Chip Sets.
Taking this idea and expanding on it from an upgrade by the “One component at a time” standpoint we further decided to keep the whole test rig the same and upgrade with the EP45-DQ6 and a couple of 160 Gig Sata 2 hard drives we had laying around the lab. So initially all the components are the same except for the motherboard and hard drives keeping the same DDR2 memory running at 800 Mhz. Then with an eye to the incremental upgrader throw a new 2 Gig set of Patriot DDR2 1200 in the mix and see how the upgrade path has helped the evolution of the platform.
Sound like your upgrade path? It’s a daunting task indeed, but one that reflects a viable upgrade path for the value minded enthusiast that still wants performance and not have to sleep on the couch. (Not sleeping on the couch is a Big Plus).
About Gigabyte
Founded in 1986, GIGABYTE started as a research and development team and has since taken the lead in the world’s motherboard and graphics accelerator markets. To truly reach out to all consumers, GIGABYTE further expanded its product portfolio to include more diverse digital products such as Notebook and desktop PCs, digital home appliances, networking servers, communications, mobile and handheld devices, servicing every facet of people’s lives at home or at work.
Everyday, GIGABYTE aims to “Upgrade Your Life” by knitting a global network to effectively honor its commitment to world wide customers. What’s more important, GIGABYTE wishes all users to see and feel the brand through its products and all the touch points from GIGABYTE to the hands of all users.
FEATURES AND SPECIFICATIONS
Features
Based on the new Intel P45 Chip set the EP45-DQ6 supports a blazing 1600 Mhz FSB and support for the latest 45nm Core 2 Duo/Quad processors. It’ll use your existing DDR2 800 and provide an upgrade path to DDR2 1200 making it a good choice for the forward looking upgrade minded enthusiast.
Optimized for the 45nm generation of CPU’s the EP45-DQ6 will accept any current Intel 775 LGA CPU adhering to the VRD11.1 power phase specification, and cannot be compatible with VRD10 designed CPU’s, it’ll accept any CPU with that standard from 800 Mhz to 1600 Mhz FSB making it extremely flexible in CPU choice and upgrade path.

Supporting the latest DDR2 1200 for blazing fast speeds in the DDR2 range you’ll also be able to keep your existing DDR2 800 until your ready to make the move to the faster DDR2 1200. Unfortunately the EP45-DQ6 won’t support the new DDR3 standard which has been slow in gaining acceptance due to it’s price for performance showing. Supporting DDR2 alone instead of DDR2 and DDR3 is probably a good thing because we’ve seen performance issues with a lot of dual ram boards.
If your worried about PCI-E bandwidth issues on the old P35 or PCI-E 1.0 standard on your current board, you’ll be glad to know that the EP45-DQ6 supports PCI-E 2.0 to address your future bandwidth needs. It carries 2 PCI-E 16X slots which will operate at 16x and 8x respectively and support the PCI-E 2.0 Standard while running ATI CrossfireX technology.

Supporting ATI CrossfireX technology you’ll need to ensure your using ATI boards that have the Crossfire bridges to get those blazing frame rates and superior graphics you crave so badly. With the release of the new ATI 4870 and 4850 and the excellent performance Crossfire is looking pretty good these days. Great price, great performance, and you’ll be on the forefront of technology with the Dual PCI-E slots running the 2.0 Standard.
Using the Realtek ALC889A codec and supporting High Definition Audio on 2/4/5.1/7.1-channel speakers and featuring support for Dolby Home Theater you’ll be rattling those windows before you know it. Explosions, in game conversations, music and sound effects will flow from your speakers delivering an incredible sound experience without the need for an add in sound card. In trouble with the family for to much in game enthusiasm with the Volume Knob, your covered with the inclusion on an on board HD audio connector for your gaming headphones ensuring that you don’t get attacked by the family in a barrage of pillows and feathers while they try to sleep during those late night gaming sessions.
GIGABYTE Dynamic Energy Saver Advanced will allow you to save energy through dynamic energy saving features that will throttle back on energy usage during less demanding activities. It utilizes the world’s only motherboard energy saving technology with hardware-based Dynamic 6-Gear switching and requires 45nm processors with the PSI signal enabled. Current energy prices have driven the design of a lot of energy saving motherboards in the recent months. While energy is a concern, we are planning on running this beauty at full throttle until our need for speed is satisfied or that Magic Blue Smoke ascends from the case in it’s majestic plume. We will of course test the energy saving features, but a beauty like this should run full throttle until the last piece of Coal at the energy plant is exhausted and the Power Company begs for mercy.
We also checked with Gigabyte on the power saving features and we were reassured to hear, “GIGABYTE has also retooled Dynamic Energy Saver to allow overclockers to experience the benefits of multi-gear power phase switching while over clocking, providing ultra stable, ultra smooth over clocking performance.”
Of course along with the dynamic energy savings Gigabyte has mandated and implemented top quality highly efficient components to facilitate the energy savings we need and the smokin performance we want.
Among those revolutionary features you’ll find Ultra Cooling – Low RDS MOSFET Design which reduces switching resistance and provides faster charging and discharging.

Low Power Loss – Ferrite Core Choke Design comprised of a compound of Iron Oxide and other metals to hold energy much longer than traditional Iron core at higher frequencies.
The EP45-DQ6 addresses longevity with it’s Longer Life – All-Solid Capacitor Design. The capacitors contain a solid organic polymer as opposed to electrolytic capacitors which use a common liquid electrolyte. The high quality Japanese capacitors last longer than electrolytic and have gained public notice and became an issue with motherboard design recently.

After checking with Gigabyte we were told that all Gigabyte P45 motherboards uses 2 Phase power switching for the North Bridge and Memory allowing for cooler operation, a longer life span, higher frequencies, and better performance.
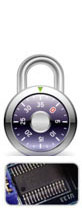
Need some data encryption to protect that large collection of, errr vital files relating solely to work and not that pictorial site we never mentioned? With the inclusion of 2048 bit encryption in the form of an Ultra TPM you’ll enjoy security, manageability and flexibility that surpasses software-based encryption. Requiring a portable user key in the form of an inexpensive Thumb Drive (not included) you can ensure the valuable data on your hard drive is safe. A copy of that key may be made for safe storage but only with the original key present and Gigabyte warns that you need to ensure safe storage of the keys and passwords because losing the key or forgetting the passwords will result in the files not being able to be read or cracked to retrieve them. A sticky note with the password attached to the monitor doesn’t count as a security measure.

Ethernet port holding you back, sitting on a massive T1 or fiber optic trunk line that provides so much bandwidth that your Ethernet port is screaming for mercy? Want to drop that ping time in online gaming so you can get off that vital head shot before your brains get splattered on the wall? Need to run multiple routers to accommodate that hot point your not supposed to be running, or use the old desktop for server purposes? How about Quad Gigabit Ethernet on board with teaming capabilities, yes you read that right 4 gigabit Ethernet controllers for increased speed or driving that impromptu Lan Party at the dorm.

How many times have you craved more voltage options for the CPU, NB and memory, left thinking if I could just get more NB voltage, or if I had more choices I could shave a little off the CPU voltage and knock a little heat off the CPU? This board can do it for you with Hardware Over voltage Control ICs which provide more voltage control options than before for the CPU North Bridge and memory. Yes you can enjoy adjusting voltage in increments as low as 20mV for better over clocking performance.

For the less experienced over clocker Gigabyte has included Easy Tune 6, which allows you to manage and monitor your hardware from the Windows GUI environment. While were not big fans of GUI based tuning utilities we realize the need for them to accommodate the “Sunday Driver” or less experienced over clocker community. With a feature rich BIOS designed especially for over clocking laid out in a user friendly environment we’ll test the Easy Tune 6 utility but will delight in running our fingers over the BIOS features.
During testing of Easy Tune 6 we were able to achieve a solid over clock on the Q6600 we are using for the review. We punched it up to 3.2 with a FSB of 400 at 1.36 vcore but to go beyond that we had to go into BIOS to achieve a higher over clock. You should know that it took longer to achieve the Over Clock in Easy Tune 6 than it did in BIOS but we would attribute that more to learning curve than the software’s design.
On the EP45-DQ6 motherboard you’ll find 10 Sata 2 connectors, 4 of which are purple and Hardware Raid based plug and play, don’t get to excited yet though, it’s designed for data backup and protection. We thought it best to let you read what Gigabyte had to say about the Hardware Raid based ports. “Gigabytes Smart Backup allows users to connect up to 4 Serial ATA devices for effortless RAID data protection. Dual on board RAID controller chips automatically configure RAID setup without user intervention, making it easier than ever for users to enjoy enhanced data transfer performance, low CPU utilization, real-time backup on-the-fly and protection against HDD failure.”
Hoping for hidden features that would allow us to boot from the ports using the hardware raid setup we spent 7 hours trying to configure them at boot up and use them for the boot drives on the test rig. Then later on we found out that while it’s a Hardware Raid backup it won’t back up a Raid Array like the Matrix Dual Boot array we have on the test rig. Gigabyte might want to think about putting the information about not being able to back up a Raid Array to the Hardware Raid array at the front of the manual (which we actually read). We never did get it to boot to the Hardware Raid and it’s not designed for that but we feel that Gigabyte should make that a little clearer in their marketing of the product.

Worried about bios flash issues and Bios over writer viruses rendering your new prize nothing more than a paperweight? Gigabyte has included their patented DualBIOS on the EP45-DQ6 to protect, backup your BIOS and in case of BIOS failure or crash it will automatically recover your bios for you. During later testing we managed, with difficulty, to crash a few time while Over Clocking. The BIOS recovery feature very politely booted us into a safe configuration where we were able continue our efforts to squeeze every ounce of speed out of the CPU. For those that like multiple Bios profiles Gigabyte has provided for that and the BIOS keeps track of the successful boots into each profile. Very helpful after a long days testing when things start to get fuzzy.

Ever wondered why that new board won’t boot right out of the box? Left wondering if you have a bad board or bad component when you went to bed after a long day of trying to kick that new board to life? The EP45-DQ6 has a full range of diagnostic LED’s on the motherboard that will among other things indicate Over Voltage, improperly seated components, and error conditions at a glance. Not only do they indicate errors they look pretty snazzy when gazing into the casing. We tested the LED setup by inserting some DDR 2 we had laying around the lab that had gone bad and the memory LED lit up red at boot. After a short peek at the manual we were able to identify the LED and it correctly identified the bad ram.
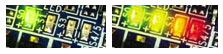
There’s a little peek at the diagnostic array of LED’s by the CPU.
Stuck with a screw driver or razer blade trying to jump the board to life on the work bench? On this board you won’t be, on the edge of the board easily accessible you’ll find a reset, power and clear CMOS button. That feature alone makes this a noteworthy board increasing the ease of testing and clearing CMOS after a happy little over clocking accident or hardware change. We tested the CMOS reset button, power on button, and reset button on the EP45-DQ6 inside the case. The location of the buttons isn’t the best in a tower case, their located at the bottom of the boards layout in the corner closest to the rear of the case. With a dual slot GPU in the test rig it was a little bit of a stretch to reach them. We were able to reach them so we aren’t complaining.
Specifications
| Gigabyte EP45-DQ6 Specifications |
|
| Features |
Intel® Core™ 2 Quad processor Intel® Core™ 2 Duo processor/ Intel® Pentium® Dual-Core processor Intel® Celeron® processor in the LGA 775 package |
| FSB |
|
| Chipset |
|
| Memory |
|
| Audio |
|
| LAN |
|
| Expansion Slots |
|
| Storage Interface | South Bridge:
GIGABYTE SATA2 chip
iTE IT8720 chip:
|
| IEEE 1394a |
(via the IEEE 1394a brackets connected to the internal IEEE 1394a headers) |
| USB |
(8 on the back panel, 4 via the USB brackets connected to the internal USB headers) |
| Internal I/O Connectors |
|
| Back Panel Connectors |
(Center/Subwoofer Speaker Out/Rear Speaker Out/Side Speaker Out/Line In/Line Out/Microphone) |
| I/O Controller |
|
| H/W Monitoring |
|
| BIOS |
|
| Unique Features |
|
| Bundle Software |
|
| Operating System |
|
| Form Factor |
|
| Note |
|
We’ll get a little more in depth on a few of the more interesting Features and Specifications in a little while but for now lets move on to Packaging, Contents, and Pictures.
PACKAGING, CONTENTS, PICTURES AND IMPRESSIONS
Packaging
With the EP45-DQ6 calling our names we really don’t want to spend a lot of time on the packaging.
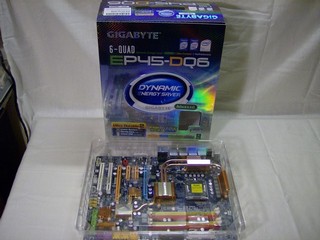
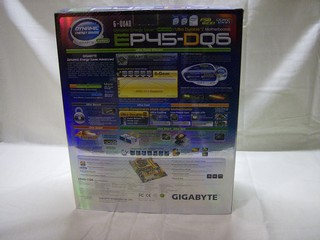
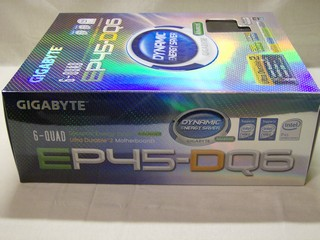
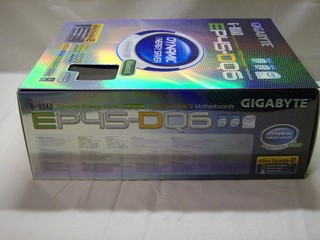
The EP45-DQ6 comes in a really nice foil skinned box that has a Book-Type flap that opens and provides more than enough information for the interested consumer to make a decision about it’s purchase. It’s solidly constructed and the interior packing is more than sufficient to protect your prize.
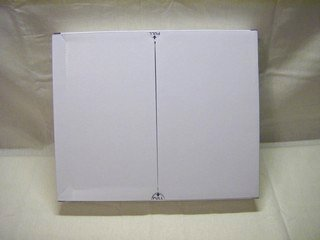
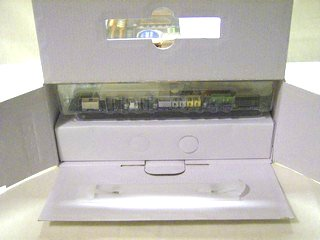
Rest assured that Gigabyte has this beauty packaged in a clam shell and the bountiful accessories safely packaged in the cardboard sleeve that closes like a book.
Contents
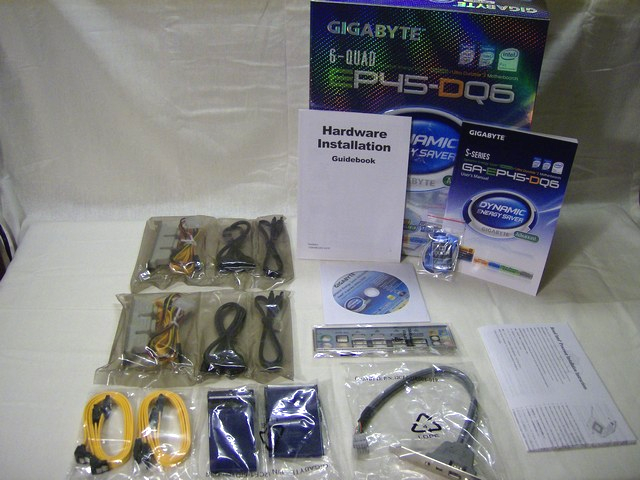
Inside the box you’ll find:
- 1 – Gigabyte EP45-DQ6 Motherboard
- 1 – Driver Disk
- 1 – I/O Backplate
- 1 – Quick Install Guide
- 1 – Motherboard Manual
- 3 – Case Badges
- 1 – Set Floppy/Ide Cables
- 4 – Sata Cables (2 flat head)
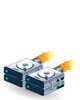
- 1 – 1394 Firewire Bracket W/2 ports 4 & 6 pin
- 2 – E-Sata port bracket W/4 ports & 2 power connectors
- 2 – E-Sata Cables
- 2 – E-Sata Power Cables
- 1 – Intel Boxed Processor Installation Instructions
As professionals it’s interesting to watch the bundles swell then shrink over the years. In recent memory Graphics cards had copious bundles that included as many as two video games and every accessory you could think of. That trend has some what reversed itself and now motherboard bundles are starting to grow. A trend not only seen on premium model boards like the Gigabyte EP45-DQ6 but more Vanilla models. This bundle is quite generous but given the location of the Sata ports, in proximity to the PCI-E 16X slot, I’d like to have seen more Flat Head Sata Connector Cables. It strikes us that given the length of time that full length dual slot graphic cards have been on the market; that all motherboard companies should be able to accommodate the full length cards without blocking the Sata ports at all. Since the advent of Crossfire and SLI few if any companies have made any attempt to take into consideration that the use of dual slot cards is going to make using some of the Sata ports impossible. At the very least abandon the less expensive upright connectors and go to an all side mounted connector.
Pictures And Impressions
We like to get right to the pictures and save the impressions for after the gazing.
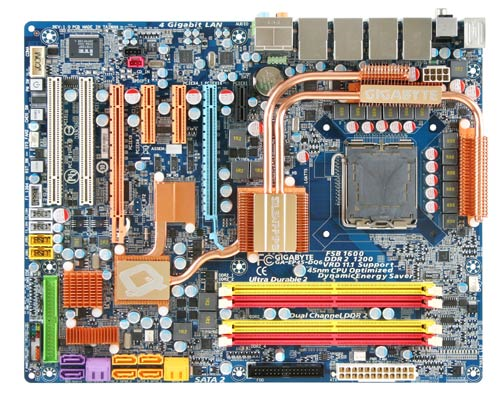
The board features a Blue PCB, all copper heat pipe construction, and an over all colorful yet tasteful layout. They layout of the PCI-e Slots is going to allow for QUAD Crossfire with single slot cards but concentrating that much heat from the current offerings from ATI in that small a space is asking for trouble. We’d be comfortable with two GPU’s in that layout with good case air flow, and possibly Quad Crossfire in the form of a couple of 4870×2 GPU’s with some good cooling taking the heat out of the case.
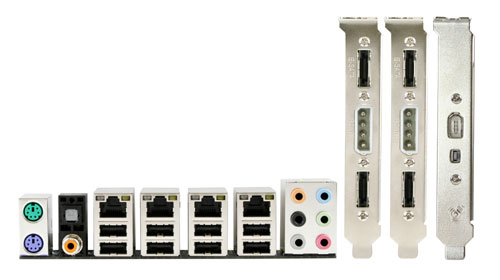
Notice the 4 Gigabit Ethernet ports, 8 count them 8 USB ports, PS2 Mouse and Keyboard ports, optical S/PDIF Out connector, 1 coaxial S/PDIF Out connector, and 6 audio jacks (Center/Subwoofer Speaker Out/Rear Speaker Out/Side Speaker Out/Line In/Line Out/Microphone).
The three included brackets are a nice touch extending the on board connectors functionality with out having to foot the bill for them later making this an even better value. You have the two E-Sata brackets, and a 1394 Firewire Bracket with both 4 and 6 pin ports. We are impressed with the number of available back panel USB ports because there never seems to be enough USB ports on modern Motherboards. With the internal on board USB ports you get a total of 12. In our case we dug up a standard USB expansion port bracket and hooked the other internal port to the top panel USB on the Armor Full tower case we chose. With 12 USB 2.0 ports available most users won’t be scrambling for a USB hub any time soon.
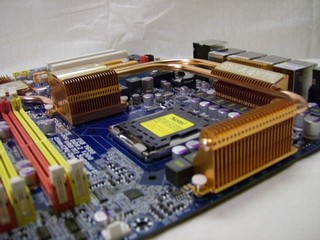
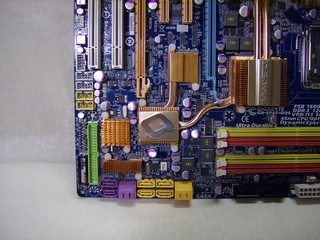
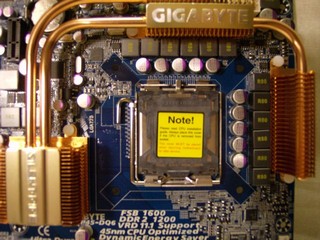
Here’s a good look at the cooling arrangement that Gigabyte has devised for the EP45-DQ6, you get a pretty good idea that Gigabyte wants this chipset kept cool enough for all but the Extreme cooling crowd. It makes for a pretty compact arrangement but we tested a couple of common tower CPU coolers on the board and had no problem with installing them. (Thermalright Ultra 120 fit without a problem as did a Silenex Tower Cooler)
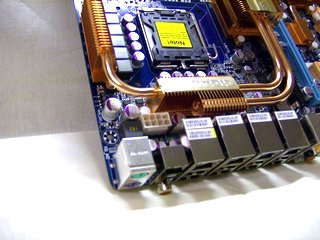
You might have a little trouble with the 8 pin CPU connector being located right behind the rear I/O panel and right against the copper vanes of the cooling setup on the mosfets. It’s not a big inconvenience and on a board this packed with features some compromises have to be made.
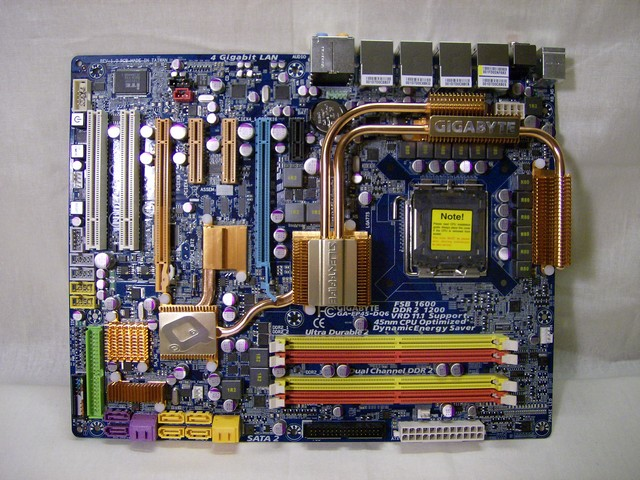
Notice the blue PCI-E 16X slot, check it’s proximity to the ram slot clips? We checked and you can get ram in and out of the slots but with a dual slot GTX-260 in the slot just barely and not with the ram clips fully opened.
Then imagine the same GTX-260 extending down over the two side mounted Sata Ports, you can still use them with no problems. The two upright slots right next to that are partially obscured by the dual slot card and using Flat Head Sata connectors in them the GTX-260 rests on the Sata Connectors which makes us a little uncomfortable about using them. Then notice the orange 8x PCI-E slot, with a full length card in that slot you’ve pretty much obscured 4 of the available yellow slots which could have easily been avoided by using side mounted connectors. With a company that has the engineering expertise that Gigabyte does this should have been spotted during design layout and changed to the already available side mounted connectors.
Now that we’ve gotten a good look at the board itself let’s take a look at some of the special features and the layout on the EP45-DQ6.
SPECIAL FEATURES AND LAYOUT
Special Features
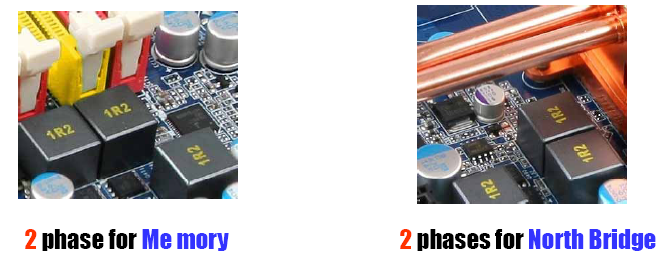
Gigabyte has the Over Clocker in mind with their 2 phase design allowing for greater voltage control on the Northbridge and Memory, adjustments can be made in as small as 20mV increments. With the 2 phase design you’ll get better working temperatures, enhanced reliability, and best of all unsurpassed Over Clocking capabilities.
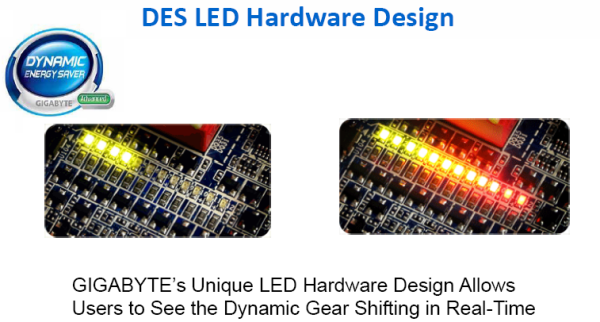
Like the graphic says the DES (Dynamic Energy Saver) is keyed to the on board LED string and depending on the energy state of the Board it will display yellow, orange, or red depending on the power it’s using. How does that work you ask?
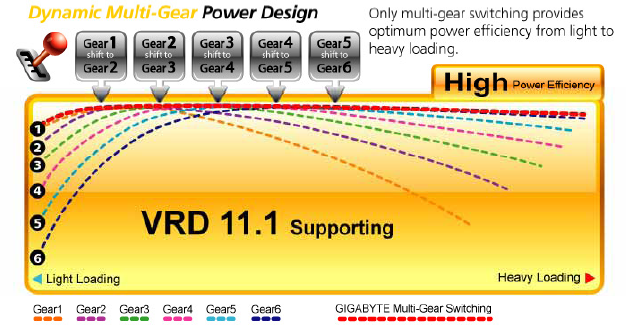
Gigabyte has implemented a Dynamic Multi Gear power design with 12 settings for light to heavy loading. This is an advanced 12 Phase Virtual design that requires a CPU supporting the VRD 11.1 standard. This portion might be Virtual but if your interested in power savings this will do it for you. How do you control it?
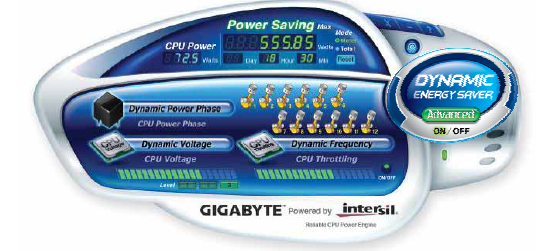
You control it with this slick interface that handles the power state on it’s own. In order to use it you need to have the power saving functions turned on in BIOS and the software will inform you of that if it’s not turned on when you load the interface. We Over Clocked to 3.2 on the CPU and the software had no problems shifting speeds and the system remained stable during the entire day of testing we put it through. We used the energy saving feature while surfing, gaming and normal every day operations keeping an eye on it and it scaled well to our activities. We saw it effortlessly shift from 2.4 to 3.2 on numerous occasions and if we weren’t keeping an eye on it wouldn’t have noticed the transitions.
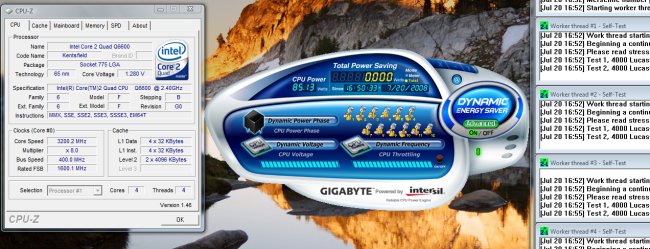
We of course couldn’t let it go at that so we enabled the power savings features in BIOS with our 3.2 Ghz overclock intact and ran some Prime95 action while the DES interface was up and running and thought you might like to see the blend of overclocking functionality combined with the energy saving features.
That left us wondering what type of power design this board was packing.
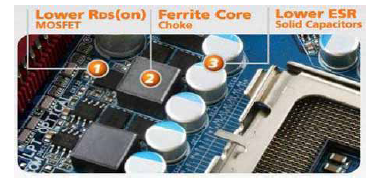
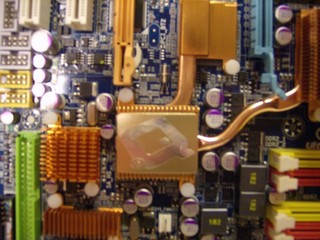
The best we could come up with on the design is this graphic of the Lower RDS Mosfets, passing into the Ferrite Chokes then directly into the high quality capacitors. You should note that while this is representative of the design, it’s not the exact board we have for testing. In reality the EP45-DQ6 is an even more advanced board with mosfets, ferrite chokes and capacitors packed at the top and right side of the CPU. Unfortunatly to get a shot of the mosfets would require pulling the entire heat pipe arrangement off the board and Gigabyte assures us that wouldn’t be advisable.
So if you want to get crazy and pump up the graphics you’ll want to know what type of graphics punch you can get out of this board?
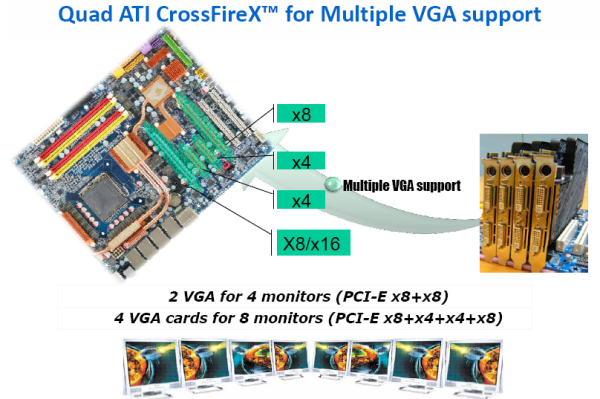
You can potentially run Quad Crossfire on the EP45-DQ6 with 4 Single slot ATI Crossfire ready GPU’s. You’d be running two GPU’s at 8x, and two at 4x. Like we mentioned before running 4 ATI cards in that configuration will be packing a lot of heat in a very small space so if you try that you’d better have some of the best cooling available removing the heat from the case. Running two dual slot GPU’s would probably be a better option.
If your looking to go crazy and run multiple monitors you can get the worlds largest desk and run up to 8 separate monitors in a 4 card configuration. We suspect that that would be a lot like a tennis match and might result in neck injury from trying to view all 8 at once but it’d be fun trying.
Then last but not least lets get a look at the pegged graphic of the board before we move on to Bios.

You can see this is a pretty advanced design for a pocket friendly motherboard. Core 2 Duo/Quad support, FSB up to a smokin 1600 Mhz yet allowing for older 800 Mhz processors. DDR2 memory from 800-1200 for a nice upgrade path (in one spot on the Gigabyte website it mentions DDR2 667 being compatible). Cooling with a great heat pipe design that cools the SB, NB and mosfets, all done in copper unlike some boards that merely paint things copper colored. Four PCI-E slots for your graphics and upgrade cravings, two additional PCI slots for your older equipment. The ALC889A codec pushing a 106dB signal to noise ratio pumping out enough sound to rattle the windows in a crystal clear vibrant sound. We tested the on board sound against an X-FI extreme Music we had on hand and the sound from the on board is as good as the X-FI making this board yet again even more economical to own and operate.
Then on the right side of the board you get a glimpse at the location of the DES LED bank shining in all it’s LED glory. We found the arrangement of the Mosfets, Ferrite Chokes and Capacitors to be an especially smart design. Then take a look at the placement of the 2 phase power design for the NB and Memory slipped right in there at the end of the memory slots. Gigabyte did a lot right on this board, smart component placement minimizing the distance between where it’s used and where it originates reducing the distance/time it takes to perform it’s functions. Shorter paths also means less voltage which translates to less heat, somebody got over time on this design.
You also have a true Dual Chip BIOS, two physical BIOS chips to ensure you don’t accidentally frag your BIOS in that late night flash. Then Bios backed up to hard drive, and finally quad redundancy in the form of BIOS ready to go on the driver disk. Can’t ask for much more piece of mind than that.
TPM Chip
We saved this feature for last because we had problems with it. We put an email into Gigabyte Support about it and haven’t heard back from them 8 days later. We of course did not use a Bjorn3D email address preferring to see what type of support an ordinary user would get. Two days later we emailed them again just to make sure, again no response at the time of post.
We tested the Ultra TPM chip using a Thumb Drive we had laying around for a key, followed the instructions by turning it on in BIOS, installing the drivers, creating the Thumb Drive key on a Sandisk Micro Cruiser and the program created the key, then promptly popped up and told us the Encryption key was not found. We can see the key it created, we can see the backup key it made, but the program continues to pop up and say “key not found please insert key”. So we switched Thumb Drives to a Sapphire 2 Gigabyte Thumb Drive for a Key thinking maybe it’s the unusual setup on the Sandisk Micro Cruiser. After trying the Sapphire Thumb Drive we got this error.
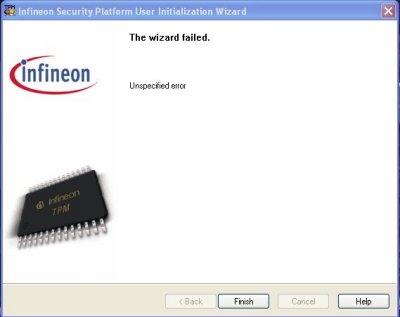
After switching Thumb Drives we got the error pictured above. We disabled the chip, uninstalled every thing including the TPM driver which was an eye popping 233 MB on disk and reinstalled every thing a total of 5 times with no luck. Perhaps if Gigabyte had written us back, or answered the phone at the number on the website without making us wait more than an hour we could have managed to make the feature work.
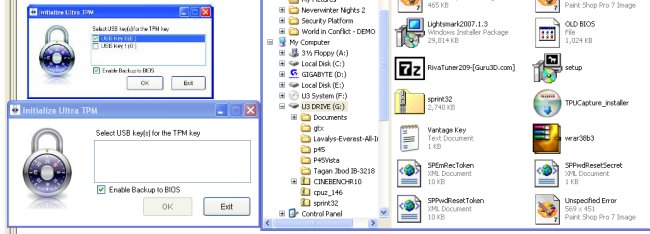
You can plainly see the .XML files it created in the picture above, and the box on the top left is what we were supposed to see (From the help file description), then right below it you see the same window clipped from attempt number 5 and the window was empty yet again.
We can’t comment on if we did something wrong, but with book in hand (the last 4 tries) going step by step we were unable to use the feature. You might have better luck than we did but we are still waiting on that call or email response so the situation is subject to change.
Perhaps Gigabyte needs to rethink the interface, instructions or software. We have a lot of experience enabling new features and are pretty savvy when it comes to computers and we had problems, we’ll leave it at that.
On a more positive note every other feature we tested worked easily, just as described and we’re quite pleased with the feature rich board. Perhaps something we did in the initial, glance at the TPM chip instructions and fire that puppy up method we used caused the problem. We would gladly amend this portion of the review at a later date if/when we hear from Tech Support.
BIOS
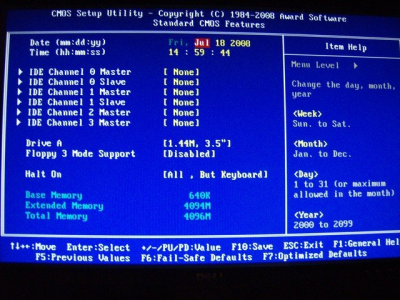
No big surprises in standard CMOS, every thing you need and not much more.
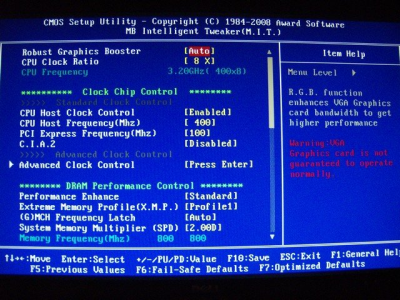
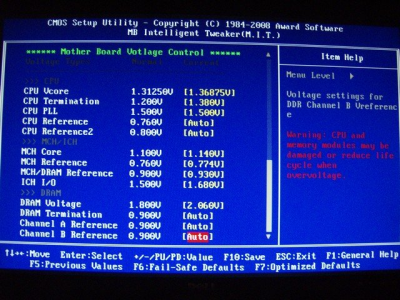
This is where the EP45-DQ6 starts to get interesting. The Intelligent Tweaker screen is about 2 1/2 screens long and contains every thing you need for your over clock in one spot with the exception of turning off the Intel Power Saving features found in Advanced BIOS.
Please note that during initial Over Clocking we spent about 10 minutes, jumping the FSB directly to 400, Bumped the Vcore. Raised a couple of ram voltages for the aggressive timings on the OCZ Reaper DDR2 800 to run it at 4-4-4-15 as per the EPP profile. The EP45-DQ6 read EPP flawlessly and defaulted to it without a hitch, we dropped out of BIOS and went into Windows after just 10 minutes and Prime95 ran without error for 10 hours overnight. Every test across two operating systems ran without flaw during 16 hours of exhaustive testing, not one flaw, blue screen or so much as a burp. We did have a spot of trouble with the Patriot DDR 2 1150 but after consulting Patriot we found that reducing the voltage from the 2.3 advertised on the website and package to 2.10 fixed us right up. After reducing the voltage (Go figure ram usually wants more, not less, voltage) the EP45-DQ6 picked up the EPP profile perfectly and we experienced no further problems.
Gigabyte was nice enough to send us a new BIOS after testing and we saved the old BIOS to a drive and one of the many profiles, loaded the new BIOS via Q Flash from a thumb drive and we successfully flashed BIOS and Q Flash reloaded the old values back into the new BIOS. At that point we needed to bump a few voltages to accommodate the new BIOS but not by more than one increment and we were back at prime stable again. The pictures you are seeing are from the new F8D bios just released to us.
It was one of the easiest if not the easiest Over Clock we’ve seen to date. For those interested, with pen in hand, those voltages and settings are what we are currently using with the Q6600, and OCZ Reaper DDR2 800 if you want a good starting point for your OC. We suspect that voltages can be trimmed a little but due to time constraints we’d rather run them a little high until the review is finished.
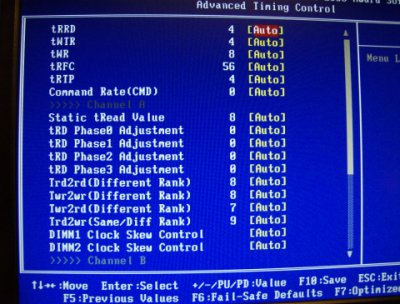
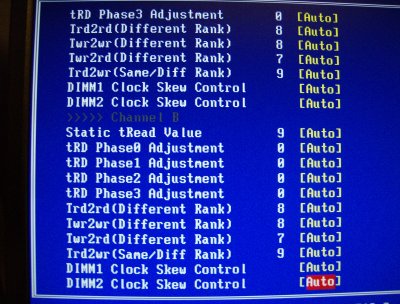
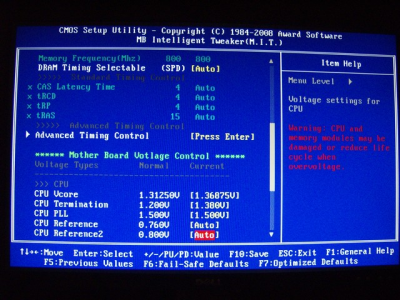
In the middle of the Intelligent Tweaker screen you can see Advanced memory settings. There’s about a page and a half of advanced memory settings on this beast, enough to satisfy the most demanding memory tweaker out there.

Advanced bios doesn’t hold any surprises and it’s where you can disable the power savings features for over clocking. Again for beginners these are the over clock setting we used successfully if you want a place to start your OC. Keep in mind though each piece of hardware Over Clocks differently and may require different settings.
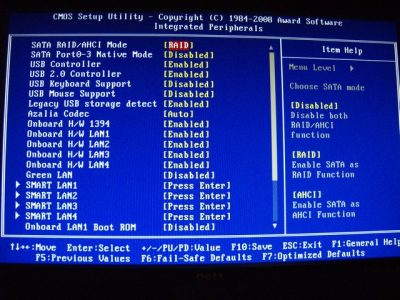
Here’s a shot of the Integrated Peripherals screen and the settings we used for setting up our Matrix Raid 0 (Striped) array with two RAID 0 partitions running Vista and XP on two hard drives. Yes two raid arrays on two drives, thus far problem free and practically effortless to set up. If you want to use a couple of drives connected to the Purple ports on the EP45-DQ6 you can use the included Steelvine software to maintain real time backups on the hardware plug and play raid controller and rest assured your Operating System and Data are secure. The hardware Raid Arrays can run in Raid 0 for speed, or Raid 1 for maximum data protection and are independent of the controller we have the Matrix Arrays on. Like we mentioned earlier, the Express Recovery feature isn’t for Raid drives but with the transfer rates we got from the two arrays we set up it’d be hard not to use the Raid 0 feature.
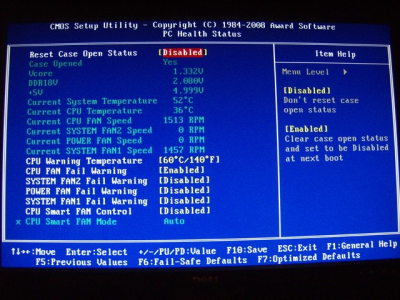
There’s a pretty standard PC Health Status Screen where you can set a thermal alarm for the CPU, check operating temps, fan speeds and let the CPU determine fan speeds according to thermal need if you want.
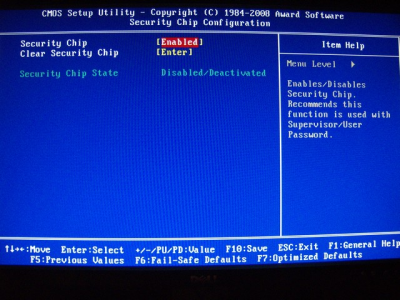
Here’s the screen you need to access for the TRD Security feature of the EP45-DQ6 where you enable the chip if you want to take advantage of the 2048 bit encryption it offers. Be sure to hold on to the Thumb Drive you’ll need to create your security key and keep track of the passwords because once encrypted your going to have to have them to decrypt your files they are un-readable and uncrackable if you lose the thumb drive or forget the password.
TESTING & METHODOLOGY
Test Methodology
As we stated in the introduction we are testing the EP45-DQ6 in XP and Vista against a P35 Asus PK5C, using the Intel Q6600. We assembled a group of benchmarks (Tabled Below) that are readily accessible to the general public, and they are free. We feel the chosen benchmarks will be representative of this system’s complete performance. You will also note that we ran all of the tests that were specific to the 32-bit Vista operating system utilizing SP1. For the XP partition we used Windows XP SP3, it’s a fresh load and all applicable updates and patches have been applied. All tests were run 3 times and the average of that reported.
Test Platform
| Test Rig “Quadzilla” |
|
| Case Type | Thermaltake Armor |
| CPU | Intel Q6600 @ 3.2 Voltage 1.36 vcore |
| Motherboard | Gigabyte EP45-DQ6 Asus P5KC |
| Ram | OCZ Reaper DDR 800 2 X 2 Gig Kit @ 4-4-4-15 Patriot DDR2 1150 @ 1200 MHZ @ 5-5-5-15 |
| CPU Cooler | Swiftech MCP350 Pump Swiftech Apogee GT CPU Water Block Swiftech Micro Res Swiftech MCR320 360mm Radiator 3 Yate Loon 120mm 12v Fans 83CFM |
| Hard Drives | WD 160 Gig Sata 2 Model # WD1600AAJS Maxtor 160 Gig Sata 2 Model # 6G160E0 |
| Optical | Sony DVD R/W |
| GPU | Leadtek GTX-260 @ 576/999 |
| Case Fans | Two 120mm Thermaltake Front/Rear Push/Pull 250mm Side fan 90mm Rear Exhaust 90mm Top Exhaus |
| Docking Stations | Tagan IB290 W/Deskstar 2 1/2 Inch 80 Gig Sata 2 Tagan IB390 W/Maxtor 160 Gig Sata 2 Thermaltake BlackX USB W/Seagate 80 Gig Sata 2 |
| Testing PSUs | Thermaltake Toughpower 1K Thermaltake VGA Express 650 Watt |
| Legacy | Floppy Drive |
| Mouse | Razer Lachesis |
| Keyboard | Razer Lycosa |
| Gaming Headset | Razer Piranha |
| Speakers | Logitec Dolby 5.1 |
| Any Attempt Copy This System Configuration May Lead to Bankrupcy | |
Testing Suite
Unfortunately there’s no one test you can run that will give you definitive results that are representative of a systems total performance. It’s necessary to test the CPU, Memory, Graphics and Hard Drive performance and we’ll draw conclusions from those.
|
Synthetic Benchmarks |
|
PCMark Vantage |
|
3DMark06 v. 1.1.0 |
|
SiSoft SANDRA XII Professional SP2 |
|
Everst Ultimate Edition v. 4.50.1330 |
|
SuperPi Mod 1.5XS |
|
HD Tach RW 3.0.1.0 |
|
Cinebench R10 64 bit |
|
WinRar v. 3.71 |
|
Lightsmark v. 1.3 Graphical Benchmark |
|
Games |
|
Crysis v. 1.02 |
|
Company of Heroes v. 1.71 |
PCMARK VANTAGE & 3DMARK06
Before we get started in with the testing results phase we’d like to take time out to thank Ollie at Futuremark.com for providing us with the software key for Futuremark’s 3DMark Vantage on short notice. Ollie took time out from holiday to hot shot us the much needed Key and did so within an hour of the request. Thanks Ollie, and Futuremark!
PCMark Vantage
“PCMark® Vantage is the first objective hardware performance benchmark for PCs running 32 and 64 bit versions of Microsoft® Windows Vista®. PCMark Vantage is perfectly suited for benchmarking any type of Microsoft® Windows Vista PC from multimedia home entertainment systems and laptops to dedicated workstations and hi-end gaming rigs. Regardless of whether the benchmarker is an artist or an IT Professional, PCMark Vantage shows the user where their system soars or falls flat, and how to get the most performance possible out of their hardware. PCMark Vantage is easy enough for even the most casual enthusiast to use yet supports in-depth, professional industry grade testing.”
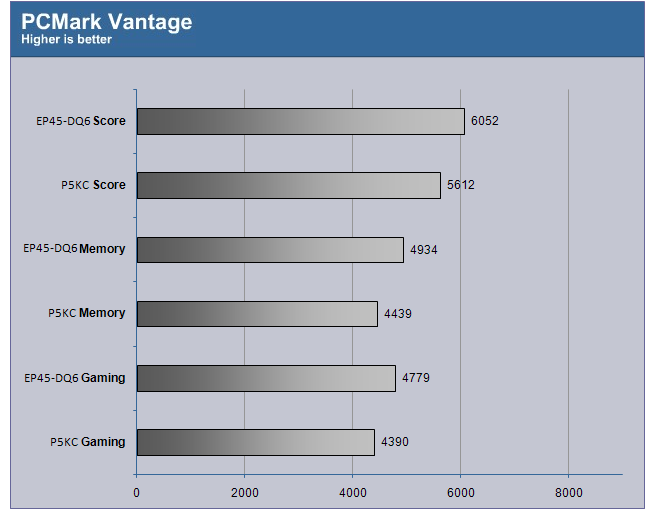
In PCMark Vantage the Gigabyte EP45-DQ6 showed a significant advantage over the Asus P5KC outdoing the aging P35 chip set by as more than 400 points in some cases. PCMark Vantage being somewhat stingy in the point scoring system makes that a significant difference. We were seeing as much as an 11% performance increase using the EP45-DQ6 in this test.
3DMark06
3DMark06 developed by Futuremark is a synthetic benchmark used for universal testing of all graphics solutions. 3DMark06 features HDR rendering, complex HDR post processing, dynamic soft shadows for all objects, water shader with HDR refraction, HDR reflection, depth fog and Gerstner wave functions, realistic sky model with cloud blending, and approximately 5.4 million triangles and 8.8 million vertices; to name just a few. The measurement unit “3DMark” is intended to give a normalized mean for comparing different GPU/VPUs. It has been accepted as both a standard and a mandatory benchmark throughout the gaming world for measuring performance.
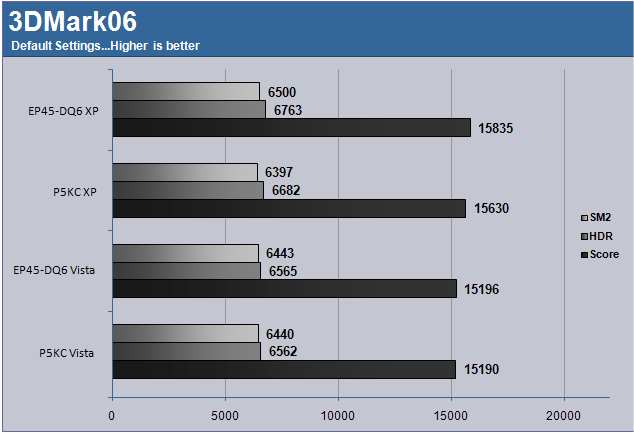
The Gigabyte Ep45-DQ6 edged out the Asus P5KC in 3DMark06 but this time just barely.
CINEBENCH & SANDRA
Cinebench
“CINEBENCH is a real-world test suite that assesses your computer’s performace capabilities. MAXON CINEBENCH is based on MAXON’s award-winning animation software, CINEMA 4D, which is used extensively by studios and production houses worldwide for 3D content creation. MAXON software has been used in blockbuster movies such as Spider-Man, Star Wars, The Chronicles of Narnia and many more. MAXON CINEBENCH runs several tests on your computer to measure the performance of the main processor and the graphics card under real world circumstances. The benchmark application makes use of up to 16 CPUs or CPU cores and is available for Windows (32-bit and 64-Bit) and Macintosh (PPC and Intel-based). The resulting values among different operating systems are 100% comparable and therefore very useful with regard to purchasing decision-making. It can also be used as a marketing tool for hardware vendors or simply to compare hardware among colleagues or friends.”
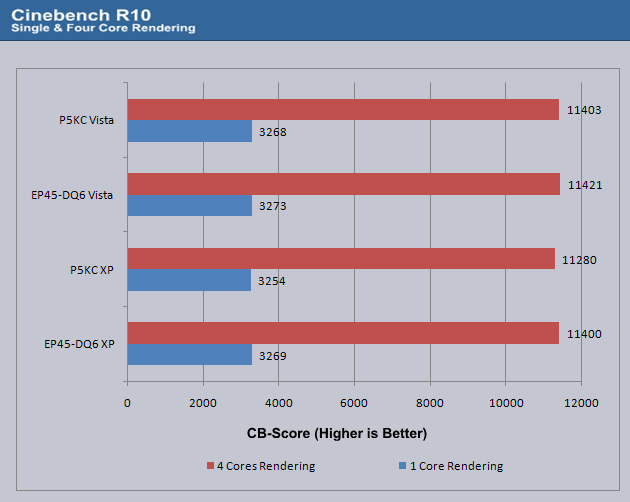
The EP45-DQ6 and the Asus P5KC were neck and neck in Cinebench with no significant difference but the Gigabyte board did turn in slightly better numbers.
Sisoft SANDRA 12 Professional SP2a
“SiSoftware Sandra (the System ANalyser, Diagnostic and Reporting Assistant) is an information & diagnostic utility. It should provide most of the information (including undocumented) you need to know about your hardware, software and other devices whether hardware or software. It works along the lines of other Windows utilities, however it tries to go beyond them and show you more of what’s really going on. Giving the user the ability to draw comparisons at both a high and low-level. You can get information about the CPU, chipset, video adapter, ports, printers, sound card, memory, network, Windows internals, AGP, PCI, PCI-X, PCIe (PCI Express), database, USB, USB2, 1394/Firewire, etc.”
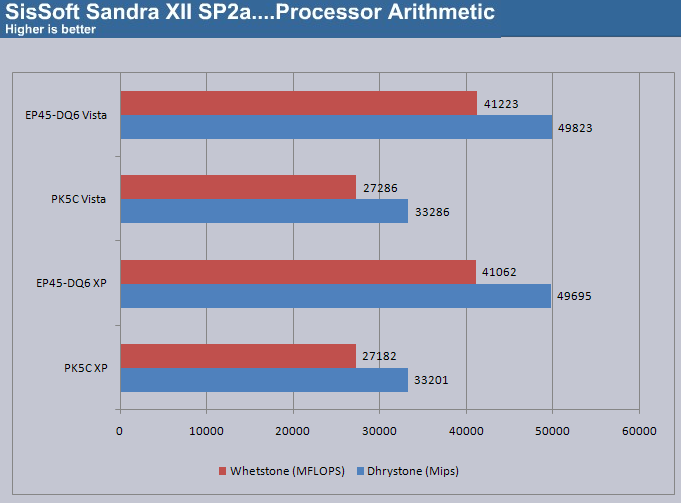
In SANDRA the Gigabyte EP45-DQ6 was starting to show really significant performance increases and we ran the SANDRA tests well beyond the 3 runs we use to get our results just to verify that they were accurate. The results in processor arithmetic were as much as 34%-35% better on the Gigabyte EP45-DQ6 than the Asus P5KC so you can see why we wanted to verify the numbers.

The Gigabyte EP45-DQ6 numbers held true in the Processor Multimedia tests showing the same 34%-35% lead over the Asus P5KC. Keep in mind the only difference is the motherboard and we went with a Raid 0 (Striped) array in the EP45-DQ6 setup. The total dollar value of the upgrade was in the $300 dollar range and seldom do you see increases of 35% in performance in that price range.
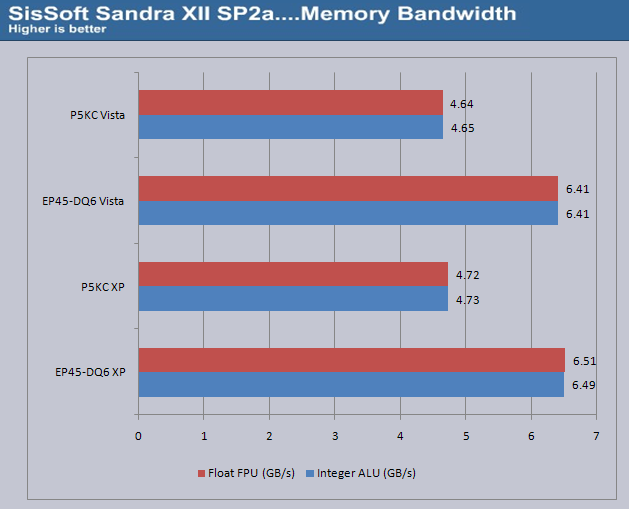
Much to our surprise the EP45-DQ6 with it’s P45 chip set was turning in a 28% better performance than the P35 chip set.
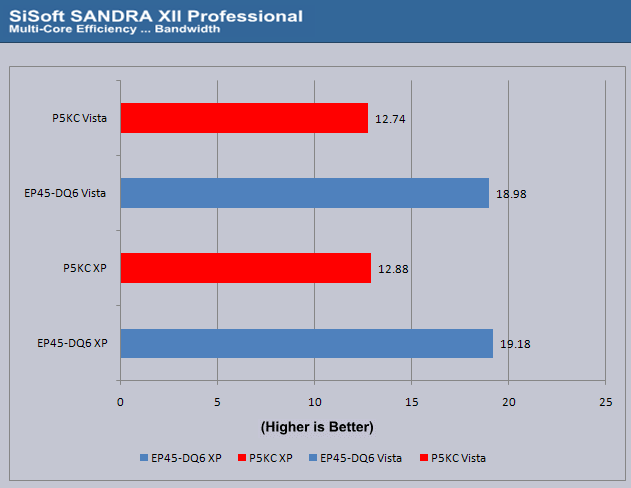
We about fell off of our milk crates when we got the results from the Sandra Multicore Efficiency test. A 33% performance increase with the P45 chip set in processor bandwidth is an unusual but exciting result. Just to make sure we once again ran the test a total of 6 times. First we finished the SANDRA tests then uninstalled and reinstalled a freshly downloaded version and ran all the tests again but the results remained the same across the battery of tests. Prompting us to consult the Multicore Latency test to see if they resluts held true there.
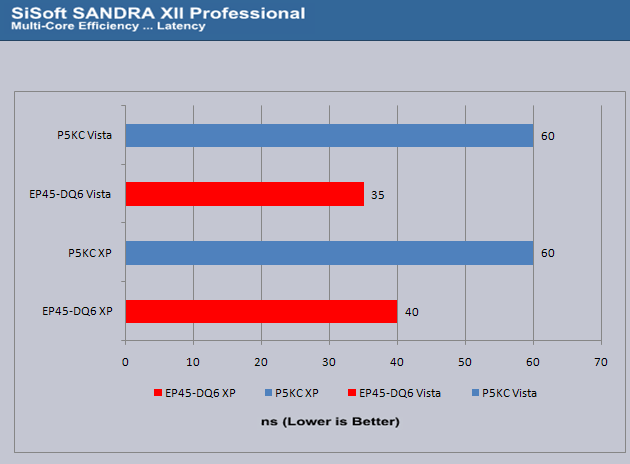
By this point we had to reach up and close our mouths manually, with the same hardware setup, same FSB to Ram ratio, same CPU clocks, same hardware connected to the MB (again we used a RAID 0 array but that shouldn’t have a bearing on a Multicore efficiency test) and we were seeing a 33% decrease in the latency of cores. Obviously this is significant, if the cores are taking less time to communicate and cooperate they are going to operate faster. Across the billions of calculations the reduced latency combined with the increased inner core bandwidth we felt like we were looking at a beast of a board.
With SANDRA being such a well know and trusted measure of hardware capabilities we are sure these results will weigh heavily in our rating of this Motherboard.
EVEREST, WINRAR, & SUPERPI
Everest Ultimate
“EVEREST Ultimate Edition is an industry leading system diagnostics and benchmarking solution for enthusiasts PC users, based on the award-winning EVEREST Technology. During system optimizations and tweaking it provides essential system and overclock information, advanced hardware monitoring and diagnostics capabilities to check the effects of the applied settings. CPU, FPU and memory benchmarks are available to measure the actual system performance and compare it to previous states or other systems. Furthermore, complete software, operating system and security information makes EVEREST Ultimate Edition a comprehensive system diagnostics tool that offers a total of 100 pages of information about your PC.”
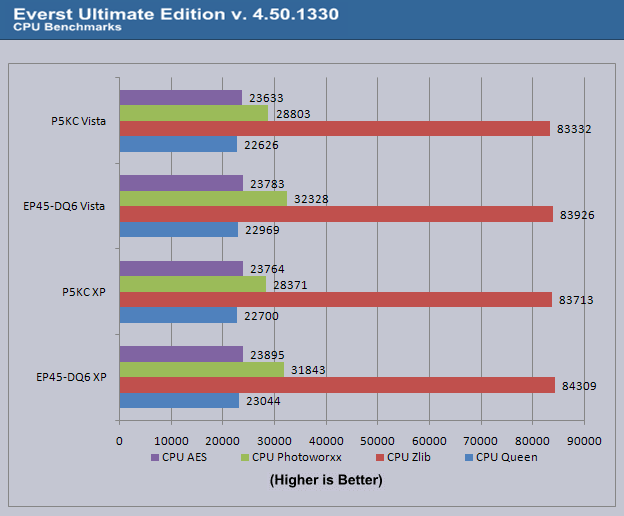
The differences in Everest Ultimate leaned in favor of the Gigabyte EP45-DQ6 but not as significantly as the results from Sandra.
SuperPI
SuperPi which is the “Gold standard” for many when it comes to judging system performance. We ran 1 and 2 Meg calculations, again running each test three times and reporting the average of the results.
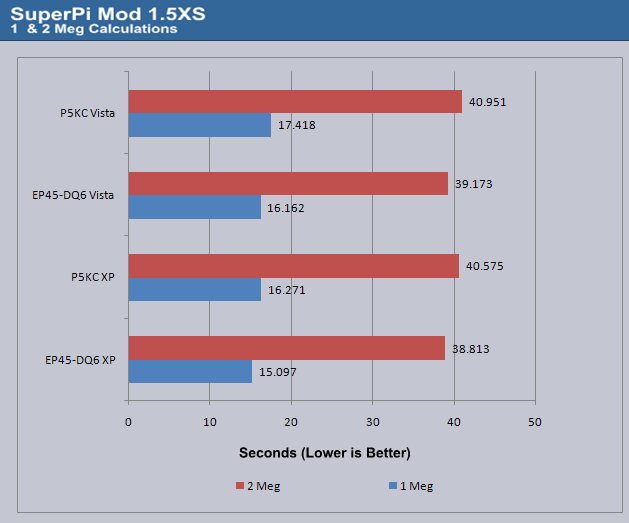
Once again in every test the Gigabyte EP45-DQ6 out performed the Asus P5KC which by this time was no surprise to us.
WinRar v. 3.71
This module in WinRar generates random data, which contains specially introduced redundancy, increasing the load to both the processor and memory. Data is the passed through RAR compression and decompression algorithms, and the output of the decompression algorithm is compared to the source data. If any differences are found, WinRAR then reports “Errors found – Yes” in the command window. WinRAR displays a size of processed data and compression speed, current and resulting, in kilobytes per second.
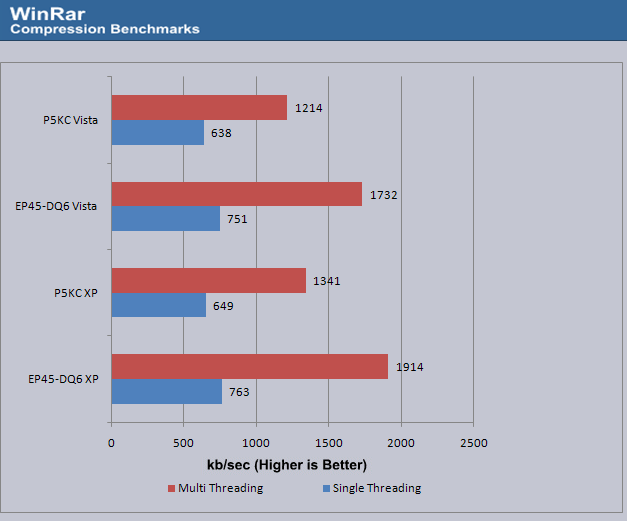
In WinRar we are seeing a 30% performance increase over the P35 chip set running the P45. With the results holding true to the same performance increase across the battery of tests in many areas we are beginning to draw the conclusion that the P45 is a superior chipset providing a real life gain in performance and doing it at a much more pocket friendly price than a lot of the “Premium boards” with their hefty price tag.
HD TACH, LIGHTSMARK, COH & CRYSIS
HD Tach
HD TACH performs sequential read and write tests on removable media and fixed disks. HD Tach is also capable of performing the sequential read and write tests on the entire disk instead of the small number of zones in the quick and long test. We opted to use the Long 32(MB) test in the sequential read mode only, as sequential writes are covered by other benchmarks.
|
Hard Drive Tach |
||||
| P5KC XP | P5KC Vista | EP45-DQ6 XP (Raid 0) |
EP45-DQ6 Vista (Raid 0) |
|
| Random Access Time* (ms) | 19.3 | 19.1 | 12.5 | 12.1 |
| Average Read Time (MB/sec) | 79.2 | 81.1 | 109.9 | 110.6 |
| CPU Utilization* | 2% | 2% | 2% | 3% |
| Burst Speed (MB/sec) | 233.5 | 237.4 | 301.3 | 301.5 |
|
*Lower is Better … Otherwise Higher is Better |
||||
With the switch to the Raid 0 array using two mismatched 160 Gig drives we had laying around the lab we were able to achieve a much better access time, improved average read time, and a whopping almost 70 MB/s improvement in burst speed. The two 160 Gig drives were 8 Meg cache drives and the non Raid drive used on the Asus P5KC was a newer 250 Gig 16 Meg cache drive. With the performance increase using a couple of 160 Gig mismatched drives you can imagine what this board would do with a couple of modern 32 Meg cache drives or matching Raptors.
Lightsmark
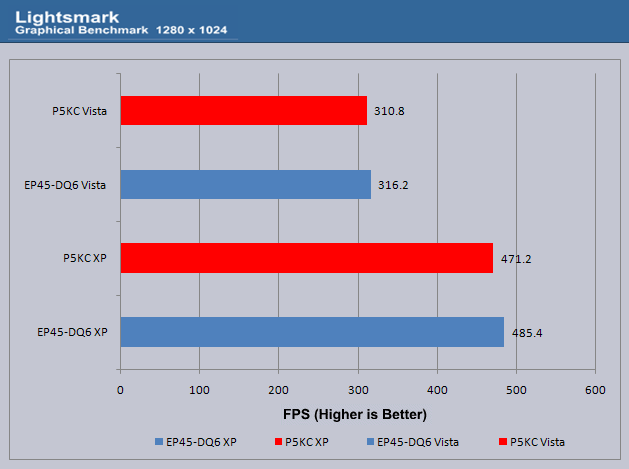
In Lightsmark we got a few more frames out of the new Gigabyte EP45-DQ6 than the Asus P5KC but scores were close enough that it’s not very significant. Notice the performance decrease from XP to Vista that’s significant.
Company Of Heros
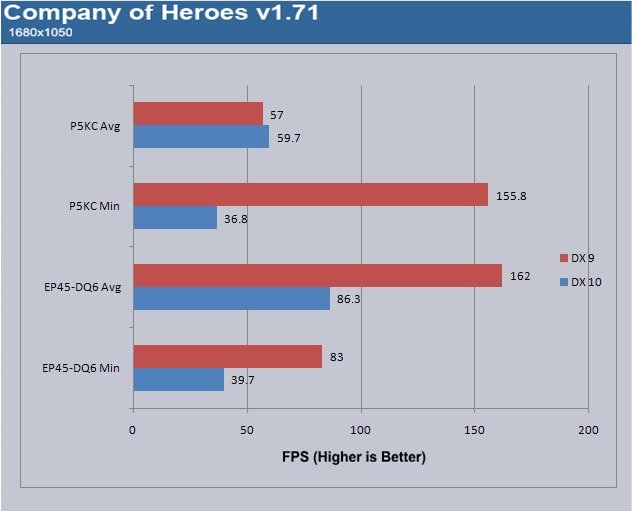
You can see a little benefit from the new P45 chip set over the P35 chip set in COH but being primarily GPU intensive you won’t see a tremendous difference.
Crysis
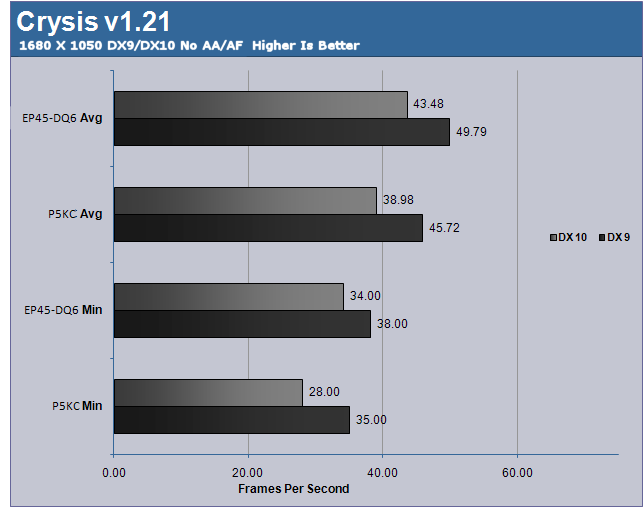
In Crysis the P45 maintained an above 30 FPS frame rate while the P35 did dip below 30 to 28 FPS. The significance of the “Magical” 30 FPS is that at or above 30 FPS video looks rock solid to the human eye so the EP45-DQ6 did give a better performance and raised the bar for Crysis. Given the nature of Crysis the Gigabyte EP45-DQ6 did really well with the Leadtek GTX-260 as the GPU.
THE UPGRADE PATH
We decided to include some results on the EP45-DQ6 with a set of Patriot DDR2 1150 (1142 by EPP) so you can see the result of going from DDR2 800 to DDR2 1150. The thing you need to keep in mind here is that we are giving up the “Holy Grail” of over clocking in going to the Patriot DDR2 1150, which we ran at 1200 Mhz and timings of 5-5-5-15.
The OCZ Reaper DDR2 800 we were running at a 1:1 ratio with the FSB, when running like that the CPU and Ram are in complete synchronization. Running the Patriot DDR2 1150 we give that up and end up running at 1200 MHZ with a ratio of 8:5, the CPU and Ram are out of synch running like that. Not many boards are capable of running a 600 Mhz FSB to attain a 1:1 ratio with the Patriot and in our case with the minimum 6X multiplier on the Q6600 we’d be running the CPU at 3.6 Ghz which would invalidate the results.
In essence we are giving up a finely tuned and balanced setup with the RAM and CPU for sheer speed on the RAM. Your results might differ depending on your setup but we wanted you to have the results so you can judge for yourselves.
3DMark06
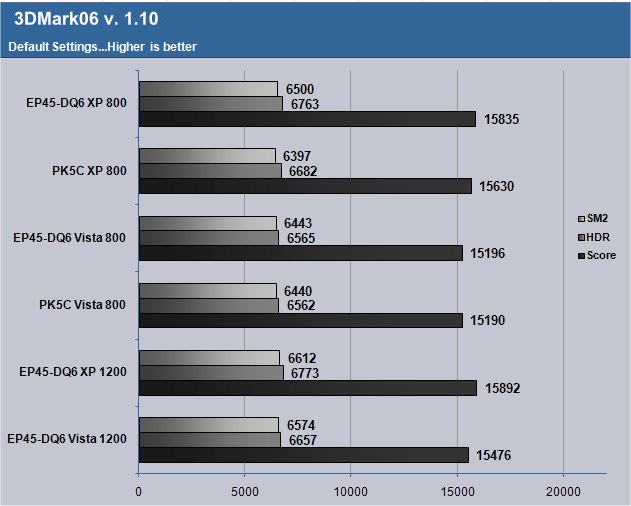
We picked up some points in 3DMark06 but not what we’d expect for upgrading to ram that’s running 50% faster than the previous set. Please note that this is for comparison only and isn’t a reflection on the Gigabyte EP45-DQ6 or the Patriot Ram. It’s a reflection on the different setups with the ram. The ram is running like it was intended to run and the EP45-DQ6 is doing it’s job, but the different RAM to FSB ratio is starting to rear it’s head. We picked up some points so the sheer speed helped out here a little.
SANDRA Professional 12 SP2
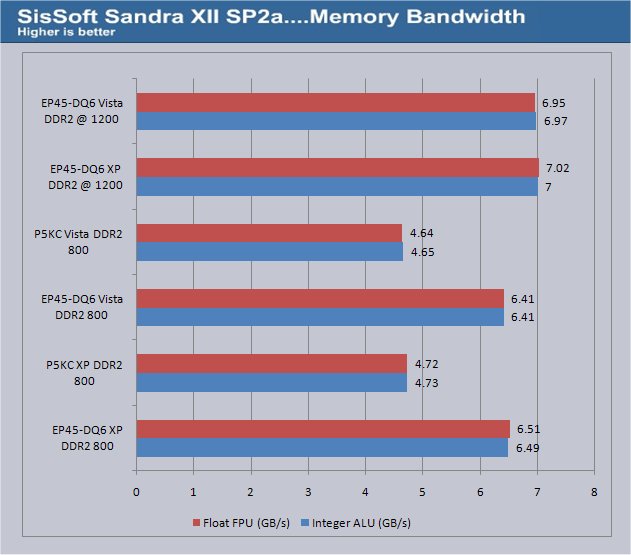
We are still seeing a much better performance over the P5KC with the new Patriot DDR2 1150 but the bandwidth difference between the EP45-DQ6 running DDR2 800 and the Patriot DDR2 1200 is in the neighborhood of a half a Gigabyte per second. Again a slightly better performance but not 50% more bandwidth due to 50% more speed.
Is it the ratio of Memory to FSB? We are seeing benefits from it so far but not to the extent one might expect.
EVEREST, WINRAR, & SUPERPI
Everest
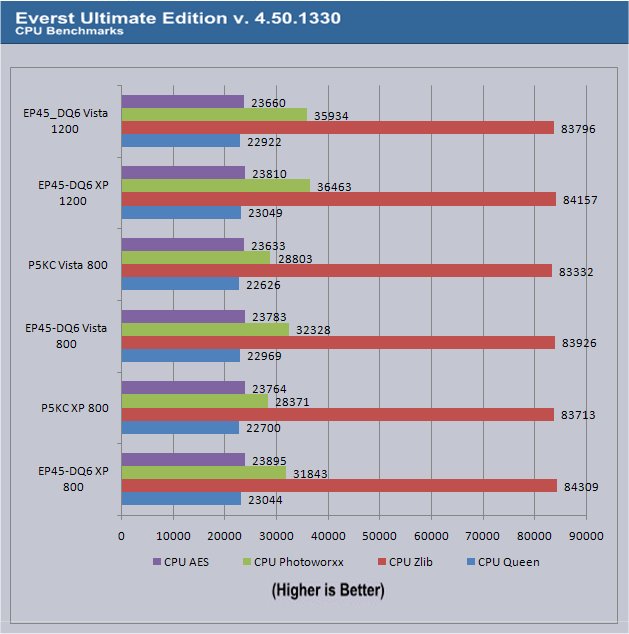
Everest was a mixed bag of results, some better with the DDR2 1150 and some better with the DDR2 800. In general though the DDR2 1150 did better in more categories than the DDR2 800. In each test it’s barely beat out the DDR2 800, we are seeing benefits but not massive benefits. Keep in mind that it’s just one component of a complex system and as such is only part of the performance, so the increases we are seeing might be better in that way.
WinRar
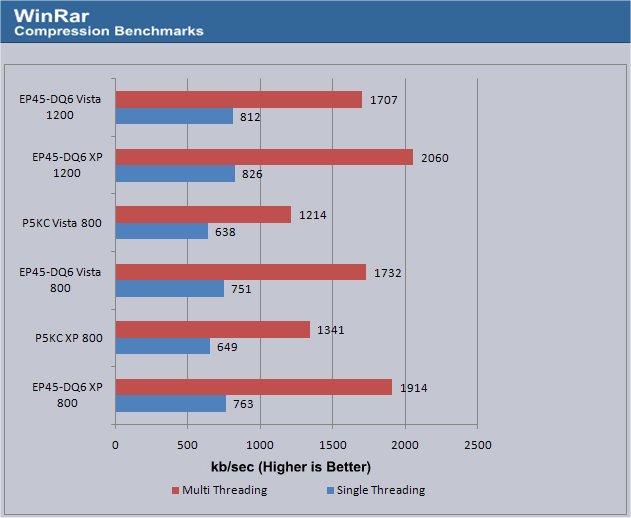
The Patriot DDR2 1150 did WinRar pretty good we see some pretty significant gains here. Seems WinRar likes fast ram. That left us wondering if SuperPI would appreciate some Patriot Action.
SuperPi 1.5
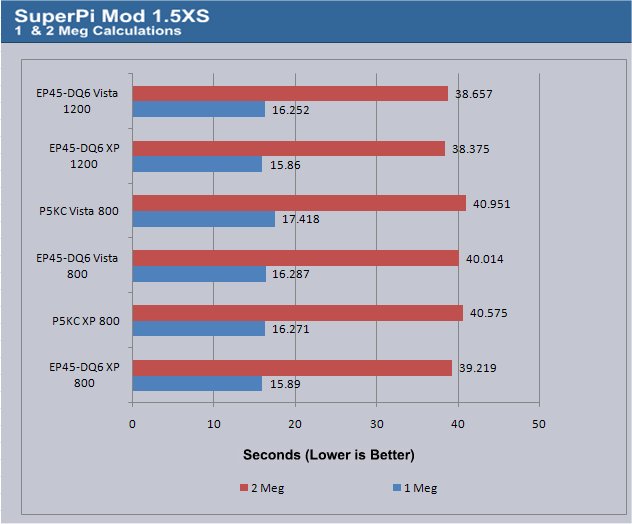
The EP45-DQ6 with the Patriot DDR2 1150 out did the Reaper DDR2 800 in SuperPi which is no surprise because SuperPi is known to like raw ram speed more than any thing else.
Hows the EP45-DQ6 going to do with the Patriot DDR2 1150 going to help gaming? We ran a couple of games with it for comparison but by this time our Benching bench was starting to show signs of wear so we only ran a couple.
CRYSIS, COH & HDTACH
Crysis v. 1.2
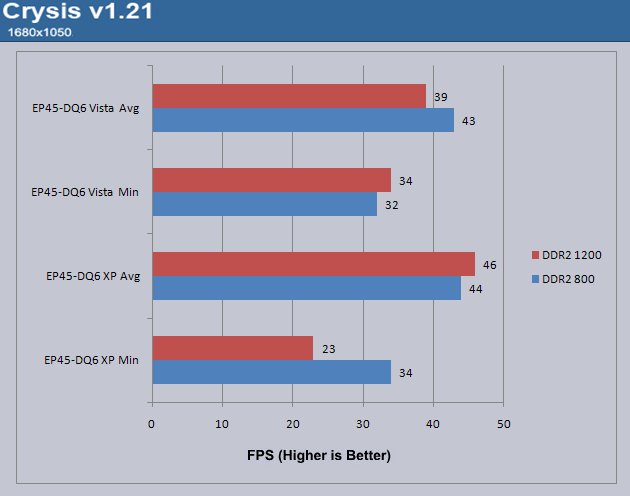
Crysis was a mixed bag of results and despite running the test an additional 3 times the results remained true. We’ll leave that for you to judge.
Company Of Heroes v. 1.71
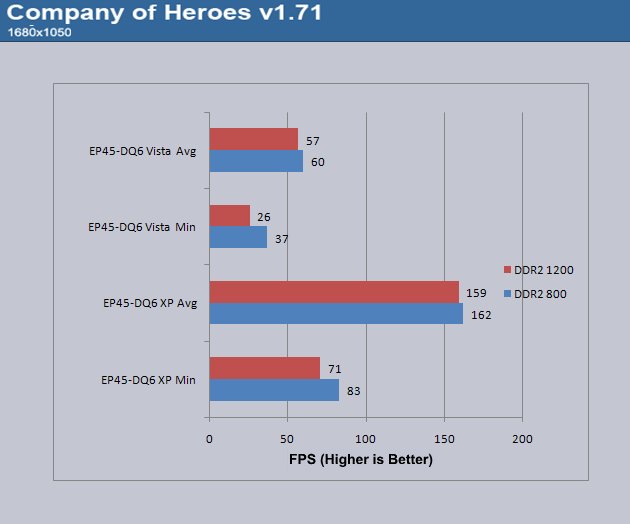
Company of Heroes likes the well tuned DDR2 800 better but the differences were negligible.
HDTach v. 3.0.4.0
|
Hard Drive Tach |
||||||
| P5KC XP 800 | P5KC Vista 800 | EP45-DQ6 XP 800 (Raid 0) |
EP45-DQ6 800 Vista (Raid 0) |
EP45-DQ6 XP 1200 (Raid 0) |
EP45-DQ6 1200 Vista (Raid 0) |
|
| Random Access Time* (ms) | 19.3 | 19.1 | 12.5 | 12.1 | 12.0 | 11.7 |
| Average Read Time (MB/sec) | 79.2 | 81.1 | 109.9 | 110.6 | 114.6 | 126.2 |
| CPU Utilization* | 2% | 2% | 2% | 3% | 2% | 2% |
| Burst Speed (MB/sec) | 233.5 | 237.4 | 301.3 | 301.5 | 332.5 | 328.7 |
|
*Lower is Better … Otherwise Higher is Better |
||||||
We didn’t expect to see any differences in HDTach but with the Patriot DR2 1150 we saw gains so we thought you’d like to see them. The hard drives in the Matrix Array were well broken in when we installed them so it’s not them breaking in, we didn’t defrag in between tests so it’s not that. The only defrag we did do was before we started testing. Nothing has been added or deleted since then yet we got better transfer rates with the Patriot DDR2 1150 than the DDR2 800.
That’s the upgrade path from the OCZ Reaper DDR2 800 to a faster set of Patriot DDR2 1150, we’ll leave you the reader to draw conclusions from the data as to the results and your own choices for upgrading. The results from the upgrade path will only reflect on the Gigabyte EP45-DQ6 in one respect. It read and correctly identified the ram and it ran the ram at the rated speed at the rated timings as advertised. Since the EP45-DQ6 is rated to run up to DDR2 1200 we though it’d be nice to run it with ram that would do the rated speed. Now when we review the Patriot DDR2 1150 by itself at a later date we’ll throw our 2 cents in.
POWER CONSUMPTION & OVERCLOCKING
Power Consumption
We measured power consumption with a Kill A Watt P4400. Idle consumption was taken at the Windows Desktop after idling for 15 minutes with only the default background tasks running. Load consumption was measured with 3DMark06 running and the highest consumption was noted. All the power saving features in BIOS were enabled, the OC we used from the beginning 3.2 Ghz was maintained, and DES was running taking care of the boards energy consumption and speed shifting with it’s virtual 12 Phase capabilities. Due to the nature of the test, complete idle and complete load we didn’t see a lot of stepping in the power consumption. It was either at an idle or at full load and while testing the DES itself we did see the CPU shift from 2.4 to 2.8 and on up to 3.2 but the shifting occurred so swiftly and without notice that it would be impossible to note the different power consumption by eye. You will be glad to know the DES software will track power savings for you but we prefer to eliminate any prejudice from the included software and use a hardware measuring device.
| Power Consumption In Watts |
||
| Idle | Load | |
| Gigabyte EP45-DQ6 | 167 | 283 |
| Asus P5KC | 160 | 291 |
At idle the Asus P5KC drew 7 fewer watts than the Gigabyte EP45-DQ6 but at load the EP45-DQ6 took 8 watts less to run. Considering the increased performance of the P45 chip set over the older P35 we are surprised that the P45 didn’t draw significantly more power. With the EP45-DQ6 design Gigabyte has a winner in the power consumption department. We monitored the power consumption on and off during the entire testing of the board and even with the Leadtek GTX-260 it never reached 300 Watts. You’ll probably be more aware of the power savings using the DES software over a period of time as it accumulates the savings data and can display it for you.
Overclocking
Overclocking the Gigabyte EP45-DQ6 was a breeze, we’ve never had a board that was this easy to overclock. It either worked or it’d kick us in to the CPU’s default speed and allow us to go back into BIOS and the only thing we had to reset once or twice was the Multiplier, it held all the other settings intact. Once we achieved a good testing overclock we were able to save it and numerous other profiles to Bios and successfully reload them to CMOS at will. We saw as many as 8 profiles at one time during Ram overclocking and the list just seemed to keep growing, each entry had the number of successful boots listed next to it which was a really big help during one of our late night overclocking sessions.
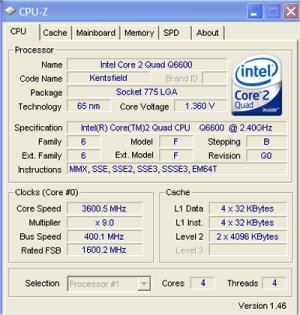
Here’s some CPU-Z shots of the first setup we used with the OCZ Reaper DDR2 800 after the successful 3.2 Ghz OC that took us all of 10 minutes,we achieved a 10 hour prime stable status in that short time.

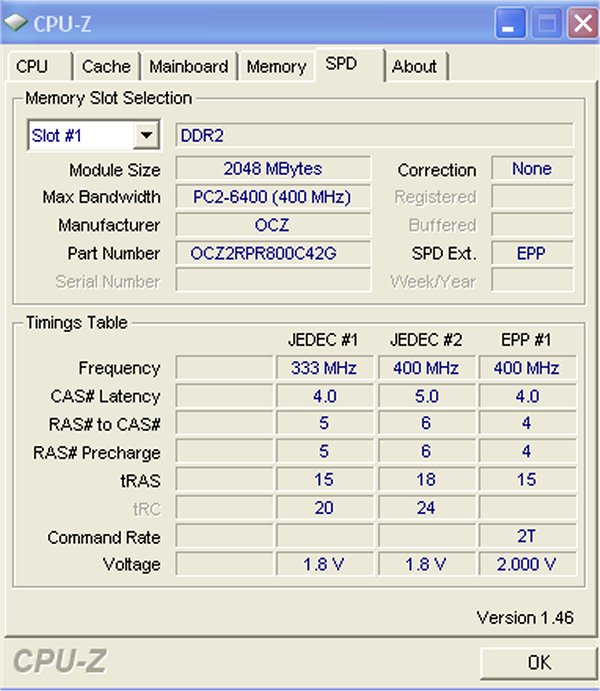
In this setup we were running at 3.2 Ghz (1.36 vcore it’ll probably go accept a lower voltage but we didn’t have time to trim voltages), with the OCZ Reaper DDR2 800 @ 800 4-4-4-15 (2.1 vRam) as per the EPP profile shown in CPU-Z. That’s a pretty decent boost for the 2.4 Ghz stock CPU but we still had to bring the Patriot DDR2 1150 into the picture.
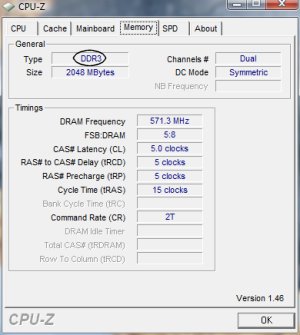
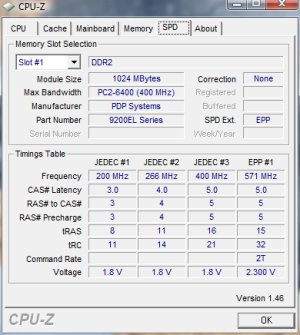
Notice anything unusual in the CPU-Z picture? CPU-Z picks up the Patriot DDR2 1150 as DDR3 but the rest of SPD and all the other information was read correctly. We are surprised CPU-Z hasn’t fixed this issue with the P45 Chip Set yet it’s been a common error for a while.
The Gigabyte EP45-DQ6 picked up the EPP profile on the Patriot DDR2 1150 and set it to 1142 but we had to fool with it a little bit (lowering the ram voltage to 2.1 from the advertised 2.3 vRam) to get it to run right. Why is it running at 1142 instead of 1150, that’s what the Patriot SPD EPP profile set it to. We checked on the Patriot site and it noted “1142 by EPP” so that’s a Patriot issue and not an issue with the EP45-DQ6
But did you overclock the ram you ask? We overclock our toasters at Bjorn3D of course we overclocked the ram but didn’t try for a maximum overclock, we have to save a little suspense for the review on it.

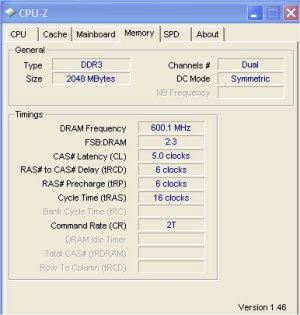
We achieved an easy OC on the ram from 1142 to 1200 Mhz but had to loosen the timings to get the 58 Mhz boost in ram speed. All attempts to boot any higher than 1142 with the 5-5-5-15 timings including upping Ram and NB voltages failed but as soon as we loosened the timings a little we got to 1200 easily which is the highest rated speed of the motherboard. We are sure the ram and board have more in them but you’ll have to come back for the Patriot DDR2 1150 review if you want to find out how high we can drive it on this board.
Oh what’s that we hear? You want to know the maximum OC we achieved with the Q6600 on the EP45-DQ6, well if you want to know that toss a buck in the tip can by the home page.
We were able to drive the CPU frequency up to 3.6 Ghz at 1.42 Vcore and had reached the point of diminishing returns so we left it at that. There’s more there to get it just depends on how bad you want it. The highest FSB at which we were able to get a post was 517 Mhz but we didn’t attempt to stabilize it and get into Windows. We had to switch out to an E8400 to reach that Post as the Q6600 we were running has a known FSB wall at about 438 FSB. We didn’t do any further testing with the E8400.
The Gigabyte EP45-DQ6 met every expectation we had for it in the overclocking department, overclocked easily, provided a good number of profiles to store our attempts in and operated solidly at every OC we tested. There are plenty of options in bios for the enthusiast overclocker and a page and a half of advanced memory timings. If your a serious overclocker this is a good choice at a decent price.
CONCLUSION
The Questionable
Lets deal with the negatives first and get that out of the way. If your using a full length NVIDIA GPU like the new GTX-260 with it’s full length cowling your going to obscure a couple of Sata ports. In testing the full length GPU barely touched the flat Sata connectors but still it’s enough to make you uncomfortable about using them. The full length Sapphire 4870 and the 4850 we tested didn’t obscure any ports.
The TPM security chip was a convoluted process that we didn’t get to work but we’d attribute that to documentation more than hardware. The rest of the manual was easy to use, easy to read and was quite helpful in feature testing.
Some of the more highly touted features were limited in functionality. The Hardware Raid system was only for backing up and not bootable, bootable hardware Raid would have made this board phenomenal. Referring to information starting on page 93 of the provided manual, it tells you how to set up an array using the hardware Raid controllers, which is why we spent 7 hours trying to get a bootable array on the 4 purple ports. Then at the very bottom of the page it says (paraphrased) that “the bios setup menus described in this section may differ from the exact settings for your motherboard. The actual BIOS setup menu option you will see shall depend on the motherboard you have and the BIOS version.” The out of the box BIOS in that section didn’t remotely match what was in the manual.
We spent considerable time with the BIOS based on the manuals description of setting up a hardware Raid Array only to find out that the arrangement on the EP45-DQ6 is for hardware Raid backup only. We’d like to see a manual specifically for the board that’s in the box and feel that is what most consumers expect.
Referring to page 12 of the manual, NOTE 3:”If installing only one Sata Device be sure to connect it to GS0 or GS1 source connector.” (The purple ports) We did that initially after 5 attempts to install XP Pro and being told that no hard drives were found and 7 hours trying to get a bootable array we feel that that portion of the manual could be some what refined. NOTE 4: Goes on to tell about setting up a Raid array on GS0-GS4, (the purple ports) again at least on this revision their not bootable and that wasn’t made clear. (Yes we did create the Raid driver disk, we created every posible Raid driver disk and tried them.)
Express Recovery, in order to use Express Recovery you must partition your primary hard drive into 2 partitions, one for the Operating System and one for the Recovery Partition. Express Recovery will only check the first physical hard disk in a specific order, Pata1, Pata2, Sata0, Sata1 and so on. Then it will only back up that one hard disk to the partition you created to store it on. They recommend a 10 Gig partition and backing up the hard drive shortly after installing the drivers. If you want to back up the whole hard drive you’ll need to split the drive into two equal parts and there is no option to back up to a mirror drive. Express Recovery will not handle drives in Raid or AHCI mode. It will be a useful option for some if they are willing to live with it’s limitations and not using Raid or AHCI.
The DES energy saving feature is best utilized with E7XX and E8XX CPU’s supporting the VRD 11.1 standard. It works with the Q6600 we tested and shows throttling of the CPU when using light tasks. For those using CPU’s supporting the VRD 11.1 cpu and interested in saving power it’ll do the job for you, however to date that is a small percentage of the CPU’s available. It did work well and flawlessly with our over clocked Quad. How it will compare to the built in (BIOS) power saving features without a VRD 11.1 capable CPU we can’t say.
Those things being said we feel that they are mainly advertising and informational issues. Marketing products is an art but it should be an art that involves making things painfully clear and not playing on the expectations of consumers inflating the importance of the feature and delivering short of that expectation.
The Good
The Gigabyte EP45-DQ6 features might have had a few limitations but they were far out weighed by the functionality and performance of the board. In a lot of the testing we did against the older P35 chip set Asus P5KC we saw a 30% or more performance increase with the EP45-DQ6. The Matrix Raid Array we set up on 2 hard drives and partitioned to run dual boot XP/Vista worked perfectly and provided a superior transfer rate that exceeded 100 MB/s and after things got broken in was hitting 120+ MB/s in most cases.
It was easy to set up, easy to run and handles a wide range of DDR2 up to DDR2 1200, and with some over clocking we know it will drive the ram beyond 1200. Over clocking on this board was a dream come true, 10 minutes in and we hit 3.2 stable and eventually drove the frequency up to 3.6 stable with a little room left, previously the best OC we got on the P5KC was 3.2 and all attempts at higher frequencies took hours stretching into days. On the EP45-DQ6 took 10 minutes to get to 3.2 Ghz, and another 15 and we were at 3.6 Prime Stable. Of course every piece of hardware over clocks differently and your results may vary. We are of course not responsible for any over clocking mishaps you might have while trying to reach that sweet OC.
BIOS is feature rich and designed for the over clocker. Over Clocking features in BIOS were all in one spot and easy to understand. Once over clocked and Prime95 verified the stability we didn’t have any problems with the board. In several days of extensive testing we didn’t experience any Blue Screens or performance problems.
Load times were faster with the P45 chip set, games loaded faster, frame rates were better, synthetic benchmarks ran faster. In some cases much faster. Memory bandwidth increased from slightly over 4 GB/s to over 6 GB/s using the same set of OCZ Reaper DDR2 800 when we went from the P5KC to the EP45-DQ6. The Multi-Core Efficiency bandwidth increased dramatically when we migrated to the P45 chip set. The Multi-Core Latency went down significantly (Lower is better) when we went to the EP45-DQ6. Given the combination of an at least 33% decrease in latency and a 33% increase in Multi-Core efficiency it’s no wonder the EP45-DQ6 performed better in almost every test than the Asus P5KC.
The layout on the board was pretty good, cabling wasn’t an issue. Twelve USB ports were a welcome sight, 4 Gigabit Lan ports with teaming functionality while excessive in our case will provide functionality to a wider range of end users. The bundled E-Sata expansion modules and Firewire module were welcome additions to the bundle which was more than generous. While we would have liked to see all flat head Sata connectors 2 is the norm so we aren’t complaining about that.
The Gigabyte EP45-DQ6 is a well behaved high performance board with a lot of advanced features and plenty of connectors. Given it’s (at the time of post) price tag of $242.95 (USD) and the performance it gave us it’s a bargain that’s sure to satisfy the Over Clocker in you.
Pros:
+ Great performance
+ Over Clocking Dream
+ Matrix Raid Works Flawlessly
+ 12 USB Ports
+ 4 Gigabit Lan With Teaming
+ Sweet Bundle
+ Good Power Consumption
+ Well Behaved
+ Significant CPU Performance Benefits
+ Crossfire Ready
+ Price
+ Supports A Wide Range Of CPU’s and Ram
Cons:
– Documentation and advertising on the features could have been better
– Full length NVIDIA GPUS (GTX-2XX class) will obscure a couple of Sata ports
– Haven’t heard from Tech Support Yet
The Gigabyte EP45-DQ6 is an Over Clockers Dream that combines fantastic performance with affordability. The only problems we had were documentation related and those were far out weighed by it’s well behaved performance which easily won us over.
If the documentation and advertising issues were cleared up we wouldn’t have a problem scoring this as high as a 9.5 but since they exist we gave it a Final Score of 8.5 out of 10 and the Bjorn3D Seal of Approval.