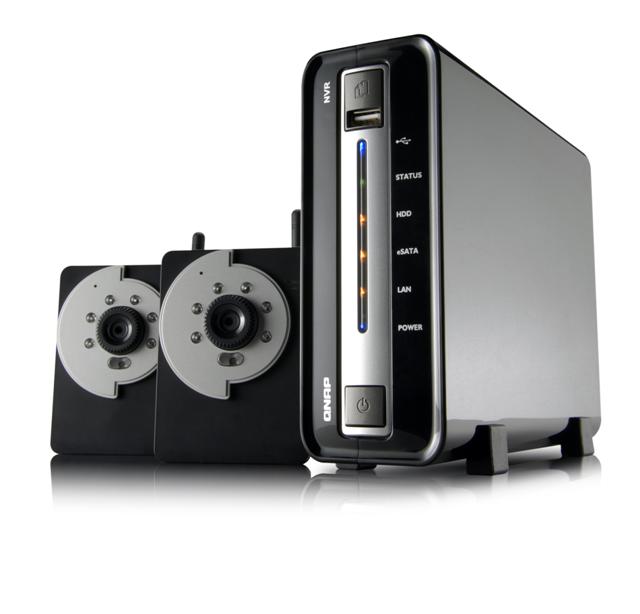
The NVR-1012 pairs the NVR-101 Network Video Recorder with two ICS-1013 IP cameras for dual-zone monitoring, with the ability to expand the system if needed.
INTRODUCTION
I always thought that the little security system signs that people place in their landscaping and on their windows at home looked a bit goofy. I mean, yes, it may deter some of the more novice thieves, but like they say, “locks only keep the honest people out”. It also seemed like putting up the signs was almost an advertisement that shouted “Hey! Look at me, I have goodies inside!” These thoughts all came to me before I actually owned my own house, but now that I am in my second house, I see the appeal of a security system. One thing that most security systems do not come with however, is any sort of camera or video recording features, and if they do, they are outrageously expensive. This is where the NVR-1012 Network Surveillance System from QNAP comes into play. The NVR-1012 pairs the NVR-101 Network Video Recorder with two ICS-1013 IP cameras for dual-zone monitoring, with the ability to expand the system if needed. Follow along to see just how the QNAP NVR-1012 can help you get started with monitoring your home or office.
ABOUT QNAP
“QNAP Systems, INC. (QNAP) is a devoted and dominant provider of Internet Appliance products. With our solid and integrated expertise in the Linux embedded platform, QNAP has released more than 30 models for the network storage and digital network surveillance series over the past 6 years, providing our consumers with high performance and high reliability storage, backup, and surveillance solutions. Today, QNAP continues to lead the industry with our innovation in design and technology. Our products have gained worldwide recognition. For example, TS-109 Pro was honored the “The Best NAS Box” from MAXIMUMPC (US), “Lord of NAS” from Hexus (UK), and “Golden Bear Award” from Bjorn3D (US) etc. TS-209 Pro was honored “Gold Medal Award” from ComputerGEIL.dk (Denmark), Golden Award from InfoMods (France), and “Product of the Year 2007″ from Hardware-TEST.dk (Denmark) etc.”
FEATURES
Live real-time monitoring
- Electronic map for easy preview: Electronic map (E-map) can be uploaded for ease of identification of monitoring locations.
- Variety live video monitoring: Single-channel, multi-channel (max. 4 channels), and picture-in-picture monitoring modes are supported for flexible and key-location monitoring.
- Supports live 2-way audio: Real-time audio and video monitoring, voice broadcasting.
Instant alarm, in case any accident should happen
- Instant on-screen alert and e-mail alert: Instant alarm signal will appear on the monitoring screen to alert users. Alert e-mails will be sent to administrator immediately when a system error or emergent event takes place.
Various alarm type to capture
- Motion detection: Recording is triggered when a moving object is detected by the camera.
- Alarm schedule recording: Different recording modes can be defined for different time periods, e.g. alarm recording at daytime and continuous recording at night time.
Powerful system functions and data protection
- UPS (Uninterruptible Power Supply) supported for continuous services against interruption or risk of data crash caused by power outage.
- Video data can be exported to an external storage device via the one-touch copy button for ease of archiving. *It is suggested to use USB backup devices, e.g. QBack-25S, QBack-35S.
- When the power resumes after a power outage, PC-based recording solution will not be started up automatically and recording is stopped. QNAP NVR supports automatic system startup and recording is enabled immediately after power resumes. The system maintenance cost is largely reduced.
- Supports advanced RAID1 mirroring for ultra secure data protection by connecting to an external eSATA device, e.g. QBack-35S.
Most complete recording functions
-
All-in-one recording modes
- Continuous/ Schedule/ Manual recording
- Alarm schedule recording (by motion detected or sensor triggered)
- Synchronized audio recording
- With scheduled recording, users can set different recording schedules for different cameras. Up to 15 schedules are supported for each camera. Manual recording allows users to activate recording in any necessary conditions. The NVR-101 also provides alarm recording that starts automatically when motion detection or camera sensor is triggered.
- Standard video recording format with Time Stamp: The recordings are saved in AVI format (codec provided) for easy playing by Windows Media Player. Time stamp on the video is provided for convenient data search and can be used as legal evidence.
- Flexible adjustment of the length of recording files: User can adjust the length of the recording files flexibly (1-15 minutes).
Trouble-free setup and effortless maintenance
- Easy 6-step Setup: Quick installation wizard is provided for users to finish system setup in 6 steps within 5 minutes. Intuitive web-based interface is provided for easy configuration.
- Manage and access recordings remotely: Recording data can be retrieved securely and remotely via web, FTP, and My Network Places with login access control.
Environment-friendly and energy-saving design
- The normal power consumption of the NVR in operation is less than 18W (less than the power
consumption of an energy-saving light bulb). - The low-noise fan design allows long-term and quiet operation at home or in office.
SPECIFICATIONS
|
NVR-101 and ICS-1013 Specifications |
||||||||
|
Device: |
NVR-101 | |||||||
|
HDD: |
Support 1 x 3.5″ SATA I/II HDD, up to 1GB or above, expandable to 2TB via eSATA (the HDD is not included) | |||||||
|
LAN Port: |
1 x Gigabit RJ-45 Ethernet port | |||||||
|
LED Indicators: |
Power, USB, status, LAN, hard disk | |||||||
|
USB: |
3 x USB; for USB storage device (one touch auto-video backup) and UPS device | |||||||
|
Buttons: |
USB auto-video backup button, power button, reset button | |||||||
|
Form Factor: |
Portable desktop | |||||||
|
Hardware Dimensions: |
218.4(D) x 60(W) x 165.5(H) mm | |||||||
|
Weight: |
Hardware net weight: 0.71Kg (without HDD) Color box shipping weight: 1.57 Kg (without HDD) |
|||||||
|
Temperature: |
0~35°C | |||||||
|
Humididty: |
0%~85% R.H. | |||||||
|
Power Supply: |
External power adapter, 36W, 100~240V | |||||||
|
Energy Saving Design: |
Low power consumption & low noise design | |||||||
|
Secure Design: |
K-Lock security slot for theft prevention | |||||||
|
Device: |
ICS-1013 | |||||||
|
Image Sensor: |
1/4″ color CMOS sensor | |||||||
|
Day Vision: |
Minimum illumination 0.5 lux | |||||||
|
Night Vision: |
IR LED with light sensor control night vision 0 lux within 5 meters with built-in 6 infrared LEDs on | |||||||
|
Image Setting: |
Brightness/ sharpness/ saturation | |||||||
|
Upside Down and Mirror: |
Yes | |||||||
|
Digital Zoom: |
3x | |||||||
|
Compression Ratio Setting: |
5 levels | |||||||
|
Lens Type: |
Board lens | |||||||
|
Aperture (F/No.): |
2.8 | |||||||
|
Focus Length: |
4.5mm | |||||||
|
View Angle (Diagonal): |
54 degrees | |||||||
|
LED Control: |
Normal / Off | |||||||
|
Power LED: |
Orange | |||||||
|
Link/act. LED: |
Green | |||||||
|
Reset Button: |
Press over 5 sec to reset to factory default | |||||||
|
USB Dismount Button: |
Press over 4 sec to dismount USB device | |||||||
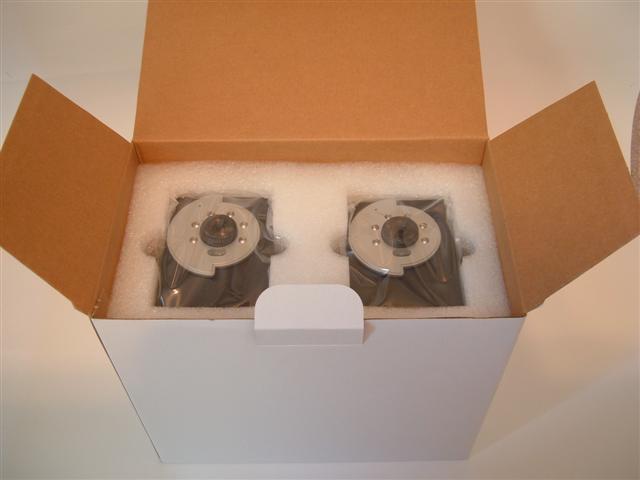
CLOSER LOOK: PACKAGING
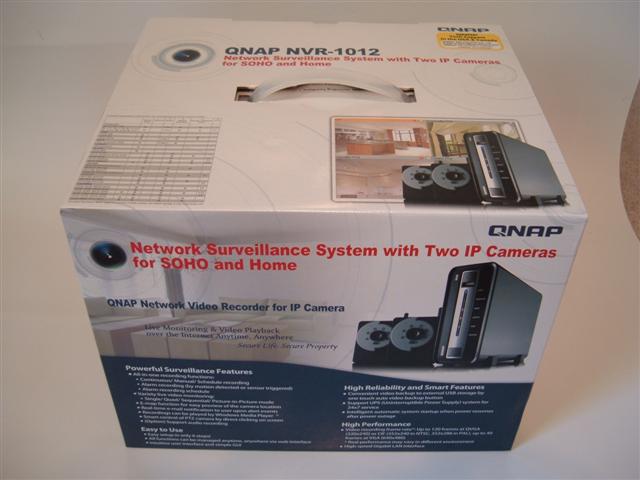
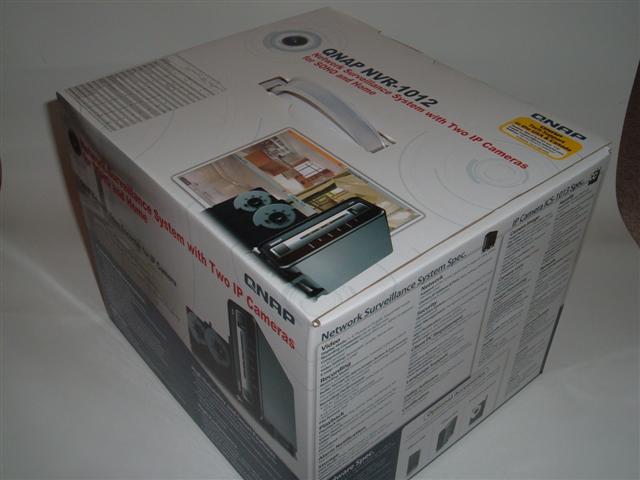
The first thing that you will notice about the QNAP NVR-1012 is that the packaging is top notch. There is a plethora of information on the box, including not only the standard features and specifications of the NVR-1012 system, but also includes a list of supported cameras from various vendors. I found this information to be very helpful, as some users may already have an IP camera or two at their location and knowing which cameras work with this system is very useful information.
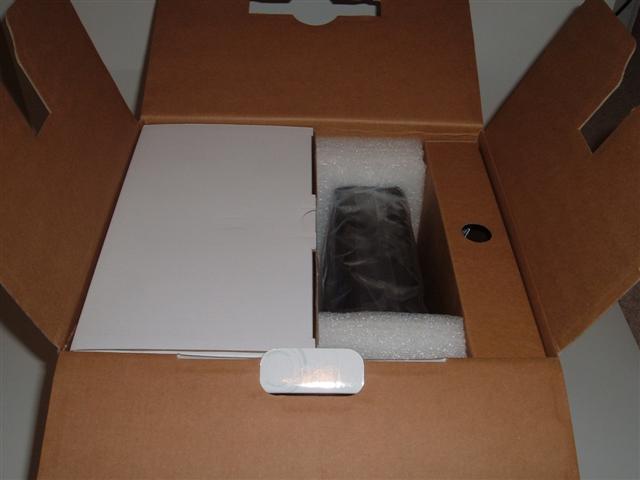
Once the box is opened, you are presented with three options when unpacking the system. Each “sub-component” is packaged separately and has custom-fit foam to ensure a safe ride to its final destination.
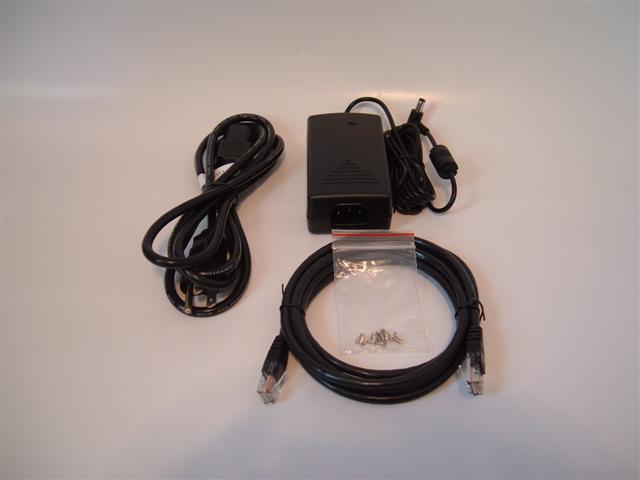
CLOSER LOOK: CONTENTS
NVR-101
- NVR-101
- Power cord
- Power adapter for NVR-101
- Ethernet cable
- Various screws
- Quick Installation Guide
- CD-ROM including user manual, quick install wizard, and utilities
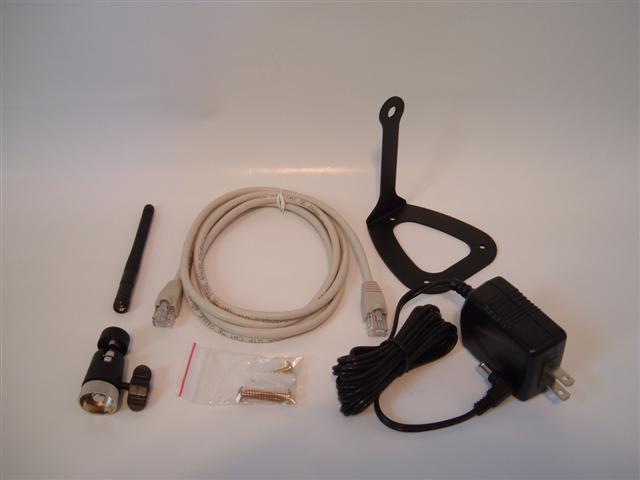
ICS-1013
- 2 x ICS-1013
- Power adapter
- 2 x Ethernet cable
- Quick Installation Guide
- 2 x Mounting kit
- 2 x antenna
- CD-ROM
CLOSER LOOK: NVR-101 – EXTERNAL
I absolutely love the look of the NVR-101. The glossy finish that QNAP used just puts a smile on my face. That is, until I need to move the unit. With the glossy finish comes finger prints, and there is no way of getting around this, unless you are in the habit of wearing cotton gloves 24/7.
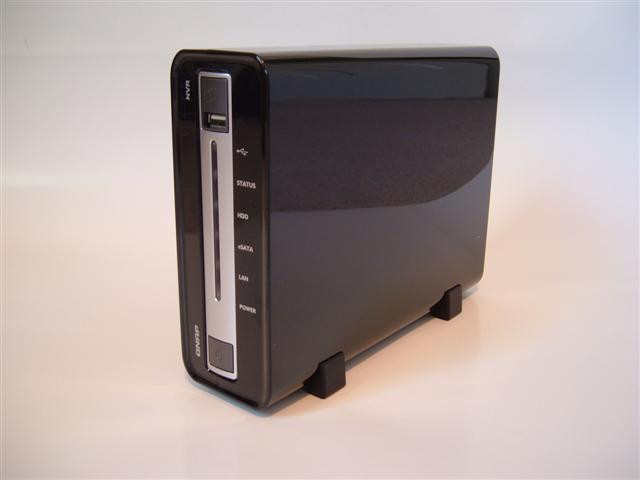
The front of the NVR-101 features six LED indicators that help you determine the state of operation that the unit is in. The standard power LED is present, as well as an indicator for LAN activity, eSATA drive connectivity, internal drive connectivity, overall status of the NVR-101, and a USB status indicator. The LEDs are also used in conjunction with the internal speaker to present the user with codes for troubleshooting and various maintenance operations.

Below the array of LEDs is the power button, which as you have probably already guessed, is used to power the NVR-101 on. Located above the LEDs is the front mounted USB 2.0 port and button that are used for backup storage.
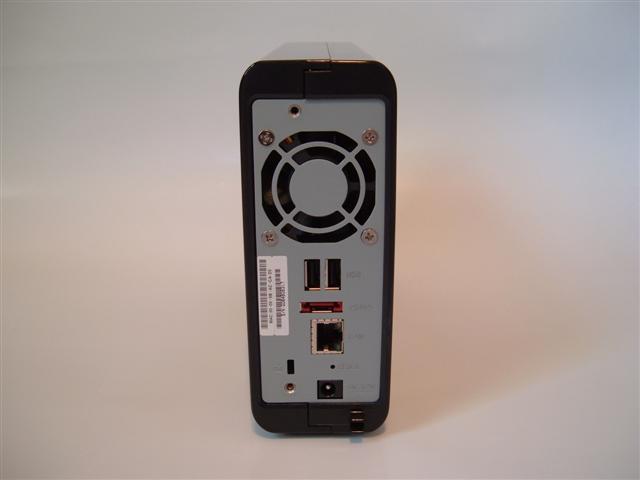
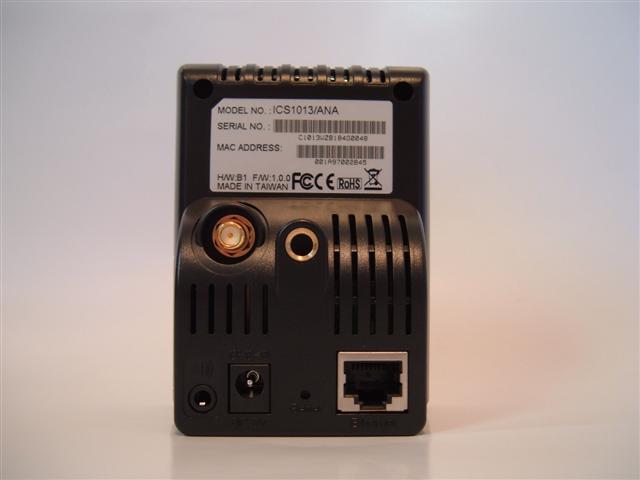
Around back, the NVR-101 provides access to two additional USB 2.0 ports, an eSATA port for connection of additional storage media, and single Gigabit Ethernet connection. There is also a K-lock security slot, as well as a reset button and power plug. Below all of these ports is a clip used to help organize the cables associated with the unit. At the top of the back of the unit is a small fan used to make sure that not only the hard drive is kept cool, but also the internal motherboard. There is a lot going on under the hood of this device, and keeping it cool will improve the performance and longevity it. Another item found on the back of the NVR-101 is the MAC address and serial number. The MAC address can come in handy when you are configuring different components on your network.
Along the bottom of the unit are four rubber feet used to keep the NVR-101 in place, as well as an intake for the cooling fan.

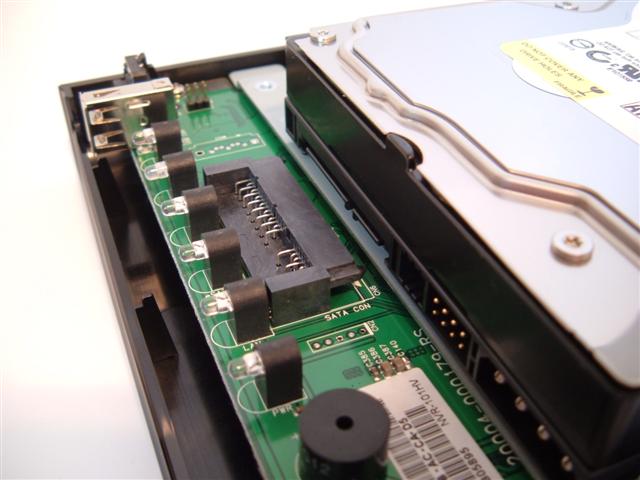
CLOSER LOOK: NVR-101 – INTERNAL
Once you remove the screws that keep one half of the cover secured to the NVR-101, you will be able to slide it off and reveal the area designated for the hard drive. A standard SATA or SATA II hard drive is needed to complete the NVR-101 package and QNAP provides a list of compatible drives in the user manual, as well as on their website.

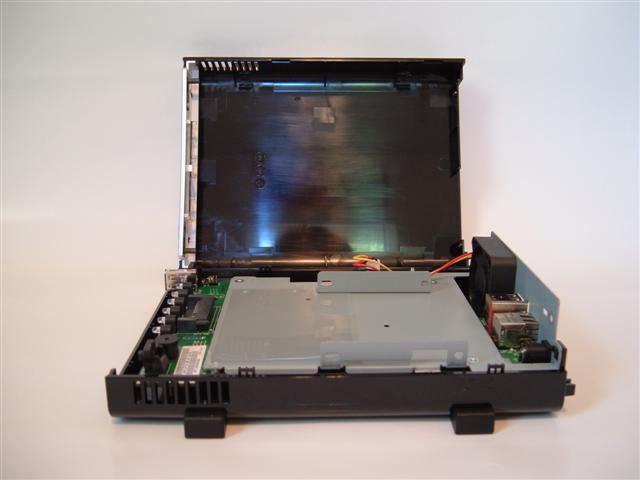
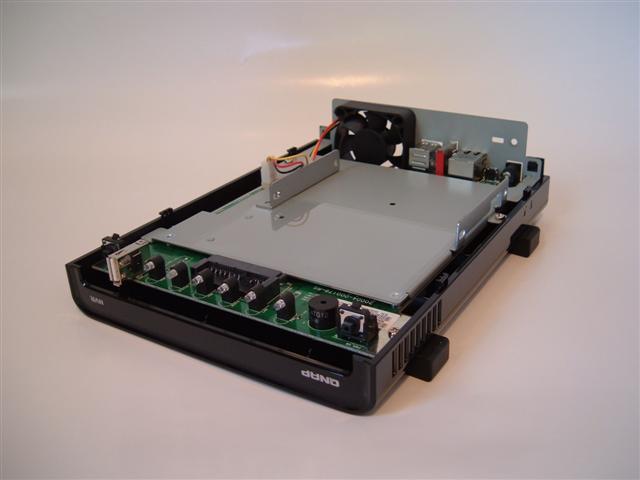
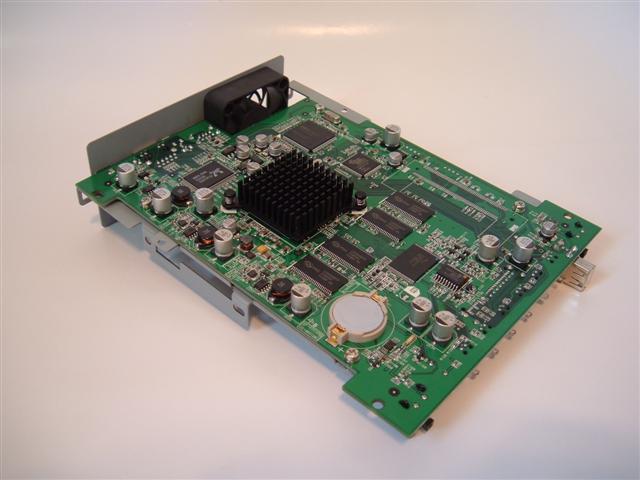
Aside from the hard drive mounting area, we are now privy to the rest of the internal components of the NVR-101. Removing a few screws allows us to get a look at the small motherboard that is running the show.
CLOSER LOOK: ICS-1013
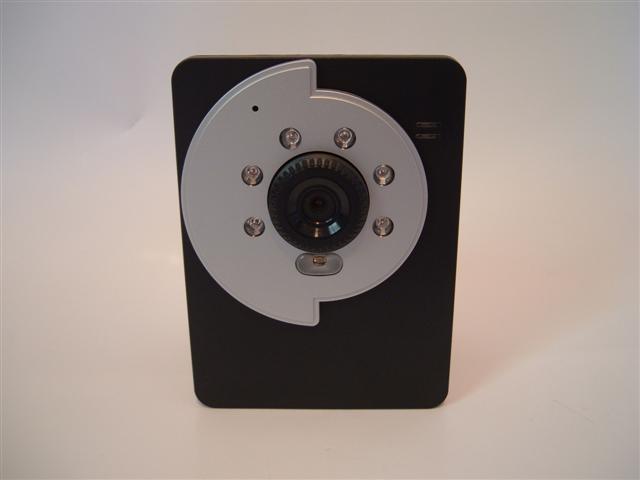
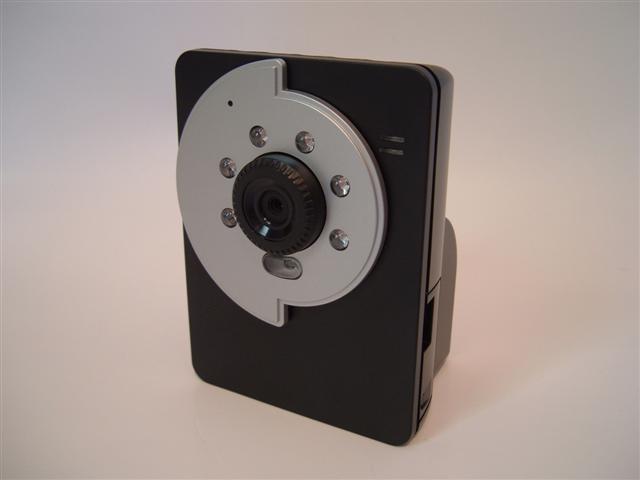
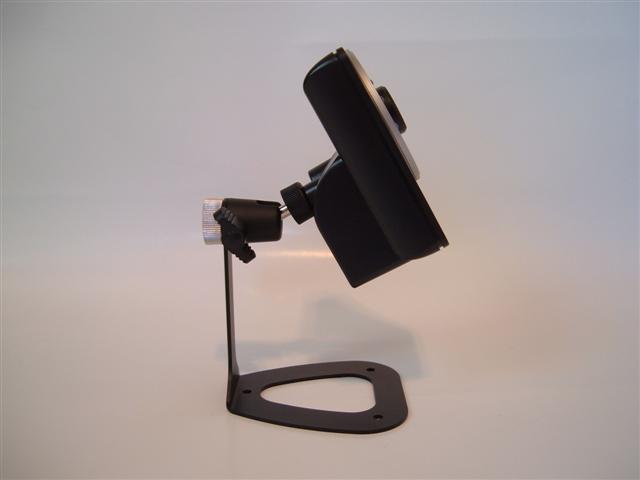
The cameras that QNAP utilizes feature a broad range of features for such a small device. While the body of the ICS-1013 is plastic, it is not at all flimsy and has a solid feel to it. The face of the camera is adorned with a small camera lens and focusing ring. These two components are surrounded by a semi-circle of six infrared LEDs and a single light sensor below the lens. The light sensor automatically enables and disables the IR emitters, for continuous viewing day and night. A small hole located above the IR LEDs is home to the microphone that is used to capture audio from the area surrounding the camera. Two LED status lights show power and network activity.
The back of the camera is home to the wireless antenna connection. The antenna can be removed if the wired connection is being utilized.
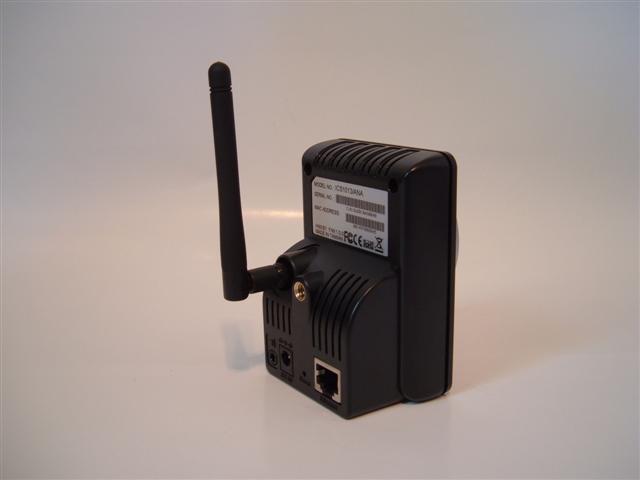
Also located on the back of the ICS-1013 is a screw hole for the included mounting hardware, as well as a power plug. If you want the ability to transmit sound to the location of the camera, a stereo jack is also located on the back of the camera for connectivity to an external speaker.
Around the side of the ICS-1013 is a single USB 2.0 port used to connect an external storage device to the camera for recording.

INSTALLATION AND SETUP
HARDWARE INSTALLATION
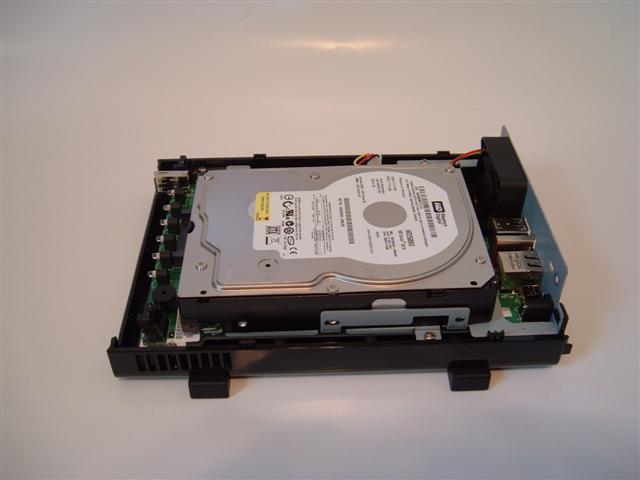
Installing a hard drive in the NVR-101 is very easy. By removing the two screws from the back of the unit you gain access to the internal drive bay. A standard 3.5″ SATA or SATA II hard drive from the list of compatible drives will easily slide into place where it is secured by four included screws. Once the drive is secure, the removed side is then replaced and fastened back to the rest of the unit. All done.
Installing the ICS-1013 cameras is just as easy as the NVR-101. The cameras can either sit on a flat surface, or they can also utilize the included mounting bracket that screws into the back of the camera. These mounting brackets also allow the camera to swivel around to find the best viewing angle and can be secured in place with the included hardware.
SETUP
When you are ready to setup the NVR-1012 system, you can go about it a couple of ways. You can first setup the cameras and then the NVR-101, or the other way around. Either method is acceptable, however QNAP suggests setting up the cameras first, so that is the route I took.
One thing to be note before getting started is to plan out and document your home network before and during the installation of this system. Although it may not seem like it, home networks can become overwhelming to those not familiar with their layout. This is a part of my work life that I have gladly extended to my home life and have been rewarded with excellent results every time I make a change to my home network.
My ever-changing home network currently consists of a Toshiba cable modem connected to an open-source Untangle server that is functioning as my all-in-one network gateway. The Untangle server then passes traffic on to a Linksys SRW224 managed (albeit limited management) switch via a 1Gps port. A Linksys WRT54G is attached to the SRW224 and functions as the wireless access point for my network. Various Cisco devices and PCs have also managed to leech onto the SRW224, but they are not part of this review.
Since the NVR-1012 comes with two cameras, I decided to setup one as a wireless camera for use in the upstairs of my house, and to use the other cameras Ethernet connection in my office downstairs. Setting up the cameras is a breeze, only requiring the installation of a simple application called IPFinder that is used to find the ICS-1013 cameras on the network. Using an Ethernet cable is required to initially setup the cameras, but wireless configuration is easily done after gaining access to the cameras. Once the software finds the cameras, you can use either DHCP to assign an address to the camera or configure a static IP address. I advise setting the cameras to a static address outside of your DHCP range so that you are more easily able to troubleshoot any future problems that you might encounter on your network, as well as for better network documentation. Once the address has been set, you may then browse to the IP address using Internet Explorer. It is recommended to use IE, as there are ActiveX features of the camera that you will want to use.
After connecting to the cameras built-in web server, you can either view a live image, or go on to setup more settings on the camera, including the wireless network settings. Setting up the wireless network was as simple as browsing to the network area of the page and entering in my wireless networks SSID and WPA information. Now that both cameras were setup, it was time to configure the NVR-101.
Once again, configuration consists of installing a simple piece of software called Finder and letting it find the camera on your network. Once the NVR-101 is found, you simply setup the IP address using either DHCP or static settings and continue on. After setting up the network, you will be prompted to setup the network cameras for network recording. Here is where your static IP addresses and documentation comes in handy. Simply selecting the camera model from a drop-down list of cameras and entering in the appropriate IP address and login information for each camera makes quick work of configuration duties. Once the setup software finishes formatting the hard drive that is installed in the NVR-101 and reboots the server, you are now able to login to the web page of the NVR-101 for more configuration options.
NVR-101 AND ICS-1013 CONFIGURATION
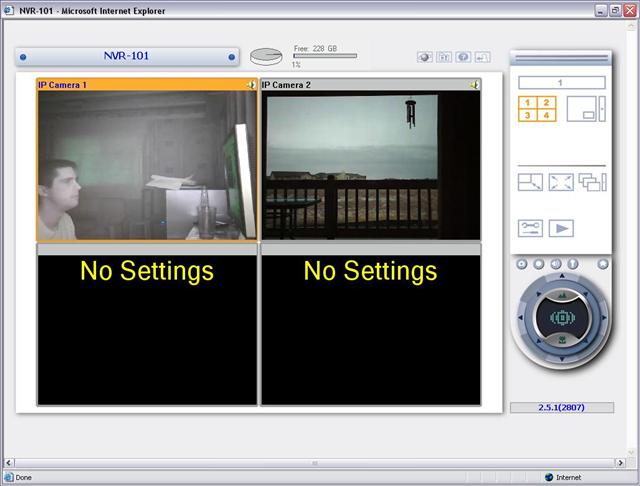
After completing the software setup of the NVR-101 and logging into the website, you will be greeted with what I like to call the “dashboard” for the NVR-101. As you can see in the image below, the two ICS-1013 cameras that were previously setup are shown in the top two windows. There are multiple ways of viewing the cameras, including a nice picture-in-picture mode. It is from this page that you can control the many functions of the NVR-101. Simply highlighting the desired camera and clicking the manual recording button will start recording for the selected camera. You will also find links to the settings page for the NVR-101, the pan-tilt-zoom cursor, links to the camera webpages, as well as a nice statistical view of the drive space available on the NVR-101.
A quick run-down of the NVR-101 settings pages will show just how robust the NVR-1012 system really is. The home page provides links to the various sections of the administration site, with links to the sub-sections under each heading.

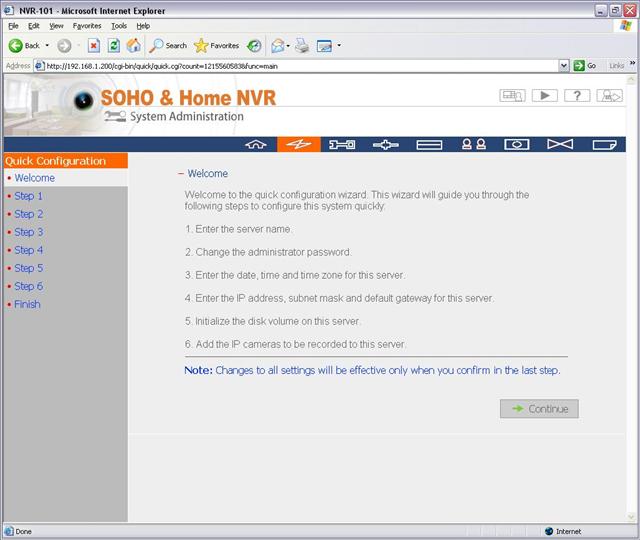
The Quick Configuration page will guide you through the steps of setting up the NVR-101 in just six easy steps. These steps are the same ones that we followed in the setup part of this review.
The System Settings page allows you to give the NVR-101 a unique hostname, and also shows you the model and firmware version currently running. The sub-section of this page allows you to configure the time settings, including the ability to sync with an NTP server.
.JPG)
Network settings are configured on the Network Settings page and allow for the basic configuration changes that you might need access to. You can also configure dynamic DNS, as well as specific ports for certain services the NVR-101 can provide.
.JPG)
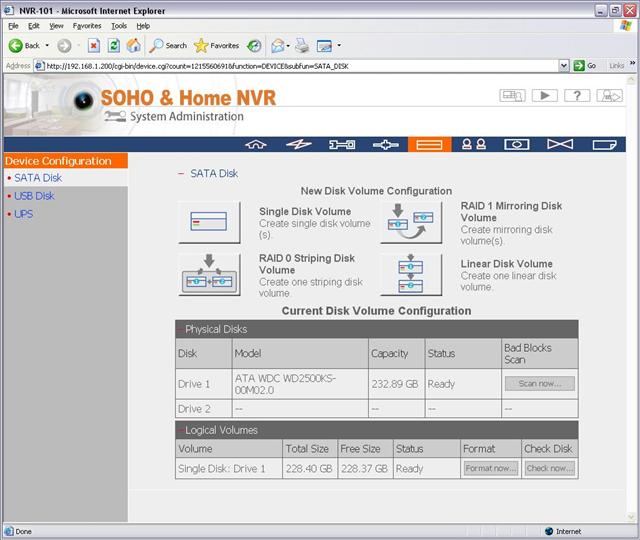
On the Device Configuration page, you are able to configure the drive settings for the NVR-101, as well as view the current status of the drive(s) in use. This page also allows access to the USB and UPS settings. The NVR-101 is able to talk with various UPS devices and shut down gracefully if needed.
The User Management page allows for additional users to be allowed to connect to the NVR-101 to either view or administer the system.
.JPG)
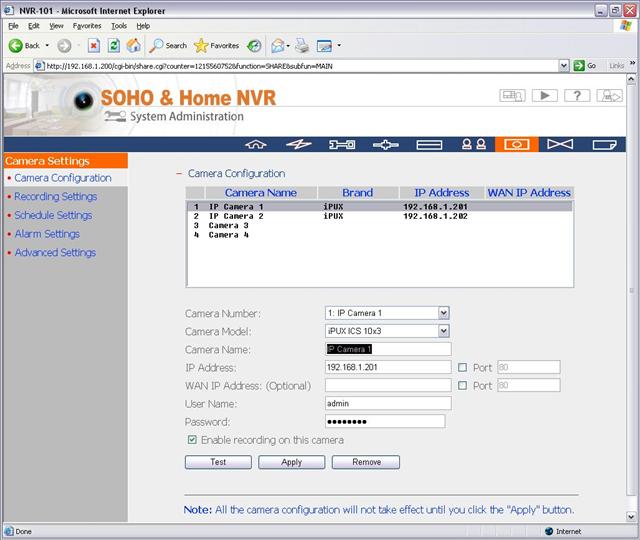
Following the link to the Camera Settings page will provide the user with a wide array of settings for the cameras that are communicating with the NVR-101. This includes recording settings and alarm settings.
The System Tools page is mainly a diagnostics page that is very useful when troubleshooting any problems you may encounter in regards to your NVR-1012 system.
.JPG)
On the Logs and System Information page you will find a list of the most recent events that have occurred in the NVR-1012 system, as well as a statistics page that lists various items such as system uptime, CPU, memory and disk utilization, and network traffic statistics.
.JPG)
TESTING
ICS-1013
Setting up the ICS-1013 cameras is probably the easiest part of getting the NVR-1012 surveilance system up and running. Their simple mounting hardware is easy to install and can be used to mount the camera in just about any position. The included software makes finding the camera on the network a breeze and as long as you have taken a bit of time to plan out your installation, assigning IP addresses to the cameras takes little effort.
Network connectivity to the ICS-1013 cameras can be achieved by either a wired or wireless connection. The wireless adapter present on the cameras is capable of securing its transmissions with WPA2 encryption if needed. This is a welcome feature and can help ensure that only those that you desire to view your camera images are viewing them. One downside to the wireless performance of the cameras is the range which the cameras are capable of operating at. My Linksys WRT54G is positioned on one side of my basement and provides wireless access for all devices in my house, even those upstairs on the main floor and all the way across the house. Unfortunately, when placed next to a computer using the same wireless network and access point, the ICS-1013 was unable to detect and connect to the wireless network. I have had mixed results with antenna positioning on both the camera and WRT54G, and have found that with my house layout, I am only able to provide good connectivity to the camera if it is within about 25-35 feet of the access point. Now this range will obviously varies from location to location, but I was definitly expecting a lot better performance out of the ICS-1013 cameras. One feature I would love to see added to the ICS-1013 is the ability to power the camera using Power over Ethernet. PoE is becoming more common all the time, and not having to rely on having a power outlet nearby can be a life-saver when determining installation location.
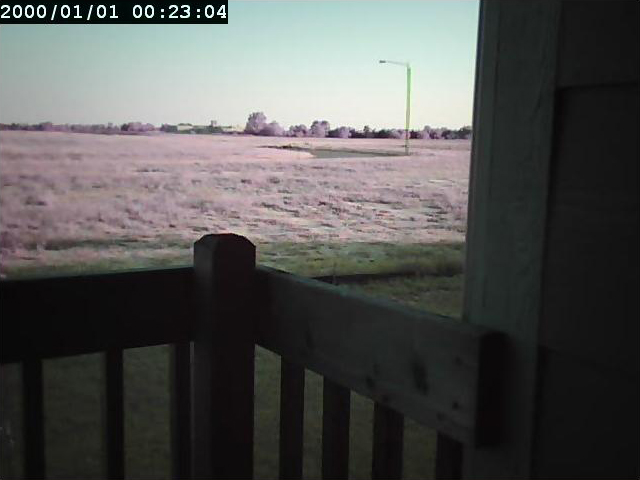
Picture quality is an important factor in any type of visual tool, and unfortunately, the ICS-1013 does not have the best picture. Most colors are not accurately represented, ie. my forrest green sofa turning out to look almost hot pink through the cameras. Even after extensive adjustments of the cameras image settings, I was often times unable to re-create the proper colors. As you can see below, the colors that the ICS-1013 produces do not always resemble the actual colors. The first image is from the ICS-1013, and the second image is from my digital camera. These two pictures were taken within a minute of each other, and the ICS-1013 was adjusted for best image quality results.

Not only does the NVR-1012 system support video, it also supports two-way audio. The audio that is picked up by the built-in microphone on the ICS-1013 is actually fairly decent, and only carries a slight delay in transmission. By hooking up an external speaker using the plug on the back of the cameras, you can actually use the system to hold a conversation, allowing the system to function as a video intercom system of sorts.
NVR-101
Setup of the NVR-101 is equally as simple as the cameras. After installing a supported hard drive, and following the six easy steps to setup the unit you are ready to use the system for basic surveilance needs. Since the NVR-1012 is designated as a surveillance system, I took this into account when evaluating the unit. One thing that I was a bit disappointed in with the recording abilities of the NVR-101 was that it only supports video clip lengths of up to 15 minutes. The system will record for longer than 15 minutes, but splits the video into multiple files. I would be nice to be able to record for a longer period before splitting off into a second file.
The software that runs on the NVR-101 is very robust and offers all the features you would expect from a high-dollar system, but in an affordable package. The video playback feature allows you to search for videos in a certain time period and lists all the video recordings for the selected camera in this range. You can then playback the video right in the browser window, or download it for viewing at a later date. The playback page also allows you to open up an SMB window, web file manager or FTP window to browse the directory structure for individual video recording files.

One aspect of the NVR-101 that I was concerned about was the power draw that the system might require. I try to be conscious of my energy usage and leaving unused electronics on 24/7 is one of my biggest pet peeves. Luckily for me, the NVR-101 showed an average draw of 15-17 watts when measured by a Kill A Watt device. This left me feeling much better about leaving the unit on at all times, knowing that it was only using about the same amount of energy as the rest of my network infrastructure.
CONCLUSION
As I stated in the introduction, surveilance systems can be very expensive when dealing with traditional home security system vendors. QNAP has brought a great package together with their NVR-1012 surveilance system. The NVR-101 is jam-packed with enough features for an experienced surveilance user, but they have also made the setup and use of this system easy enough for a novice. Just six simple steps are needed to setup the NVR-101 and the ICS-1013 cameras are just as easy to configure.
While the image quality of the included cameras is definitely lacking, they do offer versatility in their depoloyment options with the ability to be used with a wired or wireless network. Unfortunately, the wireless range of the cameras is a bit shorter than I would have liked to have seen, as the system is designed for home or office use, and many time a single wireless access point is the only option. The cameras also support two-way audio, so that you can not only hear what is going on in the location of the camera, but you can broadcast audio if needed. One way to enhance the performance of the NVR-1012 is the ability to connect to 3rd party manufacturer cameras. This allows for use of cameras that may already be in use, as well as to upgrade to PTZ cameras if needed in the future.
PROS:
- Versatility
- Easily expandable
- NVR-101 is a very robust NVR system
- Competetive price in comparison to traditional surveillance systems ($920 at Newegg)
CONS:
- Poor wireless range on cameras
- Video quality is lacking
- No PoE for cameras
In the end, the few shortages that the ICS-1013 cameras have are certainly compensated for by the robustness of the NVR-101. This extensive kit from QNAP is a great package and should definitely be looked into when contemplating the purchase and installation of a network based surviellance system. We at Bjorn3D are proud to rate the QNAP NVR-1012 as a 9 out of 10 and award it the Bjorn3D Seal of Approval.