GIGABYTE is back their flagship motherboard, the X48T-DQ6. Armed with Intel’s newest chipset and support for DDR3 this board has a lot going for it. Toss in some green action with the Dynamic Energy Saver and you may just be able to have your cake and eat it too.
INTRODUCTION
Today we are going to take a look at GIGABYTE’s high end motherboard, the X48T-DQ6. GIGABYTE makes two versions of this board utilizing Intel’s X48 chipset. The X48 which is a DDR2 variant and the X48T which is the DDR3 version that we will be covering today. The X48 brings minimal changes to the chipset when compared to the X38 and the only tangible difference should be more overclocking headroom. In recent years GIGABYTE has truly reinvented itself as a leader in innovation. In today’s world the name of the game, or color to be more specific, is green. We have green cars, green homes and now you can add motherboards to the growing list of items going green. GIGABYTE has made a concerted effort to produce motherboards that use the least amount of energy possible without sacrificing performance. A task not easily accomplished. To this end they have dubbed this innovation DES or Dynamic Energy Saver. A system which can adjust voltage, power phases and clocks speeds of the board and CPU to ensure as little energy as possile is wasted while providing as much power as needed. Is it possible to have a power efficient system without losing performance? Let’s find out.

FEATURES AND SPECIFICATIONS

Performance
Based on Intel X48 Chipset
Supports Intel Core 2 Extreme, Core 2 Quad, Core 2 Duo, Pentium and 45nm CPUs
1066/1333/1600 Mhz Front Side Bus
Chipset
Northbridge: Intel© X48
Southbridge: Intel© ICH9R
Memory
Up to 8GB of DDR3 1900/1600/1333MHz memory
Dual Channel architecture
Expansion Slots
2 x PCIe x16
3 x PCIe x1
2 x PCI 2.2
Storage I/O
- 1 x Floppy disk drive connector
- 8 x SATA 3Gb/s
- RAID 0, 1, 5, 0+1
- 1 x UltraDMA 133/100/66 for up to 2 PATA devices
Audio
- 7.1-channel Realtek ALC889A
Coaxial, Optical S/PDIF out at back I/O
LAN
- Dual Gigabit LAN
- Realtek RTL8111B
- Realtek RTL8110SC
Multi I/O
1 x PS2 Keyboard
1 x PS2 Mouse
1 x S/PDIF Out Coaxial
1 x S/PDIF Out Fiber
2 x IEEE 1394 Ports
2 x RJ-45 Port
6 x Audio connector (Center speaker/Subwoofer Out, Rear speaker out, Side speaker out, Line-in, Line-out, MIC)
12 x USB 2.0 ports (8 rear + 4 internal headers)
Form Factor
ATX Form Factor
Length: 12.0in – 305mm
Width: 9.6in – 244mm
PACKAGING
GIGABYTE, as always, delivers a top notch job when it comes to packaging their boards. Double boxed and sealed inside a plastic shell goes a long way to ensuring the safe arrival of your new prize. The box itself is colored in a sort of gold finish which gives it a quality look and feel to it. The back is filled with data touting the benefits of DES though probably to a fault. There is so much information in fact it makes it difficult to read and most people probably wouldn’t bother. The words less is more comes to mind in this case.
Click a picture to see a larger view
 |
 |
 |
CONTENTS
As part of the DQ6 line of products you can be sure you are receiving everything needed to setup your board. Every possible cable, connection, sticker and cord is included.
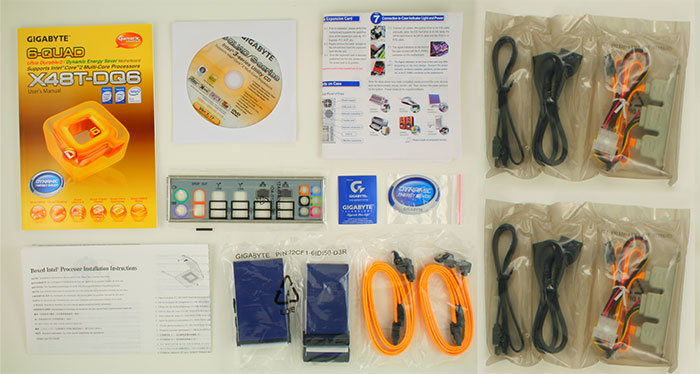 |
- Owner’s manual
- Driver CD
- Quick install guide
- Rear I/O shield
- IDE & FDD cables
- Four SATA cables
- Two eSATA expansion plates with two connections per plate (Four total)
- Two eSATA cables
LAYOUT

| Board Layout | |
| 1. 8-pin 12 volt socket | 9. GIGABYTE SATA-II chip |
| 2. 12-phase power control | 10. Eight SATA 2.0 ports |
| 3. LGA 775 CPU Socket | 11. Front panel headers |
| 4. X48 North Bridge and heat sink | 12. Internal USB headers |
| 5. Four Dual-Channel DDR3 slots | 13. LPT connector for legacy printers |
| 6. 24-pin ATX socket | 14. Two PCI slots |
| 7. IDE connector | 15. Two PCI Express 2.0 x16 slots |
| 8. Floppy drive connector | 16. Three PCI Express x1 slots |
The first picture below shows us the CPU socket area. I particularly like how GIGABYTE kept the heat sink on the North Bridge low. This enables us to use a wider variety of coolers for our CPU as well as to position them in different directions.
The second picture highlights the DIMM slots and just how close they are to the video card. The reason they sit so low is to improve signal routing for the DDR3 modules. As long as you aren’t swapping out your RAM on a daily basis this won’t be a problem. When the time does come and you want to swap out the RAM, just be aware that you should remove your video card first to give yourself enough room to remove the memory.
Lastly, we see the SATA ports on the board. There are a total of eight thanks to GIGABYTE’s SATA2 chip. This little wonder is what gives us two extra SATA ports along with the lone IDE connector that supports up to two IDE devices. If you are wondering where the onboard power and reset button are located you’re not alone. We at Bjorn3D are wondering the same thing. GIGABYTE has always impressed us with their thoughtful features and excellent board layout but we are a bit surprised GIGABYTE chose to include LPT headers for legacy printers but not onboard power and reset switches for overclockers.
Click a picture to see a larger view
 |
 |
 |
| CPU area nice and clear | Wanted: More space | 2, 4, 6, 8 SATA ports |
REAR I/O
With plenty of connectors to be found on the rear I/O, it would be hard to fault GIGABYTE here. Yet there is one glaring omission from a board that is to be there high-end offering; eSATA. With external drives becoming more prolific I was surprised not to see native eSATA on the rear I/O. GIGABYTE includes some eSATA expansion slots but these eat into the slots of your case and require you to route the cables neatly. Not the most ideal situation.
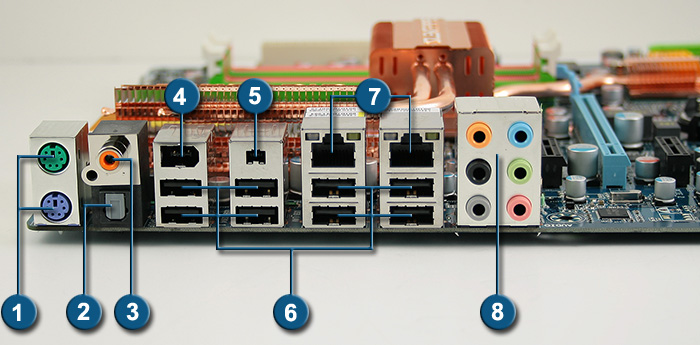
| Rear I/O | |||
| 1. | PS/2 Connection: Keyboard = Purple Mouse = Green |
5. | Mini IEEE 1394a port |
| 2. | Optical Audio out port | 6. | Eight USB 2.0 ports |
| 3. | Coaxial Audio out port | 7. | Two Ethernet ports |
| 4. | IEEE 1394a port | 8. | Analog Audio out ports |
BIOS
Ordinarily, I go through the various pages of the BIOS and briefly explain what each section is for to help you better understand your motherboard’s capabilities. Today, I am going to focus on a couple specific pages and you’ll see why in just a bit.
The main page of the AWARD BIOS is your basic page with sub-groups for the various functions of the board. The ‘MB Intelligent Tweaker (M.I.T.)’ is where the overclocking takes place and we will get to that in just a second.
The second image below shows the ‘Advanced BIOS Features’ page. Some of the features of this page may seem more at home in the overclocking section. I pointed them out to you here so you can know where to find them if you need to disable them. The features I am referring to are the C1E, TM2 and EIST functions. These features relate to the behaviour of the CPU when idle or running hot.
The final image shows us the ‘PC Health Status’ page. This is where you can find out the voltages being fed to the different components as well as the temperature of your system and CPU. Pretty basic stuff but very useful for setting safeguards should a fan on your CPU heat sink stop working.
Click a picture to see a larger view
 |
 |
 |
| Main Page |
The first thing I would like you to take note of below is how you set your multiplier if you have a CPU that can do half numbers. Some BIOS’ will allow you to just enter a number such a 9.5, 8.5, etc. With this BIOS it takes two steps. First select your integer value such as 9 or 8 and then turn on the “Fine CPU Clock Ratio” to enable the half step. It is not a huge deal but one worth noting.
Click a picture to see a larger view
 |
 |
 |
| Overclocking goodness | Voltage adjustment |
The final image shows the voltage adjustment portion. If you look two spaces up from the last entry you’ll find an adjustment labeled “Loadline Calibration”. This does the same thing as its setting on ASUS motherboards. It removes VDROOP. While this may seem like a positive thing it is not. VDROOP is a safety mechanism based on electrical principles.
When a CPU is under load and pulls a lot of voltage you’ll notice through applications like CPUz that the voltage will drop (VDROOP). This is because when the load is removed from the CPU there is a momentary lapse in voltage control and without VDROOP the voltage, like a rubber band, would snap back so fast and hard it could overload your CPU resulting in serious damage. The VDROOP causes the voltage “rebound” to remain within acceptable ranges keeping your CPU happy and safe.
People began to notice that when they modded their motherboards to remove VDROOP they could overclock their CPU using less voltage. This led to the false belief that they were doing something positive. Less voltage is good, right? This is where the idea of Loadline Calibration started. The problem is that while you may get somewhat better overclocking performance, your PC will begin to crash at idle.
Other than that, GIGABYTE makes sure to give you enough voltage to destroy your expensive toys ten times over. For the record, you are given up to 3.05v to kill your expensive DDR3, 2.35v to obliterate your new 45nm CPU and 2.25v to melt your North Bridge into a smoldering pile of goo.
TEST SETUP
All tests were conducted on the following platforms. A format of the hard drives followed by a fresh install of the OS was done. The latest drivers were then installed and all non-essential applications were halted.
| Test Platform | |
| Processor | Intel Core 2 Duo QX9650 @ 3.0 GHz |
| Motherboard | Board 1 – GIGABYTE GA-X48T-DQ6 Board 2 – XFX 790i Ultra Board 3 – Foxconn X38A Digital Life |
| Memory | 2 GB (2 x 1 GB) Aeneon DDR3-1333 |
| Drive(s) | 1 – Seagate 80GB Barracuda SATA 1 – Samsung HD501LJ SATA |
| Graphics | ASUS 8800GT |
| Sound | On board |
| Cooling | Noctua NH-U12P |
| Power Supply | OCZ GameXStream 850 watts |
| Display | Westinghouse 37″ LVM-37W3 |
| Case | No case |
| OS | Windows XP Pro SP2 |
| Synthetic Benchmarks | |
| SiSoft XI | CPU, Mem Bandwidth |
| HDTach | Single SATA Avg. Read, Burst |
| Everest Ultimate 4.0 | Mem Read, Write, Copy, Latency |
| SuperPi Mod 1.5xs | 1M, 2M |
| Games | |
| F.E.A.R. v1.08 | 640×480 0xAA/AF Highest in game settings, Soft Shadows off |
| Company of Heroes v1.71 | 800×600 0xAA/AF Highest in game settings |
| World in Conflict | 800×600 0xAA/AF Highest in game settings, High Quality |
OVERCLOCKING
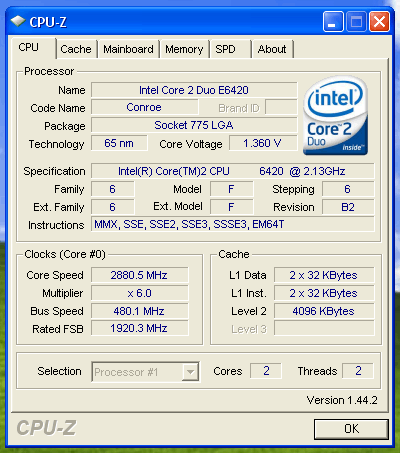
Working with a e6420 that has shown to hit 470 on the FSB, I was pleased to see it go even higher in this case. Without a doubt I know this board can go higher and it was our CPU sample holding us back.
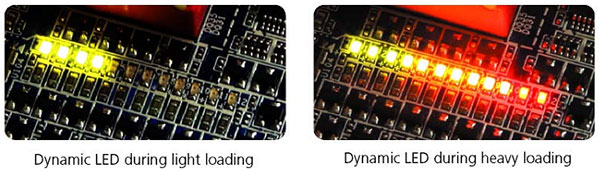
DES – Dynamic Energy Saver
Besides having the newest chipset from Intel powering this board, GIGABYTE’s claim to fame is their power management system dubbed Dynamic Energy Saver or DES. I will save you the time if you have already read our very detailed explanation of DES. For those of you who would like to find out more, please see our article HERE.

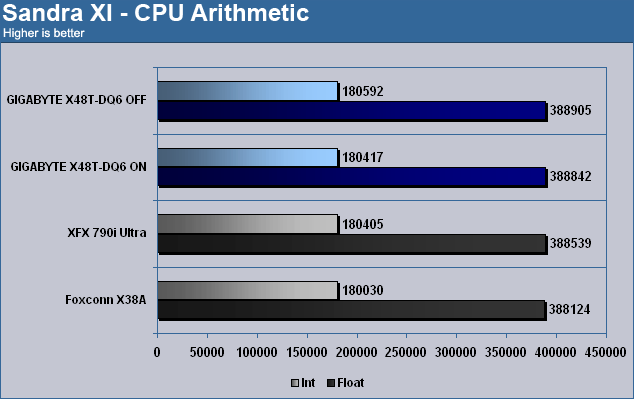
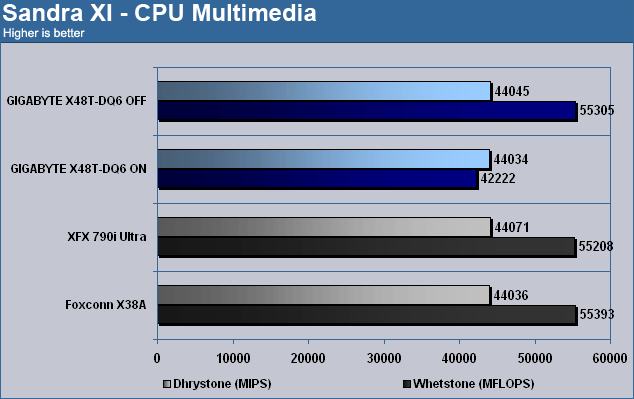
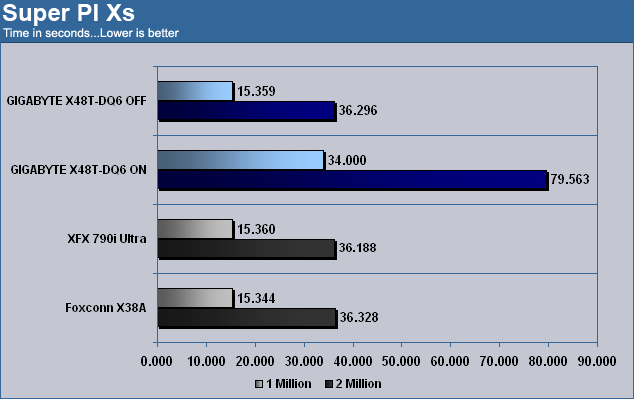
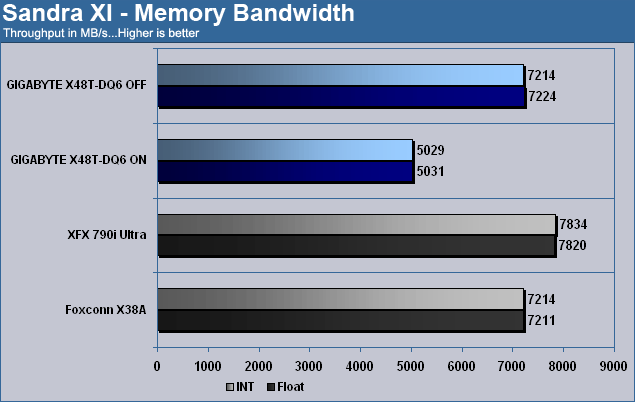
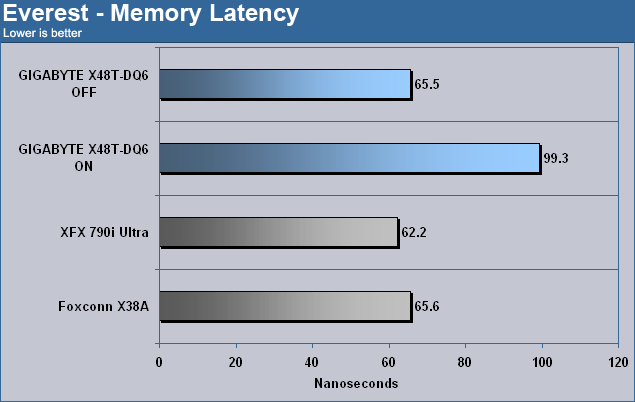
TEST RESULTS: CPU
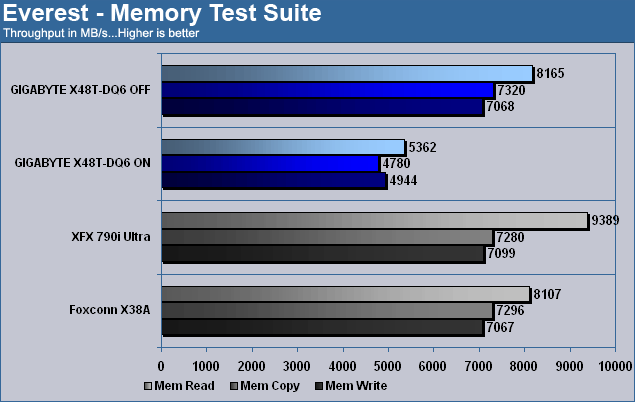
TEST RESULTS: RAM
TEST RESULTS: GPU
We have just seen the impact on CPU and memory performance DES has when enabled. But what about video games? Will the same trend continue or does the GPU need little input from that pesky processor?
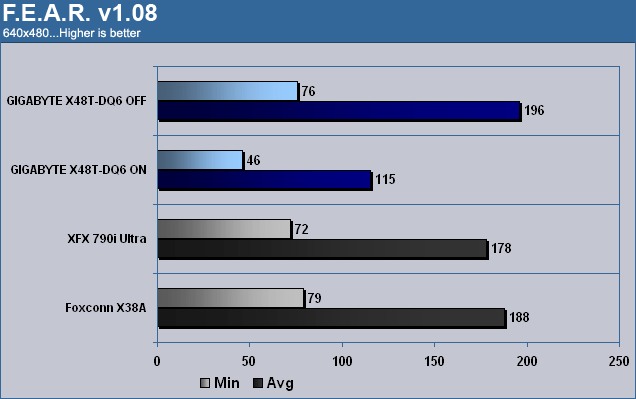
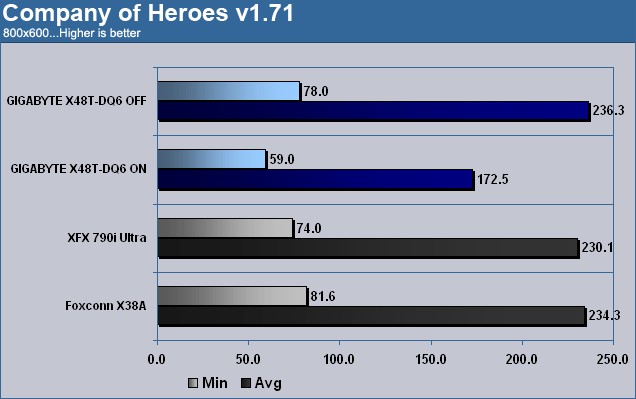
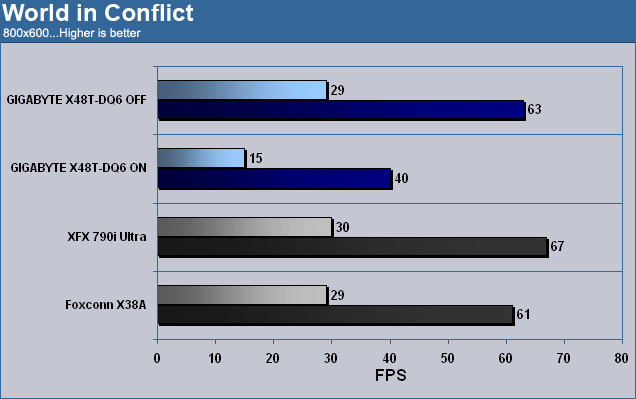
On the surface it would seem that using DES is going to hurt your gaming performance but these tests don’t tell the whole story. At the resolutions tested we are severely limited by our CPU and thus any reduction in CPU performance will be painfully obvious. So I ran all the tests again but with one major difference.
I used settings that a gamer would actually play with. That is a higher resolution and with image quality settings turned on. For reference we used 4xAA and 16xAF.
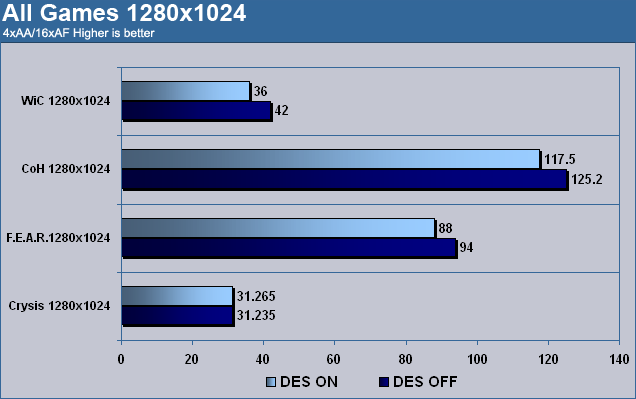
That’s more like it. We see a much smaller delta between the on and off setting for DES because now the video card is doing most of the work and the CPU can relax. This means that if you play with even moderate settings on your favorite video game you can enable DES and when the gaming stops the energy savings will continue and you won’t be watching a slide show.
TEST RESULTS: POWER
Here it is. The bread and butter of the DES system. What good would this review be if we didn’t take the time to explore just how big an impact DES has on our system. To really get a deep understanding of the impact we tested our system in multiple ways. The results are of the system only and do not include the monitor.
Idle mode – No programs running for a minimum of ten minutes.
CPU load – Prime95 run across all four cores of the CPU. No GPU activity.
GPU load – ATiTool 3D view enabled to load up the GPU. (Requires some CPU activity)
Max load – Prime95 and ATiTool 3D view run at the same time.
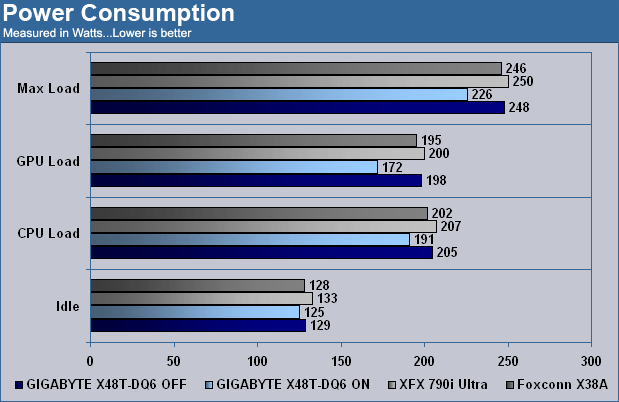
First and foremost, even with DES turned off the X48-DQ6 comes in a couple watts lower than the competition which is nice to see. With DES turned on it is no question who the winner here is. With a reduction between fourteen and twenty-six watts, depending on your usage, the DES really shines. What is even more promising is GIGABYTE’s commitment to this technology. DES won’t be a feature on some boards, it will be feature on all boards. Well done GIGABYTE, well done.
CONCLUSION
Let me start off by speaking about the DES system and its implementation. I really like the savings that can be had here and while they may not afford you a new car, they are substantial. If more people were to use the system it could have a huge positive impact on the environment. Any of you who may be concerned that it would affect your gaming performance can also breath a sigh of relief. You need only worry if you game at very low resolutions with no image quality enhancements. Even at a relatively low resolution of 1280×1024 we were able to show how enabling DES has very little effect on your gaming performance.
DES aside, the board itself is another example of GIGABYTE’s commitment to quality. With an excellent layout and lots of performance, there is a lot to love about this board. But there are some minor drawbacks. GIGABYTE gives the overclocking community plenty of voltage control but fails to include on board power and reset switches. Not a deal breaker but certainly something that should have been included. Also, there is no native eSATA. Yes, GIGABYTE gives you two add-ons to install eSATA but these require routing cables and takes up space from using expansion cards.
FINAL WORDS
Performance: 9.0/10 – The performance of this board is right where it should be. Overclockability is solid and with the inclusion of DDR3 there is little worry of this board bottlenecking you when you least expect it.
Bundle: 8.0/10 – GIGABYTE always makes sure their DQ6 line of boards comes packed to the brim with accessories. The X48T is no different. User manual, driver CD, case badges, and eSATA connectors and cables. So why did I give the X48T an 8.0 and not something higher? Simple math. Eight SATA ports > four SATA cables.
Value: 7.0/10 – Different people judge value differently. With that said, I think there are some key components missing from this board the diminish its value. The abscence of native eSATA and on board power and reset switches are the two that come to mind. With a price of over $300.00 USD you should expect to have these components included. Thankfully, it would seem GIGABYTE will be adding these features to future revisions.
Pros:
+ Energy efficient
+ Quality components
+ Solid Performance
+ Excellent layout
Cons:
– Expensive
– No integrated eSATA / power buttons
Final score: The GIGABYTE GA-X48T-DQ6 motherboard scores a 8.0 (very good) out of 10 and receives the Bjorn3D seal of approval