The Mini P180 is the latest in Antec’s “Performance One” line of enclosures and is designed for gamers on the go. Does this advanced super mid tower have what it takes to compete or does it come up short? Read on to find out.
INTRODUCTION
Over the years, there have been many improvements in computer case design and construction, and today’s examples are a nice departure from the vanilla rattle boxes of days gone by. Increased cooling capabilities, quieter operation, and style are just a few of the advances – and with these often come increased size and weight. Recognizing that many PC enthusiasts actually like to be able to move their systems, Antec has come up with a smaller, more portable case with this in mind. Enter the Mini P180 Advanced Super Mini Tower – the newest member of the Antec Performance One series of cases.
According to Antec’s Web site, “the Performance One series of cases is functional, efficient and silent. The pinnacle of performance and style, these cases feature the latest in Quiet Computing™ and innovative features to enable the ultimate computing experience. In the case (no pun intended) of the Mini P180, smaller size and portability are additional factors Antec took into consideration when designing this enclosure, but how does it measure up? I’ll attempt to answer that question here. Let’s get started:

Antec: The Company
![]()
Antec, Inc., is the leading global brand of high-performance computer components and accessories for the gaming, PC upgrade and Do-It-Yourself (DIY) markets. Founded in 1986, Antec is recognized as a pioneer in these industries and has maintained its position as a worldwide market leader and international provider of efficient, quiet, and reliable products. Antec has also achieved great success in the distribution channel, meeting the demands of quality-conscious system builders, VARs and integrators. Antec’s offering of enclosures includes a large range of cases, such as its technically advanced Performance One Series, cost-effective New Solution Series and server grade cases designed for the needs of all workstation and server markets. Antec’s products also include front line power supplies such as its TruePower Trio series, Quattro series, and EarthWatts, the most environmentally friendly power supplies available. PC gamers are an increasingly significant consumer of performance components, and many Antec products are geared toward the gaming demographic, like the Nine Hundred, the premier gamer enclosure. Antec also offers a computing accessories line comprised of many original products, including its patented LED Fans and Notebook Cooling solutions.Antec is headquartered in Fremont California with additional offices in Rotterdam, The Netherlands. The company’s products are sold in more than 30 countries throughout the world.
FEATURES AND SPECIFICATIONS
From the outside, the Mini P180 naturally resembles the P180 in many ways with the exception of size. The P180 is classified as a mid tower, so it only makes sense that the Mini version is described as a Mini Tower. Here are the full specifications:
| Case Type | MiniTower |
| Dimensions |
• 17.1″(H) x 8.3″(W) x 17.2″(D)
• 43.5cm(H) x 21.2cm(W) x 43.6cm(D) |
|
Weight
|
• Net: 20.9 lbs / 9.5 kg
• Gross: 24.4 lbs / 11.1 kg |
|
Material
|
0.8mm cold rolled steel throughout the majority of chassis.
Three-layer side panel – aluminum, plastic, aluminum for noise reduction.
|
|
Motherboard Compatibility
|
microATX
|
|
Drive Bays
|
• 8 Total Drive Bays
• External 3 x 5.25”; 1 x 3.5”
• Internal 5 x 3.5” for HDD |
|
Front Panel
|
• 2 x USB 2.0
• 1 x eSATA • Audio In and Out (AC’ 97 and HDA) |
|
Cooling System
|
• 1 rear (standard) 120mm x 25mm TriCool Fan
• 1 top (standard) 200mm x 25mm TriCool fan • 2 front chamber (optional) 120mm Fan • Exterior speed control |
|
Power Supply
|
Not Included
|
|
Expansion Slots
|
4 (standard for microATX)
|
|
Other
|
• Configurable to accommodate full length graphic cards
• Black interior • Cable organization system • Double hinge door designed to open up to 270º |
Main features include:
- Power supply resides in a separate lower chamber to isolate it from the rest of the system, resulting in lower heat and system noise.
- Cable organization system under right side panel enables better airflow and less internal clutter.
- Three-layer side panel construction (aluminum, plastic, aluminum) and silicone grommets designed to reduce system noise.
- 200mm top case fan combined with 120mm rear fan (and 2 optional front chamber fans) provide for excellent air cooling.
- Double hinged door allows front case door to open up all the way and lay flush against left side panel.
PACKAGING
I have to admit, I absolutely hate sending back products. I love to shop online to get the best prices, and I’m willing to wait a little extra time for my purchase to show up on the doorstep, but I always worry that something might get damaged in transit and then I’ll have to send it back. No need to worry about that with the beefy box in which the Antec Mini P180 was shipped. It’s made of thick cardboard and is held together by heavy staples along one seam, much like boxes used for major appliances.
Looking at the photos here, you might think for a moment that I posted black and white images. However, if you look closely, you’ll notice small areas of color such as yellow, red and small amounts of blue. Essentially though, the box is nearly monochromatic much like the Mini P180 case itself.
In addition to being well made, the carton is informative and provides good images of the case inside. The back of the box provides a nice view of the Mini P180’s interior complete with a full list of specifications in three languages (English, French, and Spanish).


Upon opening the carton, I was pleased to see the Mini P180 nested snuggly in the middle of the box with thick foam padding on each end. What immediately struck me was that Antec had basically packed this unit like one would pack a hard drive or a laptop – firmly packed with shock-resistant foam and no part of the unit actually coming in contact with the box. Note the gaps on each side of the Mini P180. It would take a lot of effort to damage the box enough to cause any harm to the unit inside. You can see from the second picture here just how well the foam supports the case.


As you might have guessed, when I freed the Mini P180 from its packing, the case was completely free of damage. This brings me to another point on the way Antec prepared it for shipping. The Mini P180 is wrapped in soft plastic, covering the shiny and silky smooth front and side panels. Again, this reminded me of the way delicate electronics are supposed to be packaged, taking complete care to make sure it arrives without a single scratch. I was impressed that a company would put this much effort into protecting a case. It made me feel like the contents must be really special to warrant this kind of attention. As it turns out, this was exactly the case (pun intended).

CONTENTS
Before I get too far ahead of myself, let’s briefly go over the contents. Open up the Mini P180 and you’ll find a small accessory box inside containing the following:
- Bag of screws, motherboard standoffs, and spare rubber grommets
- 5.25″ to 3.5″ drive bay adapter and front plate
- Drive mounting rails
- Cable ties
- User’s Manual/Installation Guide
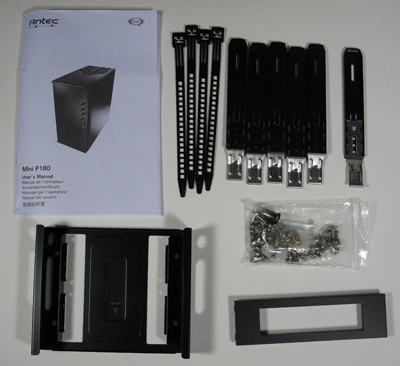
Not a lot of extras, but fairly typical of what you might expect. Overall it’s more than adequate for setting up a new system. The cable ties were made of plastic and a little disappointing, but then again, they’re just cable ties. I guess I’m just partial to the Velcro ties like the ones packaged with the Tagan power supply I installed.
EXTERNAL VIEW
Before I go on to talk about the exterior of the case, I have to admit that at first I had a difficult time trying to figure out the color of the Antec Mini P180. I’ve seen it described as “black”, but that’s not quite right. Yes, a lot of the case actually is black (including the interior), but the front and side panels are more of a dark gunmetal gray and have almost a stainless steel look about them. Take a look at the close-up shot of the front door panel to get a better idea of what I’m talking about:

The edges and the cutouts on the right are definitely black; however, the main panel has something of a brushed look to it, similar to what you see on a stainless steel appliance. The picture makes the panel look a bit lighter than it actually is, but that’s just lighting. The pictures from farther away are slightly better at illustrating the actual color. Overall it’s a great look, but another thing it has in common with stainless steel appliances – fingerprints and smudges show very easily. Now that we have that out of the way, let’s take a closer look.
The Antec Mini P180 case has clean lines and a fresh look to it. As I already mentioned, its black and dark gray/silver/stainless steel-type coloring is very interesting and I like it a lot. This is definitely one of the smoothest cases I’ve seen in a while and it looks very classy. Viewing from the front, we see the two external USB ports, audio and microphone jacks, and one eSATA port that are all accessible even when the front door is closed. The Mini P180 has venting along both sides of the door, which is double-hinged so that it will open up to 270°. This enables it to fold back flush against the side of the case, which I found very appealing. The Mini P180 also has vents cut into the door itself allowing for even better ventilation when closed. To me, these vents give the Mini a slightly more sporty and aggressive look than its big brother.
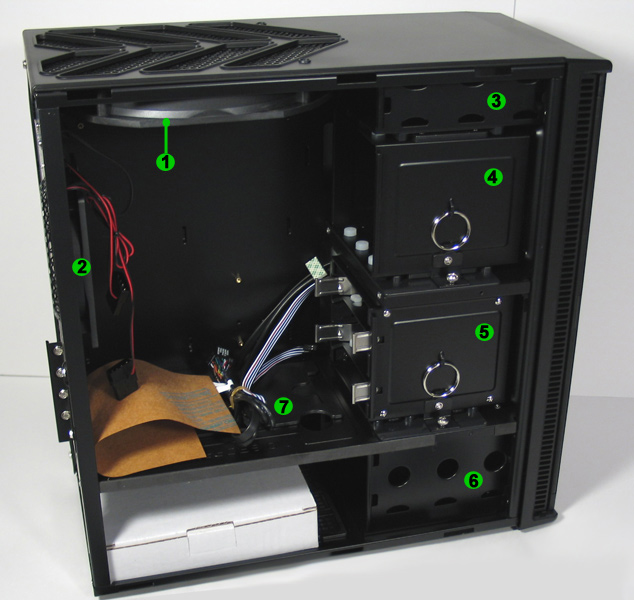
There are also two vents with removable filters built into the front of the case sandwiched between external drive bays (two below, one above.) These sit in front of internal drive bays and will accommodate optional 120mm fans. They open with little effort for easy access to the filters for cleaning and replacement. And speaking of vents – notice the large openings on the top of the case. Beneath these sits a big but quiet 200mm TriCool fan with an external controller switch on the back of the case. I like the sporty shape of the grill and that fact that it has a flat profile keeping it flush with the top of the case.


From the back, we can see clearly see the open space for the power supply at the bottom of the case. In the photo this space is currently occupied by the small box containing the screws, drive rails, etc. mentioned in the “contents” section. There’s plenty of room for even the largest of power supplies, as you’ll see in later pictures showing one actually installed. You’ll also notice Antec uses the dual chamber design in this case which isolates the power supply from the rest of the components.


Also visible on the back of the case are the four open expansion slots with locking bracket and vent. A standard I/O plate is preinstalled, but I used the one that came with the motherboard I installed – the XFX nForce 630i with integrated GeForce 7150 graphics (also reviewed here on Bjorn3d.com). Fairly standard fare these days, the 120mm rear case fan is also visible and is very well placed to work in conjunction with the 200mm fan on top. Located near the top of the case are two controller switches providing low, medium and high speed settings for the top and rear fans.
On the bottom of the case, we see four thick silicone feet to help with noise dampening. These are fairly thick and do a nice job of keeping the unit stable. Also visible is another vent covered by a removable filter. That blue color peeking through the vent is the power supply. This last picture is an inside view of one of the side panels to illustrate the construction (aluminum, plastic, aluminum), which again helps to reduce noise and vibration.


INTERNAL VIEW AND INSTALLATION
The first thing you’ll notice when looking inside of the Mini P180 is the black interior. It’s a nice touch and seems to show how much care Antec took in finishing out this case. There’s plenty of space for a microATX motherboard, and with the dual chamber design, the power supply sits at the bottom in a completely separate compartment. The theory behind this is that the heat of the power supply is isolated and vented separately, keeping additional heat away from the motherboard and other key components. I should also mention that there are four rubber pads inside the bottom of the lower chamber. When mounted in place, the power supply rests on these, providing yet another buffer against noise from vibration. Overall, I do like this concept and found it worked well.
Quick reference guide:
Now let’s take a closer look at a few key features starting with the removable HDD cages. One is designed for mounting up to two hard drives in a typical horizontal position, while the other will accommodate up to three drives mounted vertically. Each has a set of silicone grommets used for mounting the drives, providing noise and vibration dampening. One of the cages even has a small compartment built onto the side allowing for easy storage of spare grommets, screws, or whatever you might want to put in there.


INSTALLATION CONTINUED
Mounting a hard drive in one of the cages is very simple. In this example, I chose to use the one with horizontal trays. Just squeeze the metal clips on each side of the tray and pull it out. Put the drive into the tray, insert the special screws (included) through the silicone grommets and tighten just enough to give it a snug fit. Slide the tray back into the cage, then slide the cage back into the case. That’s it!


Installing the motherboard was simple and straight forward. The case comes with brass standoffs already in place for a typical microATX setup, and there are plenty of extras in case you need them. I started by pulling out both removable hard drive cages to give myself plenty of room to move around. As it turns out, the XFX nForce 630i with integrated GeForce 7150 graphics aligned perfectly with the standoffs so I didn’t need to add or remove any.
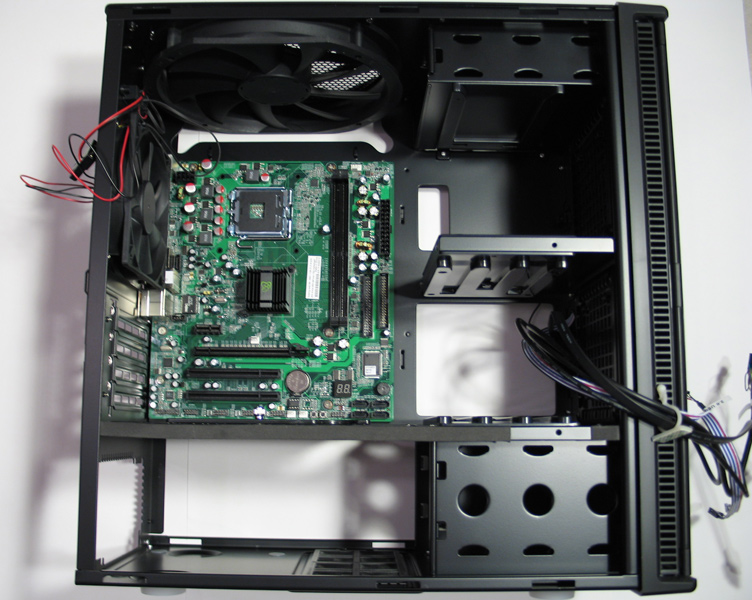
As I mentioned earlier and as you can see in the picture above, the Mini P180 has a dual chamber design which isolates the power supply in the lower section of the case. To allow cables to pass between the chambers, Antec devised a clever little sliding door with a locking screw to keep it in position. In these pictures, you can see the door in the open and then the closed position. It’s made of thick plastic so it slides nicely without scratching up the interior.


Installing the power supply was pretty standard. I intentionally used a large, non-modular PSU (Tagan ITZ1300)to test out the cable management system, which is exposed by removing the side panel. Once the side panel is back in place, the majority of the power supply cables are hidden. This is a great feature and provides for less clutter, better airflow and cooler temperatures inside the case. I wasn’t crazy about the plastic ties Antec included to secure the cables, but they worked just fine. I personally would have preferred Velcro ties like those included with the Tagan power supply, and you’ll notice I had to use one of these anyway since I ran out of the plastic ties.


Below you can see the final stages of the build. I intentionally left the CPU and fan/heatsink out in the first picture to provide a good view of the interior. (And yes, I realize I didn’t put the support bracket on for the heatsink I used, but I did install it later). Things are a little tight, but really not too bad. Since I used a motherboard with onboard video, I didn’t have to worry about a video card but this is something to keep in mind during assembly. The lower HDD cage has to be removed to accommodate a full-length video card, so you need to plan for this in advance and mount the hard drive(s) appropriately. In the second picture, you can see a closer view of the final assembly with everything in place. I did have a few challenges making sure the cables didn’t slip into either fan, and you can see how close the rear of the optical drive in the upper bay comes to hitting the big 200mm fan on top. But overall, everything fit very well and still allowed for excellent ventilation and air cooling.


CONCLUSION
The Mini P180 is a welcome addition to Antec’s Performance One line of enclosures and stands up well against its larger siblings. It’s a sleek and stylish case with a lot of features packed into it. Although the idea of a case aimed at gamers that only accommodates a microATX motherboard was somewhat lost on me at first, I can certainly see the possibilities now. This is a well designed case and it’s refreshing to see one built so well in a smaller size (understanding that “small” is a relative term and this case isn’t exactly tiny!). As Antec says, “Good things come in small packages” and this certainly applies to the Mini P180.
Final Score: 8.5 out of 10 and the Bjorn3d.com Seal of Approval


