With the nForce6 NVIDIA went all out and released the chipset first for the Intel platform. After the less than stellar nForce590 for Intel a lot of people, including me, were a bit cautious and didnt know what to expect. Has NVIDIA learned their lesson and delivered an Intel experience as solid as we used to expect from their AMD chipsets?
INTRODUCTION
NVIDIA used to be the kings of motherboard chipsets for the AMD platform. While they did release some chipsets for the Intel platform their true focus lay on creating the best possible chipsets for the AMD CPU’s. That is until two things happened. Number one is of course the success of the Core 2 Duo from Intel. Unless you are a real Intel fanboy there is no denying that AMD used to have the CPU’s that gave the most bang for the buck for a long time. This however changed with the Core 2 Duo. Suddenly enthusiasts where starting to flock over to the Intel camp buying all sorts of Intel i965 and i975 motherboards. Naturally NVIDIA wants a piece of that cake to. The second reason is of course the fact that AMD went and bought ATI. It wouldn’t take a rocket scientist to figure out that NVIDIA not necessarily would like to indirectly only support their only real competitor in the video card market.
So with the nForce6 NVIDIA went all out and released the chipset first for the Intel platform. After the less than stellar nForce590 for Intel a lot of people, including me, were a bit cautious and didn’t know what to expect. Has NVIDIA learned their lesson and delivered an Intel experience as solid as we used to expect from their AMD chipsets? Read on to find out when we test the EVGA 680i SLI.

ABOUT EVGA
I have been trying to find some more information about the company EVGA. Unfortunately they do not have any information on their site. There are pressreleases dating back to 2003 suggesting they have been around at least that long. They have always only done NVIDIA based products, both video cards and motherboards. The 680i SLi motherboard is actually “designed by NVIDIA” motherboard which NVIDIA have designed and built and then sold to eVGA so they can market it as their own.
FEATURES AND SPECIFICATIONS
Performance
Based on NVIDIA nForce 680i SLI Chipset chipset
Supports Intel Core 2 Extreme, Intel Core 2 Quad, Intel Core 2 Duo, Pentium EE, and Pentium processors
1066/1333 Mhz Front Side Bus
Memory
4 x 240-pin DIMM sockets
Dual Channel DDR2
Maximum of 8GB of DDR2 533/667/800/1200MHz SLI-Ready memory
Expansion Slot
2 x PCIe x16, 1 x PCIe Graphics expansion slot, 2 x PCIe x1, 2 x PCI
2 x 32-bit PCI, support for PCI 2.1
Storage I/O
1 x UltraDMA133
6 x Serial ATA 300MB/sec with support for RAID 0, RAID1, RAID 0+1
1 x Floppy disk drive connector
Integrated Peripherals
7.1 Channel, Azalia (HDA)
2 x 10/100/1000 LAN via
Multi I/O
1 x PS2 Keyboard
1 x PS2 Mouse
1 x Serial Ports
10 x USB2.0 ports (6 external + 4 internal headers)
Audio connector (Line-in, Line-out, MIC)
Form Factor
ATX Form Factor
Length: 12.0in – 304.8mm
Width: 9.6in – 243.6mm
Key Features
NVIDIA® SLI™ Technology
Dramatically scales performance by allowing two graphics cards to be run in parallel. Only available on select PCI-Express models.NVIDIA Native Gigabit Ethernet
The industry’s fastest Gigabit Ethernet performance, eliminates network bottlenecks and improves overall system efficiency and performance.Third PCI-Express Expansion Slot
Provides future support for 3 GPU applications
Other Features
NVIDIA RAID
NVIDIA RAID technology implements standard RAID 0, RAID 1, and RAID 0+1 techniques to maximize storage assets. NVIDIA RAID technology additionally introduces many innovations that simplify and optimize the management of RAID features and disk resources.NVIDIA StreamThru Data Transport System
NVIDIA’s patent-pending isochronous data transport system, providing uninterrupted data streaming for superior networking and broadband communications. StreamThru assists in making streaming video and audio smoother and jitter-free.Unified Driver Architecture (UDA)
Part of the NVIDIA Forceware unified software environment (USE). The NVIDIA UDA guarantees forward and backward compatibility with software drivers. Simplifies upgrading to a new NVIDIA product because all NVIDIA products work with the same driver software.NVIDIA nTune Performance Application
Enables the easiest, safest, and highest performing overclocking available for NVIDIA nForce-based PCs. Performance wizards allow automatic tuning for the best performance or the quietest operation. Previously known as the NVIDIA System Utility.NVIDIA Firewall Technology
A high-performance, hardware-optimized firewall, NVIDIA Firewall protects your PC from intruders by filtering unauthorized traffic. Integrated into NVIDIA nForce3 and nForce2 MCPs with NVIDIA Gigabit Ethernet, it provides professional-grade traffic inspection capabilities, advanced management features–remote access, configuration, and monitoring–and is easy to use and setup via a user-friendly wizard.NVIDIA nForce Networking
NVIDIA networking delivers the highest throughput for network transfers and lower CPU utilization. The manageable and stable NVIDIA networking solution results in better networking performance and a lower total cost of ownership.
THE BUNDLE
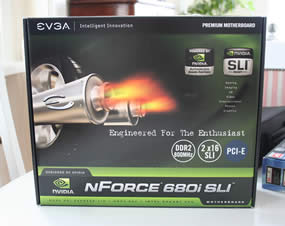
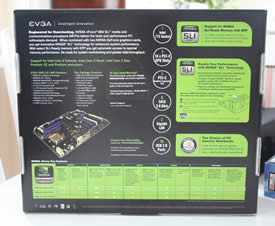
The board comes in a big black cool looking box. Right away it is obvious to whom this motherboard is intended (the enthusiasts). The back is filled with information about the motherboard as well as information about the SLI-capabilities.
Opening up the box you’ll find a whole lot of cables:
- The motherboard
- i/o shield
- Floppy cable
- 3x SATA power cable (2 on each)
- 1394 port for the back panel
- 4-port USB back panel
- 6 SATA cables
- Serial port for back panel
- IDE-ATA 133 HDD cable
- SLI-bridge
- Chipset fan
- Manual plus Quick Install Guide
- CD with drivers
- Floppy with RAID drivers


The bundle. Click on the images for a larger image.
The motherboard comes with all the cables that you need. Other than that the chipset fan is really the only extras you get. There is no extra software or any special hardware like the ones ASUS supply with their high-end motherboards (microphone, WIFI, Remote etc.). The manual is actually very good with lots of pictures and pretty comprehensive information, even for the bios. The Quick Install Guide is decent although I would like to have colour pictures instead as it can be a bit tricky to distinguish dark-grey items from a black background.
LAYOUT
At first sight the layout of the motherboard is similar to what we gotten used to. The CPU sits to the right of the motherboard and the memory slots below. There are some differences though compared to the “usual” layout.
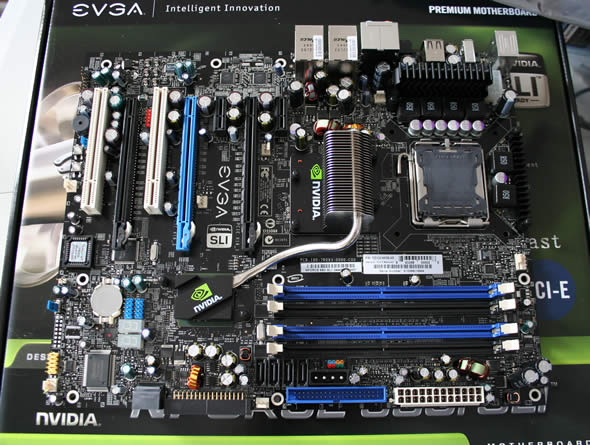
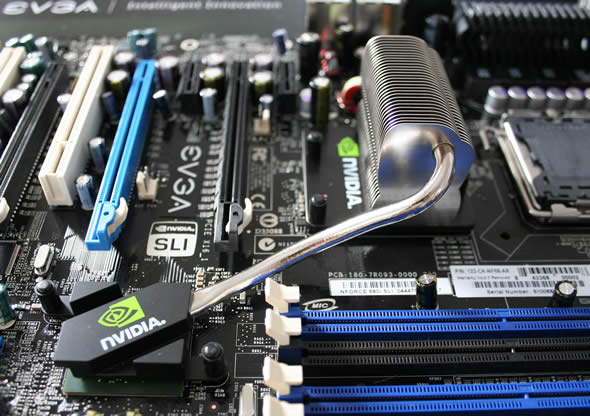
First of all the motherboard has three PCI-E slots. Two of those are running at 16x speed and are used for SLI. The third can be used for a Physics card or for a third video card running at 8x speed. The prospect of adding a third card to either have access to 6(!) monitors or SLI + a second monitor is quite intriguing. SLI + a secondary monitor support is supposed to come soon in a driver update.
You find 6 SATA ports on the motherboard. 4 sit just below of the memory slots placing them out of the way of a long video card and two sit at a 90 degree angle at the bottom edge of the motherboard. Oddly enough there are no rear e-SATA ports in the back panel.
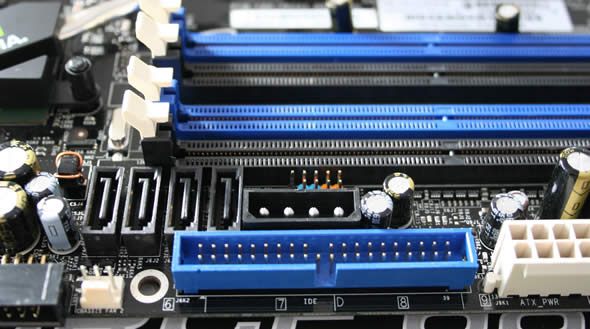
Usually the frontpanel pins on the motherboard for hooking it up to the case are situated at the far left bottom of the motherboard. This time however it has been placed below the memory slots, just above IDE-connector and the Molex connector for extra power for the GPU’s. I personally do not like the placement. It is far to close to where the floppy and the 5 ¼” units are situated and if the case is a bit smaller then it becomes a chore to get the fingers in to hook it up.
You get a small LED panel on the motherboard which displays codes that can be used for troubleshooting in case of an error.
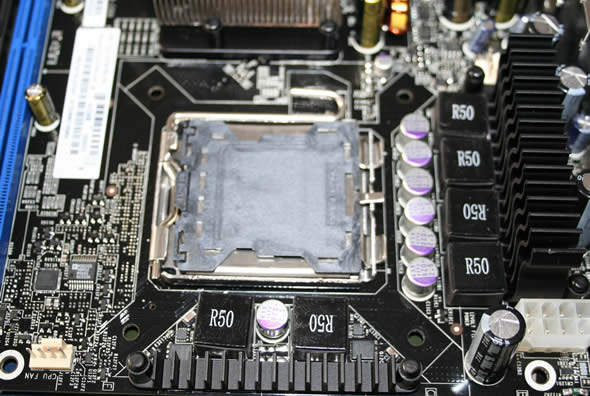
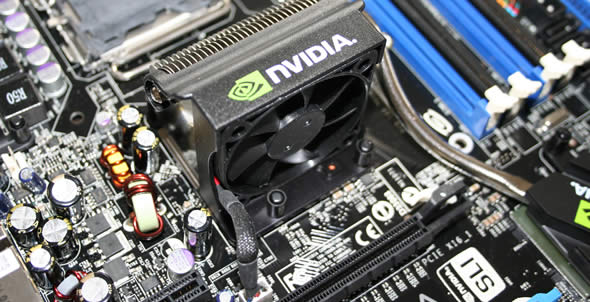
There is plenty of space around the CPU. Above it there is a heatsink which helps cool the MOSFET’s. The northbridge and southbridge chipsets are both cooled passively.
The heat goes from the southbridge and dissipates at the northbridge through the fins. If you plan on overclocking or use a fanless cooling on the CPU you might have to add some active cooling on the northbridge to help dissipate the heat. EVGA includes a fan that can be clipped onto the fins on the northbridge for this purpose. EVGA does not include a fan for the Southbridge but you can buy one from their website. This is only needed if you intend on liquid cooling of the Northbridge.
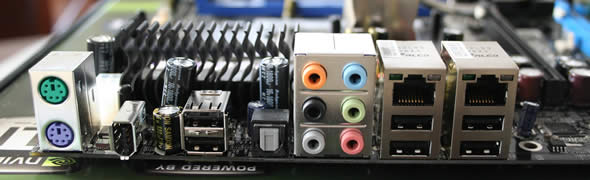
The backpanel has all the usual connectors except the e-SATA connector you see on many motherboards these days. You have the PS/2 ports, a Firewire port, 6 USB-ports, SPDIF output, 7.1 channel audio and two Gigabit LAN-ports.
INSTALLATION
Installing this motherboard was overall quite easy. It is a pretty big motherboard so it takes a bit of skill to put it into a smaller case. As mentioned previously I didn’t like the placement of the frontpanel pins since it was quite hard to reach them after the motherboard was installed. I did like the fact that EVGA put a button for on/off and reset directly on the motherboard. I guess this is a feature mostly used by reviewers but if you are an serious enthusiast and want to first test everything outside the case it is an invaluable help when building your system.
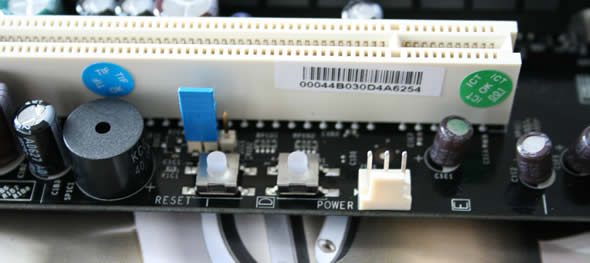
Now all we need is a “clear CMOS” button
My biggest problem actually came from something completely different: the numbering of the SATA-ports. According to the writing on the motherboard the four SATA-ports that sits below the memory slot are 1-4 while the two sitting at the edge are 5 and 6. That is pretty straightforward. In my test-system I have a total of 4 Seagate 320 MB drives. Two are run separately and the other two are set up for RAID. To make sure I do not mix them up I have marked each SATA cable with a number so I always hook them up in the same way regardless which motherboard I use. This is especially important when setting up RAID since all four drives are named the same in the bios and it is impossible to distinguish them there.
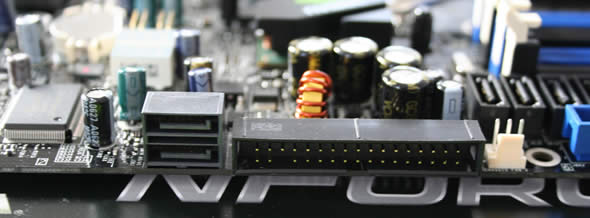
Unfortunately something is wrong in the eVGA bios. SATA port 1 on the motherboard is not SATA port 1 in the bios. In fact, I think I figured out that SATA 1-2 on the motherboard is 5-6 in the bios, 3-4 on the motherboard is 1-2 in the bios and 5-6 on the motherboard is 3-4 in the bios. Confusing? Yeah, definitely. Even after I updated to the latest bios the error still prevailed. What I did like though was the included SATA-cables. They have a nice little mechanism which helps prevent them from getting unseated by accident.
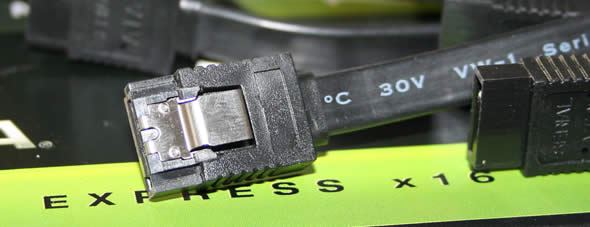
An excellent mechanism on the SATA-cables that prevents
them to get unseated by accident
I also had some issues with the board not setting the right speed of my E6400 CPU. Instead of setting it at 266×8 it had set it to 266×6 resulting in worse performance than expected. This seems to have been fixed though with a later bios. Last but not least the board failed ro recognize my Corsair SLI-memory as SLI-memory. It is no big deal since I prefer to overclock it manually anyway but still not good.
As mentioned on the page before the South- and Northbridge are cooled passively. This however works the best when the system is running at stock speeds and have a CPU with a fan on it. When I started to overclock I noticed that the temperature on the MCP got quite high.
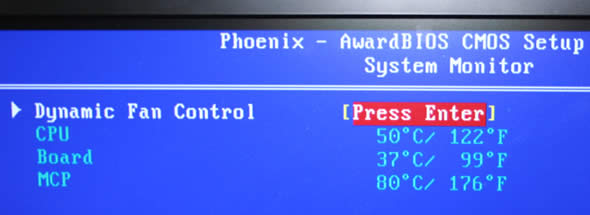
While I am sure it can survive the high temperatures it does not feel like an ideal situation for a stable system. I therefore put on the fan onto the fins that sit on the Northbridge.
The fan actually is not especially loud and I did not notice it over the noise of other fans in the system.
The fan managed to bring down the temperature considerably. Remember that this was measured after I had done some serious overclocking of the system.
THE BIOS
The bios of the eVGA 680i has been updated several times to fix bugs and instabilities. I suggest you update as soon as you get the motherboard since earlier versions of the bios were quite bad. At the time of testing I ran the P26 bios which was released March 14 2007. One interesting update in the latest bios was the decision to remove the NVIDIA linkboost feature which is supposed to automatically overclock the PCI-E bus slightly when using some NVIDIA videocards. Since the bios comes from NVIDIA directly it means NVIDIA are actually removing one of their own features.
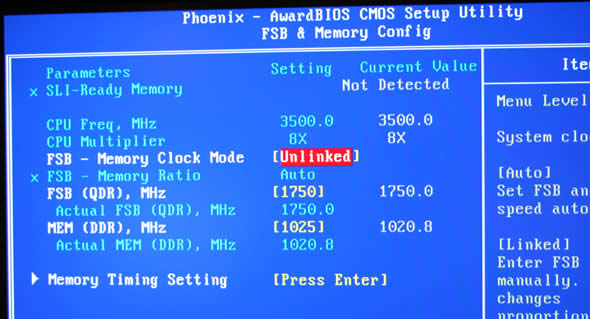
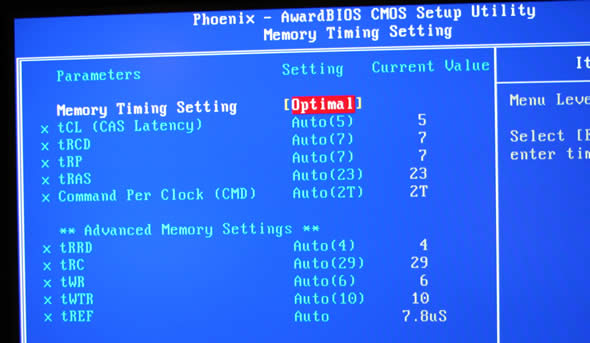
The bios is otherwise full of features for the enthusiast. I personally like the ability to unlink the memory speed from the FSB. But there is a lot more in there for the avid overclocker. Even more important is the fact that the bios is very well laid out. On many other motherboards you might have to go to several pages just to change different voltages. Here everything is grouped so you won’t have to hunt for the right page.
If you like nTunes you will be happy to hear that the eVGA 680i lets you change tons of bios settings directly from inside Windows. I must admit I rather muck about in the bios than make changes inside Windows but it is there if you want it.
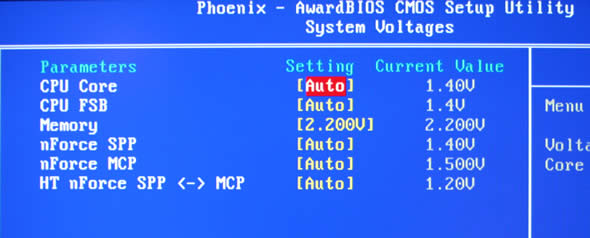
Before we take a look at some bios screenshots lets see what the motherboard does offer in terms of voltage settings:
- The CPU voltage can be adjusted in 0.025V increments. The exact range is determined by the CPU.
- The DIMM voltage can be adjusted between 1.825V to 2.5V in 0.025V increments.
- HyperTransport CP to nForce SPP voltage can be adjusted between 1.225V and 1.4V in 0.025V increments.
- HyperTransport nForce SPP to MCP coltage can be adjusted between 1.325V and 1.55V in 0.025V increments.
- nForce SPP voltage can be adjusted between 1.25V and 1.55V in 0.05V increments.
- nForce MCP voltage can be adjusted between 1.525V and 1.75V in 0.025V increments.
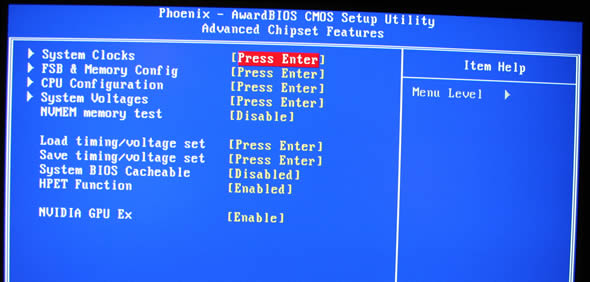
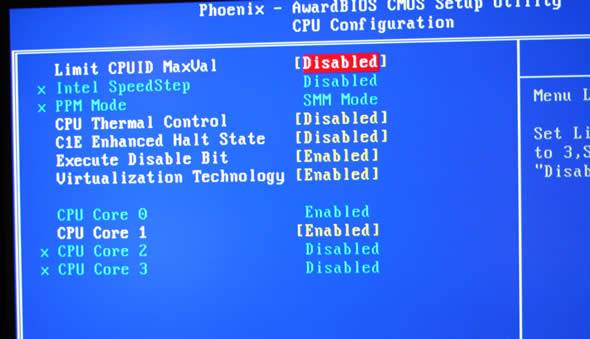
The interesting stuff can be found under the “Advanced Chipset Features” menu.

TESTING – THE SYSTEM AND THE APPLICATIONS
The following system was used to test the motherboard. The only results taken from the ASUS P5N32-SLI are the harddrive results as I wanted to compare the SATA and RAID performance between the two chipsets.
| Review System | |
| CPU | Intel Core 2 Duo [email protected] |
|
Motherboards
|
EVGA 680i SLI (nForce 680i) ASUS P5B-E (P965) ASUS P5N32-SLI (nForce 590) |
|
Memory
|
Corsair XMS2 Xtreme 2048MB DDR2 XMS-1066 |
|
HDD
|
1×80 GB EIDE, 4×320 GB SATA |
|
Video cards
|
ASUS 8800GTX AquaTank |
|
Software |
Windows XP Pro with SP2 Forceware 97.92 (GFX) Forceware 9.53 (mainboard) |
The following software was used for the testing:
| Software | |
| PCMark05 | Default, CPU, Mem, GFX, HDD |
|
SiSoft Sandra XI
|
CPU, Mem BW |
|
HD Tach RW
|
Single SATA, RAID SATA |
|
Passmark
|
Network performance |
TESTING – CPU AND MEMORY PERFORMANCE
To test the perfomrance of the CPU and the memory we have choose to use PCMark05 and SiSoft Sandra XI.

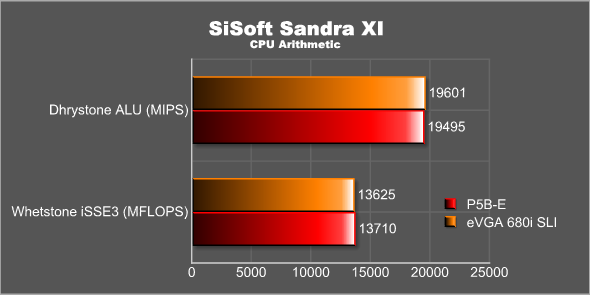
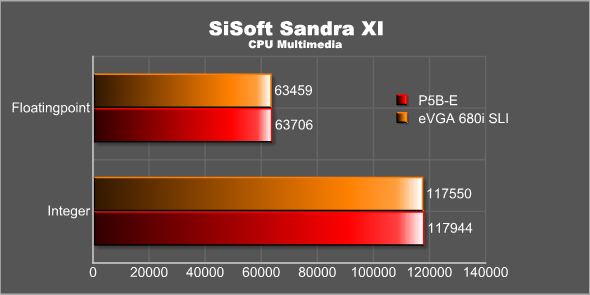
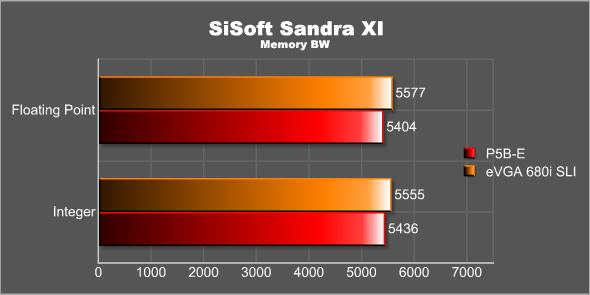
We do not expect any big differences in performance and we also do not get any. Neither motherboard seem to have any issues with memory or the CPU performance.
TESTING – SATA AND RAID PERFORMANCE
To test the SATA and the RAID performance we use the program HD Tach RW. This program allows us to test both the read and the write speed as well as the burst speed of the drives. Two 320 GB Seagate SATAII drives were set up in a RAID 0 configuration for the test. In this test I also included scores from an earlier review of the P5N32-SLI using the same components.
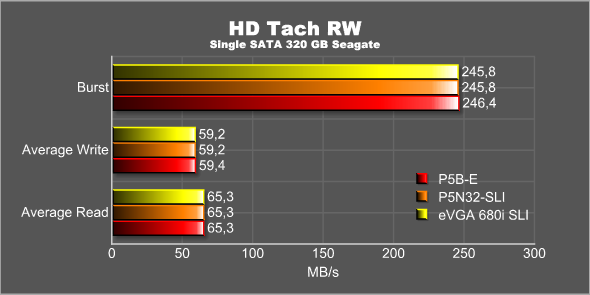
The single drive SATA performance is almost exatcly the same on all three drives. I was quite surprised that the two NVIDIA motherboards scored exactly the same.
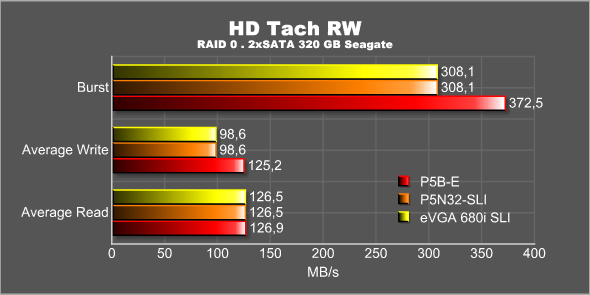
It seems that the RAID performance of the NVIDIA chipsets, both the nForce 590 and the nForce 680, is falling behind the performance of the i965 chipset, at least when writing is concerned. There is a 20% difference both in the average write speed and the burst speed. Again I was surprised to see the two NVIDIA chipsets scoring exactly the same.
TESTING – NETWORK PERFORMANCE
I decided to see if I could test the network performance of the Gigabit ethernet ports on the motherboard with the Passmark Performance Test program. The program allows you to test the network performance between two machines. In my case I used the following setup:
System 1: AMD FX52 sitting on a ASUS Crosshair motherboard (nForce 590, 2 GB DDR2, Gigabit ethernet)
Switch: Netgear 5 port Gigabit Desktop switch (GS605)
System 2: EVGA 680i with E6400 Core2Duo, 2 GB DDR2 and Gigabit ethernet
I am aware of that I am testing the Corsshair motherboard and the switch at the same time but my main goal was first of all to just see if I even got close to Gigabit speeds and to see what the CPU utilization was while running the system at that speed.
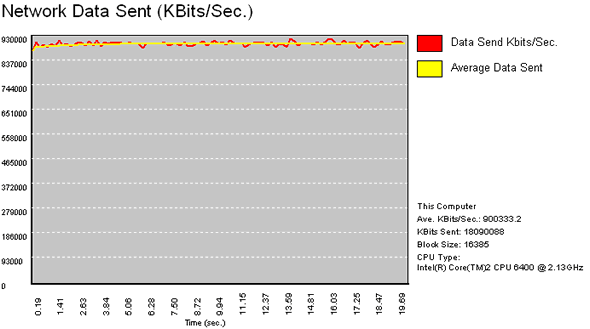
Obviously we will never see the system reaching the perfect Gigabit/s speed but in this synthetical test it still manages to perform well at 0.9 Gigabit/s. Even more interesting is to see what the CPU utilization running the network at that speed. When using TCP the CPU utilization was 39%. Using UDP the CPU utilization was 16%.
OVERCLOCKING
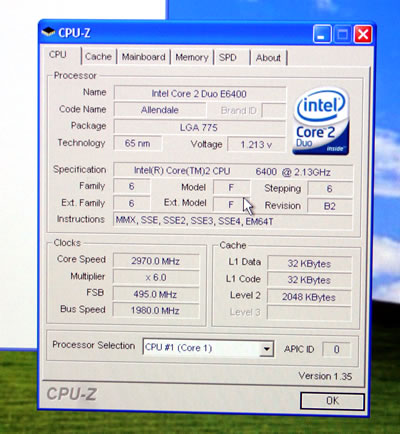
The overclockability of this motherboard is the main sales argument for NVIDIA when marketing this towards the enthusiasts. In addition to find the best overclock for my E6400 Core 2 Duo I also decided to see what the highest FSB was that I could attain. I had seen several mentionings of reaching >500 MHz for the FSB and had to find out for myself. I lowered the multiplier to 6 and started slowly increase the FSB. As you can see below I didn’t reach 500 MHz but as close as I guess you can come at 495 MHz. This was without increasing any voltages on the motherboard, just going with the stock settings. Impressive!
As well as finding the highest FSB I also decided to see what I could get out of the E6400 compared to when running it on the ASUS P5B-E motherboard. On that motherboard I reached a max overclock of 375×8 MHz = 3 GHz. I could go to 3.2 GHz but at that speed my video cards (I tested both a 8800GTX and a 7900GTX) suddenly ran at half speed. This also happened on the P5B-E Vista Premium Edition which also uses the i965 chipset.
Before I started to overclock the system I read the overclocking guide over at NVIDIA and made sure all the settings were correct in the bios. I then unlinked the memory from the FSB and set it to 1025 MHz as well as increased the DIMM-voltage to 2.2V. Next I started to increase the FSB making sure to test each speed in 3Dmark06 and Company of Heroes. after a lot of increases and testing I settled at 437.5×8 = 3.5 GHz. And this was with a stock Intel cooler and no changes in the voltage for either FSB or the CPU. That is a nice 65% overclock without actually trying that hard.
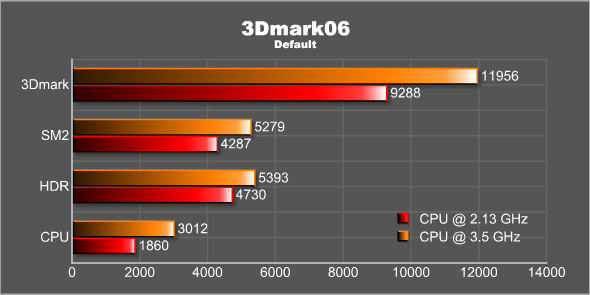
As expected it is mainly the CPU scores that go up when overclocking the CPU. However, even the video scores increased by 20% proving that with an high end card like the ASUS 8800GTX I was using in the system it pays off to have the fastest running CPU possible.
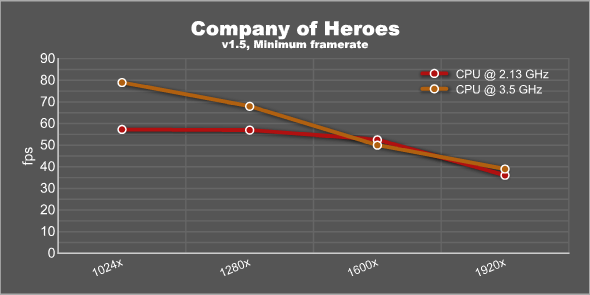
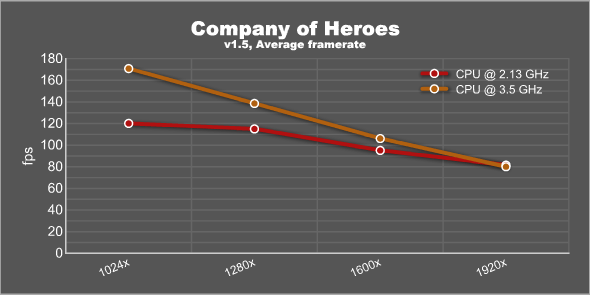
As expected the main gains of a faster CPU in a modern game like Company of Heroes is higher framerate as long as it is the CPU that is holding the game back. Incase of Company of Heroes the sweetspot seems to be around 1600×1200 with everything set to max and using 4xAA.
SUPPORT AND WARRANTY
Support
It is becoming more and more important to have a good support organization so you can deal with any problems that might arise with your products. The main way of communication that customers will use are the web. Thus it is interesting to see how EVGA are handling support on their website.
EVGA has several ways for a customer to get support:
24/7 Phone and e-mail support
You can either send in support requests through their e-mail system or call them 24/7 if it is urgent.
The Knowledgebase
I’ve seen many companies that have FAQ’s and Knowledgebases which are virtually empty. EVGA’s knowledgebase actually has a lot of good questions and answers for the 680i motherboard.
Good updated driver area
The driver area on the EVGA site seems to be updated a lot, even with beta NVIDIA drivers.
Manuals and installation guides
Of course you’ll find all sorts of manuals and installation guides on the site.
Lots of RMA-options
EVGA lets you create and track all RMA’s directly on the site. If you live in the US you can also sign up for the advanced RMA program which for instanes will give you the option of cross-shipping when a product is broken (they send you a replacement card before you send yours back).
Community forums
EVGA hosts a forum on their site with subforums for different products. The forums are not heavily moderated so you will find lots of people discussing problems in there. I also see posts from EVGA staff so they obviously do monitor the forums.
Warranty
EVGA is offering their North American customers a lifetime warranty of most of their graphicscards and their mainboards:
For our retail Graphics Card and Mainboard products purchased on or after June 22, 2005, EVGA will provide a lifetime warranty to the original purchaser of each retail product that the product will not suffer, in material or workmanship, from any defect that adversely affects the performance of the product. This lifetime warranty is valid for the life of the retail product, so long as the original purchaser owns the product
Of course there are conditions and the customer still has to pay shipping fees but it still is nice to see them offering the warranty. The warranty only applies to the AR/A1 versions of the motherboard and not the TR/T1 versions. You also ahve to register the product within 30 days to get the warranty. The 680i SLI also comes with the standard EAR program (EVGA Advanced RMA) which includes crosshipping if you need to RMA your motherboard. All we now need is for them to extend the warranty and EAR program to include us Europeans also.
QUALITY
The EVGA 680i SLI (and other nForce 680 motherboards) has had a rough time. At launch the motherboards were plagued with SATA issues that could result in corrupt data. NVIDIA finally sorted this out with a bios update.
Next came an issue with Quad Core CPU’s. Apparently some (according to NVIDIA very few) motherboards had a problem where you could not get the FSB higher than 1300 MHz when overclocking a Quad Core CPU. Even though it is supposed to just be a few motherboards affected EVGA has initiated a program where they swap it out to a new motherboard. Not only that, they offer cross-shipping (they send a new motherboard before you have to send back your own) with a 3-day turn-around and you of course will not have to pay shipping. Right now the crosshipping is only valid for the US but they recently said that they aim to extend this globally so all us non-Americans can swap our motherboards as easy as North American citizens can. The new fixed motherboards have a new part-numbers:
122-CK-NF68-AR will be replaced with 122-CK-NF68-A1
122-CK-NF68-TR will be replaced with 122-CK-NF68-T1
Since I do not have a Quad Core CPU I could not check my own motherboard but I will certainly check with them to see if I should send it in.
On the 680i-forum on evga.com the current top issue for the 680i-SLI seems to be BSOD-hangs in NV4_DISP. I seem to recall similar issues a long time ago (either the nForce 2 or the nForce 3 …). Loooking through the threads though it is hard to pinpoint the problem. EVGA and NVIDIA are investigating it.
My personal experience however has so far been very good after some initial small issues (wrong CPU-speed, mislabled SATA ports). I’ve been running this retail motherboard for a few months now and used it for gaming and testing and I’ve yet had a BSOD or any other issue.
CONCLUSION
After a bit of a rough start with the EVGA 680i SLI the motherboard now feels really good. It is a solid board that doesn’t necessarily offer any big suprises when it comes to bundle or features. Where the board shines is in the overclocking department. The bios is excellent and allows both the novice overclocker and the serious overclocker to go wild. Even more important it also translates into good overclocking results.
At first glance the price of around $240 seems quite expensive. However – compared to other 680i motherboards from ASUS, BFG and ABIT it actually is one of the cheapest 680i motherboards around. Only the ECS PN2-SLI2+ is slightly cheaper. It is also priced well compared to i975 motherboards. If you want to save a few pennies you can get the cheaper “lite” versions with the part number that ends with TR/T1 instead. This card does not include all brackets, manual comes on CD, has only the essential cables and comes with a 2 year warranty. It is only about $20 cheaper so I would rather add those $20 and get all the cables and the lifetime warranty instead.
Pros
+ All cables you need included
+ Cool looking motherboard
+ Overall good layout, especially for GeForce 8800 owners
+ Great bios
+ Great overclocker
+ Power and reset buttons directly on motherboard
+ Lifetime warranty in North America
Cons
– Mislabeled SATA-ports either on motherboard or in the bios
– Frontpanel pins placement not good
– Wrong speed set for the CPU at first install
– Some early motherboard revisions had issues with Quad Core CPU’s
Summary: After a rough start the EVGA 680i SLI motherboard has proven to be a solid motherboard with excellent overclocking capabilities.
I award the EVGA 680i SLi a score of 8.5 out of 10 and the Bjorn3D Seal of Approval.


