For this project I have selected the FOXCONN NVIDIA GeForce 8800 GTS as my test subject, which I reviewed here at Bjorn3D back in November 2006. Presently, the 640MB version of the GeForce 8800 GTS is the second-best video card available on the market. Gamers and computer enthusiasts alike have already speculated on how the GTS could be made to perform to the same level as the GeForce 8800 GTX with some tweaking.
Introduction
Overclocking can take on many forms, and the practice can range from minor product improvements to a re-engineering project which completely alters the product. In this article, I will concentrate my efforts to achieving the most gain with the least amount of effort.
Some industry voices have called overclocking a hobby, while others have compared it to product misuse. However, I believe that if you are reading this article, you are probably one of the many computer enthusiasts who believe it is perfectly acceptable to get something more out of a product without it costing more money. When I think about it, everyone enjoys getting something for nothing; it’s human nature.
Additionally, it is human nature to blame someone else if something goes wrong. This is where I warn you, the reader of this article, that neither I nor Bjorn3d.com recommend that you overclock your video card. This article explains how I conducted these experiments on my own property. Bjorn3d.com and the author of this article will not be responsible for damages or injury resulting from experiments you choose to conduct on your own property. If you read beyond this point, you are accepting responsibility for your own actions and hold Olin Coles and the staff of Bjorn3d.com harmless.
For this project I have selected the FOXCONN NVIDIA GeForce 8800 GTS as my test subject, which I reviewed here at Bjorn3D back in November 2006. Presently, the 640MB version of the GeForce 8800 GTS is the second-best video card available on the market. Gamers and computer enthusiasts alike have already speculated on how the GTS could be made to perform to the same level as the GeForce 8800 GTX with some tweaking. Unfortunately, this just isn’t possible. What is possible though is taking a great product and making it even better; and do it all for free.

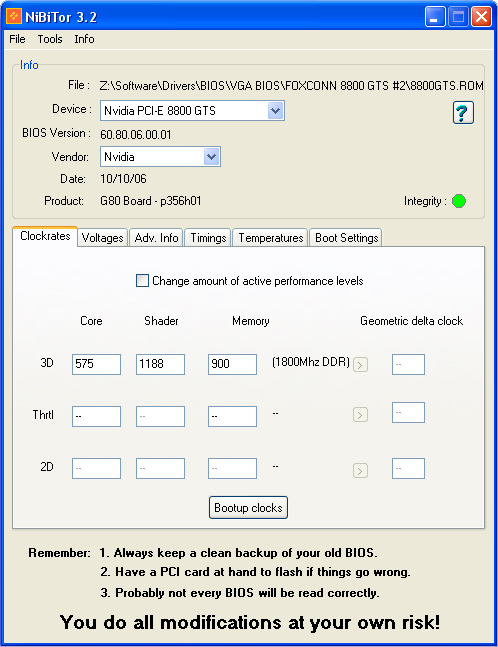
By default, the FOXCONN 8800 GTS operates with a 575MHz G80 GPU core clock speed, a 1188MHz shader, and a 900MHz (1800MHz) GDDR3 RAM speed. I will utilize the free overclocking utility ATITool v0.26 to search out the best clock speeds and simulate heavy graphic loading to establish stability. I will then make use of NiBiTor v3.2 which is another free tool to program a custom flashable video BIOS. After creating the new custom video BIOS with NiBiTor, I will use yet another free application, nvFlash, to program the new custom video BIOS onto the GeForce 8800 GTS.

Sure the name says “ATI” Tool, but the author has made this a great tool for both ATI and NVIDIA products for several years now. I have personally used many different tools for overclocking in the past, but this has proven to be the best tool for all my needs. After a straightforward installation and reboot (to complete the installation of the driver-level service), I open ATITool and see a lot of options confronting me. Try not to be overwhelmed, since all of these options could strike fear in the hearts of the inexperienced.
Getting Started
The first screen displayed will be the only screen that is really needed. While the memory clock speed copies its adjustments across all three performance levels (2D, 3D low power, and 3D performance), the software allows the user to make individual speed settings to the GPU core clock speed. Initially, the default values are saved in the profile named “default”, but as you make changes you may save and delete profiles as needed. For this project, I kept raising my speeds and saving them into a profile named “MAX”.

To begin the overclocking process, I start by raising the temperature of the GPU core by using the “Show 3D View” button to display a rotating fuzzy cube. It is critical that the video card attain the highest temperature possible prior to overclocking, because the results of a cold overclock may prove unstable during gaming conditions. After reaching the loaded operating temperature, I change to the “Scan for Artifacts” view by pressing the button. Although I could have used the “Find Max Core & Mem” buttons to have ATITool automatically work out the best settings, I choose to manually test each incremental improvement on my own.
Find the Best Speeds
Experience has taught me that overclocking the memory is the best starting point, since it has a very small impact on operating temperatures when compared to overclocking the GPU. I have also learned that clock speed improvements can be made in larger steps on RAM (10MHz steps), then they can be made on the GPU (3MHz steps). It is recommended that each clock be adjusted in small increments one after the other. Do not find the maximum RAM clock and then set out to find the best GPU clock; this will give skewed results at either end.
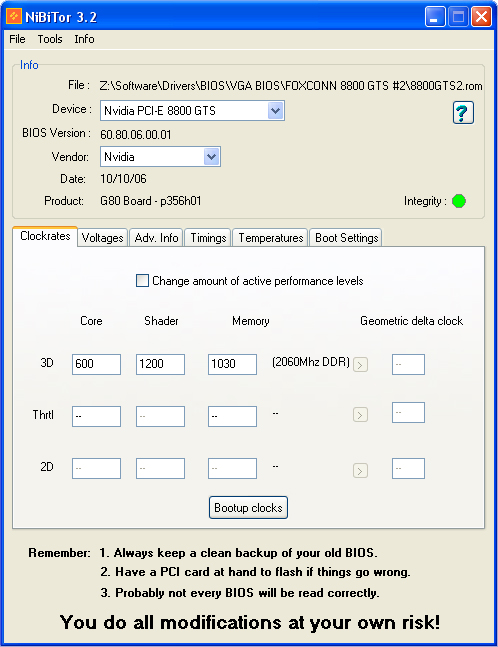
In my testing, I found that this particular card could operate a maximum RAM clock speed of 1060MHz (2120MHz) with the default GPU core clock. Alternatively, the maximum GPU clock could be raised up to 618MHz while maintaining the default RAM clock speed. However, the best combination of the two results yielded a stable 600MHz GPU core clock (25MHz improvement) with a final RAM clock speed of 1030MHz (130MHz improvement). These settings were saved to the profile I named “MAX”, and tested for a ten-minute duration using the “Scan for Artifacts” function. After stability was successfully tested, I played some of my favorite video games for an hour to confirm real-world stability. Now that I have my numbers, it is time to program them into the card.
Programming
Once the maximum stable speeds for both GPU and RAM have been found and tested, there is a choice ahead: either continue using ATITool to maintain these speeds, or flash them onto the video cards BIOS and make them permanent. Since I have already tested my overclocking results with both artificial loading and real-world usage, it is now safe enough for me to modify the video card BIOS file with my new overclocked settings and make the FOXCONN 8800 GTS operate with enhanced performance without additional software. This will make the card identical to factory overclocked versions.
Unfortunately, part of this process requires that the system boot into MS-DOS with a 3.5″ floppy disk drive, which I normally don’t have installed in my computer because it is considered an obsolete legacy piece of hardware. The USB flash drive and recordable optical drives have proven themselves to be very good solutions in terms of suitable replacements, so it may become a difficult task locating a 3.5″ floppy disk drive any further into the future. For the remainder of this project, a bootable USB flash drive or a properly created bootable CD/DVD could have been substituted, but I choose to avoid reinventing the wheel and retained the use of a spare floppy disk drive.
To begin the (simple) process of creating a custom BIOS file, I utilized the free NiBiTor v3.2 program to save a copy of my original BIOS. There are two steps for this process:
- Tools → Read BIOS → Select Device (Choose the video card here)
- Tools → Read BIOS → Read Into File (Choose a safe backup location to save the original BIOS)
Save a backup
I should only continue after creating a backup of the original video BIOS, since this file will allow the opportunity to return my settings back the factory defaults if it is every required. It is highly recommended that this backup BIOS be copied and renamed so there will be a working copy and the original backup file available. I named the original BIOS file “BACKUP.ROM”, and then created a copy of it which I named “8800GTS2.ROM”.
Up to this point, I have saved my modified video BIOS “8800GTS2.ROM” onto one floppy disk. I will save the nvFlash program which is available for free download onto this same floppy disk. On a second floppy disk I will use Windows XP to format and create an MS-DOS startup disk. It is may not required to split the project files and nvFlash from the MS-DOS startup disk because of file sizes and available space, but this is a safe practice which also decreases the chance for possible media problems.
Now that a backup of the video BIOS has been copied and stored for safe keeping, the next step for reading the working file and making changes begins with: File → Open BIOS (Choose the renamed copy “8800GTS2.ROM” of the video BIOS here).
Once again, the novice could become very concerned about the many tabs and options available in NiBiTor, but for my purposes I will only use the Clockrates tab to change the values for 3D speeds.
Using the values discovered and tested to be stable in my previous steps, I apply these values into the appropriate 3D fields, replacing the original values. Once I have typed in the new Core and Memory values, I saved this modified video BIOS file by choosing: File → Save BIOS (save this modified file onto a formatted floppy disk and name the file something simple with less then eight characters such as “8800GTS2.ROM”).
Now that I have prepared the new modified video BIOS file and saved it to a floppy disk, I am ready to make my video card operate as if it came from the factory with my new settings. I will now flash my working copy of the modified video BIOS “8800GTS2.ROM” onto the FOXCONN 8800 GTS using nvFlash.
Flash the new BIOS
Flashing a video BIOS is a very simple process; yet extra care and precaution must be taken or the hardware being flashed may be rendered non-operational. I have taken steps to ensure my computer systems stability will not be compromised by removing any system component overclocking (CPU, RAM, bus speeds), and have placed my system on a 1500VA backup battery UPS. With stability ensured, I am ready to move forward and flash the video BIOS.
The video card BIOS is flashed by:
- Boot into MS-DOS mode from a pre-formatted floppy disk
- Insert the floppy disk containing the BIOS file and nvFlash
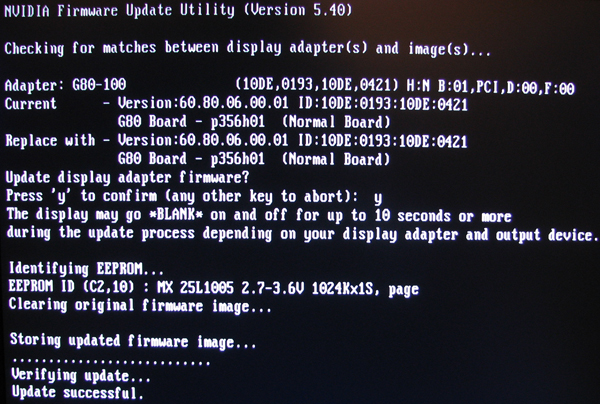
- Type “nvflash 8800GTS2.ROM” (where “8800GTS2.ROM is the name of the BIOS file)
- Press “Y” to confirm that the system is ready to flash the firmware
That’s it! The hard part is done. Once the system reboots after the successful BIOS flash, the video card is programmed with the new enhanced performance settings. But am I finished?
Cooling Improvements
With all this new power there will come increased heat output, which is something the GeForce 8800 series already knows plenty about.

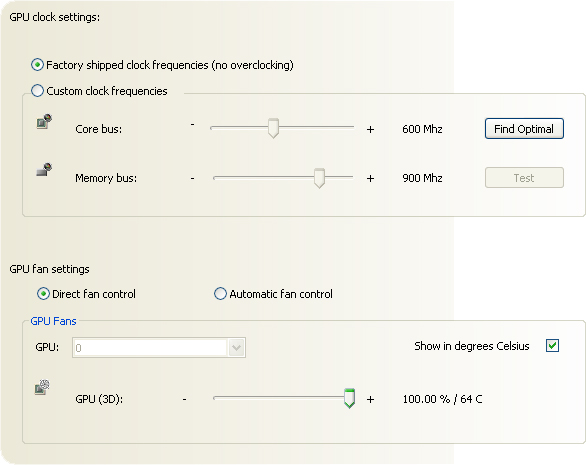
The GeForce 8800 GTS already runs close to 90° C when it is under full load, so I have taken an extra step to make sure my temperatures don’t turn this product into a personal space heater. Using the NVIDIA nTune Performance Application available free, I can adjust the fan speed from the default 60% output up to the desired 100% output.
Don’t be fooled
A closer look at the nTune utility will reveal that it offers the opportunity to overclock the video card through the GPU clock settings interface; but I had to discover the hard way that this was a very unstable and unsafe method which always resulted in system crashes. I have since avoided every feature offered in this utility except the GPU fan settings feature.
If I could find a better program with a smaller footprint which would enable me to manually adjust 8800 series blower fan speeds, I would be using it. But since this is the only one I am aware of, it is a necessary evil.
With the NVIDIA nTune utility, I can manually raise (or lower) the fan controller output. The blower fan on the GeForce 8800 series is somewhat silent at the default 60% output, but it gets humming when set up to 100% output which means that noise may become a concern.
Conclusion
For the cost of the product and about an hour of time spent, I was able to take my FOXCONN 8800 GTS and overclock the G80 GPU up to 600MHz (575MHz default) along with a GDDR3 RAM speed increase up to 1030MHz (900MHz default). This amounts to a 25MHz GPU improvement and a 130MHz RAM improvement; and all for free!
Sure, these results did not transform my 8800 GTS into a GTX, but as I mentioned before this is just plain impossible because of architecture. When it was all said and done, I did make enough improvement to the 8800 GTS to keep it more relative to the 8800 GTX. My video card was already a product pushed closely to the limit from the factory, and now I have it operating and performing as best as it can. Just imagine what could be done to the GeForce 8800 GTX!
With this in mind, it could be very possible to find more performance available for the taking out of other NVIDIA video cards. Just remember, what you do with your property is your own business. At least now you know how I did it. ![]()


