It is not often I get intimidated by a piece of hardware, but the sheer size of the Tuniq Tower 120 CPU fan/cooler made me wonder if it would fit my case and motherboard. Read my review to see how I got it installed and how it performed compared to a old stock AMD64 cooler.
INTRODUCTION![]()
Does anyone actually remember back in the days when you could run a CPU without any cooling? If I recall correctly, the first 486SX PC I bought, an IBM PS1, did not have a fan on the CPU. I’m not even sure it had a heatsink although it probably had. For each new generation of CPU, the heat generated has gone up and the need for cooling has increased.
Today’s review looks at the Tower 120 cooler from Tuniq. I’m comparing it to the stock cooler of my AMD64 3200+.
TECH SPECS![]()
The Tower 120 is a mighty beast. It is 15.5 cm high, and it needs at least a case with 19 cm height. Tuniq claims it is compatible with most cases and motherboards, and since it did fit in my smaller Antec LANBoy case I’m sure it is true. The cooler is pretty heavy at 798g (without the fan).

Inside the huge slab of metal (aluminium and copper) you’ll find a huge 120 mm 9-blade fan. With the cooler you get a fan controller that allows you to set the speed of the fan between 1000 RPM and 2000 RPM. The speed of the fan of course affects the noiselevel and while the fan is rated at 34DB at 200RPm it is rated at just 20DB at 1000 RMP.

With the fan you get a small syringe of high performance thermal grease (Tuniq TX1 Thermal Grease, thermal conductivity: >3.3W/m.K) as well as the pieces needed to attach the fan on various motherboard types including Intel and AMD motherboards.

INSTALLATION![]()
Installing this beast isn’t easy. First of all you definitely have to do it the right way; pulling out the motherboard from the case and installing it outside the case. On my first attempt I tried to do a shortcut by installing it on the motherboard while it still was in the case but it failed miserably (I know, you never should do it that way anyway).
The fan has a copper base which of course will be placed on top of the CPU (with some thermal grease added of course).

After removing the motherboard from the case I proceeded to attach the fan to the motherboard. I use a Socket939 motherboard (ASUS K8..) and thus used the included bracket that fits various AMD motherboards.

All I had to do was remove the plastic frame that was sitting around the CPU on the topside of the motherboard and then screw the whole fan to the 2 holes that were left. To be honest I first didn’t realize I had to remove the whole plastic frame since the manual was pretty vague but I quickly realized that the CPU and the copperbase never would fit together tightly enough unless it was gone.

This plastic frame needs to be removed
Attaching it to the motherboard was the easy part. The hard part was getting the motherboard back into the case. Since the fan is so high I had a very hard time squeezing the motherboard back without breaking anything. I have a smaller case, the Antec LANBoy, so a larger case should work better but in the end I managed to get the motherboard back into place. It should be noted that I had no issues at all with the fan colliding with any transistors or capacitors around the CPU-area. The actual fan-assembly is pretty high up so it shouldn’t interfere with any parts of the motherboard.

As you can see from the images it is a pretty tight fit. In fact I had some issues attaching the 12V powercable from the PSU to the motherboard since the connector on the motherboard was between the PSU and the tower 120 fan.

In the end I managed to hook everything up including the included fan-controller. I now was ready to see what this fan could do for my CPU.
PERFORMANCE![]()
All tests were made on my main system:
• Antec LANBoy case with one 120mm fan in the front and 1 120mm fan in the back.
• AMD64 3200+
• ASUS nForce4 K8N…. SLI motherboard
• 1 GB OCZ PC3200 RAM
• Sunbeam NUOO PSU
• One 36 GB 10000 rpm Western Digital Raptor HD
• One 200 GB 7200 rpm Maxtor DiamondMax 10 HD
• Stock cooler for the AMD64 3200+
• Tuniq Tower 120
The CPU temp and fan rpm was measured with ASUS PC Probe. It reported slightly higher rpm’s than Tuniq says the fan is capable of (2136 rpm as max and 1222 rpm as min compared to the 2000 and 1000 rpm in the documentation).
To test the coolers we put them through a few tests designed to work the CPU:
• The CPU-tests in SiSoft Sandra Pro 2005
• The CPU-test in 3DMark2005
These were run in loops and the max temperature was noted. In addition to running the CPU at default speed (200×10) we also overclocked it to 220×10. We then did run the same tests and noted the max temperature.
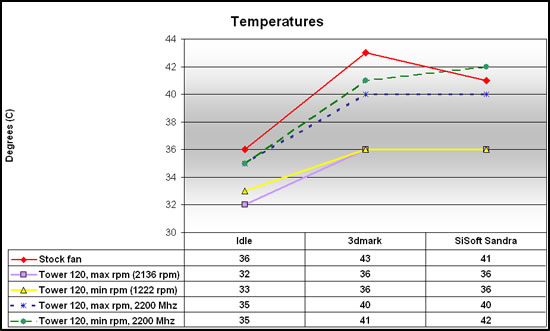
As you can see the stock fan cools the CPU a bit worse than the Tower 120. It isn’t until we overclock the CPU to 2.2 GHz (a 10% overclock) and turn down the fanspeed to the minimum that we see similar temperatures with the Tower 120. If I had tried the stock cooler at 2.2 GHz I’m pretty sure we would have seen higher temperatures.
Noise
So we’ve seen that the Tower 120 can cool the CPU better than the stock cooler. However, what about noise? The stock cooler isn’t the noisiest fan I’ve hard but it most certainly isn’t silent. The Tower 120 actually has 2 faces. At the max RPM (~2000) it is noisy. I’m not sure I would like to run it at that speed all the time. At the minimum speed (~1000) things are different. Now the fan is very silent and the other fans in the system are louder. The fact that it still cools very well at the lowest speed makes it possible to run the machine at that speed most of the time while you can turn it up temporarily if you really need the extra cooling.

From the chart it looks like the noise picks up around 1800 rpm. I could verify this by going up to around 1800 rpm before noticing a larger increase in the noiselevel. There’s a lot of room for trial and error to find the best compromise between cooling and a low noiselevel.
CONCLUSION![]()
I have to admit I was a bit skeptic when I received the package and saw the huge fan. How would that fit into my case? In the end it not only fit into the case but proceeded to perform very well.
| Pro
• Flexible, find your own balance of performance and noiselevel |
|
Cons • A bit tricky to install |
Summary: The Tower 120 might seem a bit intimidating at first glance but offers very good performance even at the lower and more silent fanspeed.
I award the Tuniq Tower 120 a 8.5 out of 10 and a Seal of Approval award.


