Beyond the extensive features that the 8Sigma series offers, the GA-8GPNXP Duo features the Intel Express 915P chipset, SATA and IDE RAID, and the Gigabyte GN-WPKG PCI wireless networking card.
Introduction
In today’s motherboard market, almost all of the features most users want are included in the chipset. This means that motherboard designers (and marketers) have to work a lot harder to differentiate their products from the competition. Actually, that is not their only concern, though, so most major players often produce mainboards that are simple, entry-level boards that infrequently deviate from the reference design. These are the boards that go to system builders and mid-range or lower segments of the market. Where these companies really like to differentiate themselves from their competitors is in the enthusiast, high-end market.
Of course, companies like Gigabyte like to get in on the action in the enthusiast market. It’s the area where margins are higher and where a company can really get noticed. To that end, Gigabyte developed its flagship 8Sigma line of motherboards. This family of motherboards is billed by Gigabyte as a “Fusion of Top Innovations”, and it features support for Intel’s LGA775 Pentium 4 processor, DDR and DDR2 memory, Intel’s High Definition Audio, dual gigabit ethernet, and Gigabyte’s patented U-Plus D.P.S. eight-phase power circuit. I have been fortunate enough to get my hands on the GA-8GPNXP Duo from the 8Sigma line, and that is what we will be taking a look at in this review.
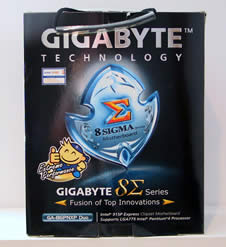
Beyond the extensive features that the 8Sigma series offers, the GA-8GPNXP Duo features the Intel Express 915P chipset, SATA and IDE RAID, and the Gigabyte GN-WPKG PCI wireless networking card.
Specifications & Features
Specifications:
| Chipset | Intel 915P Express |
| CPU Socket | Socket T (LGA775) for Intel Pentium 4 (FC-LGA4 package) |
| Front Side Bus | 533 / 800 MHz |
| Memory Support | DDR 400/333 DDR2 533/400 |
| PCI Express Slots | 1 – x16 slot 3 – x1 slots |
| PCI Slots | 2 |
| USB / IEEE 1394 | 8 USB 2.0 ports / 3 IEEE 1394b ports |
| Onboard IDE | 1 – IDE channel supporting Ultra ATA 66/100 |
| Onboard IDE RAID | 2 – IDE RAID channels supporting Ultra ATA 133 Configurations supported: RAID 0, RAID 1, RAID 0+1, JBOD |
| Serial ATA | 4 ports |
| Onboard SATA RAID | Supports all 4 SATA connections Supports hot plugging Configurations supported: RAID 0, RAID 1, JBOD |
| Audio | High-Definition Audio Sound Codec (C-Media 9880) 8-channel playback capability S/PDIF input and output on rear panel |
| Networking | Marvel MV8001 – 10/100/1000 Mbps Broadcom PCIe X1 – 10/100/1000 Mbps |
| Other I/O | 1 – Parallel port 1 – Serial port 2 – PS/2 ports 1 – Floppy drive connector 1 – Front audio connector 1 – IrDA header |
| BIOS | AWARD BIOS Supports Dual BIOS and Q-Flash |
Features:
- Supports both DDR and DDR2 memory modules (only one type can be used at a time)
- 4 DDR slots
- 2 DDR2 slots
- Supports up to 4 GB of memory
- Dual channel
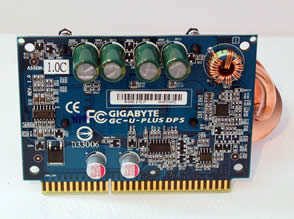
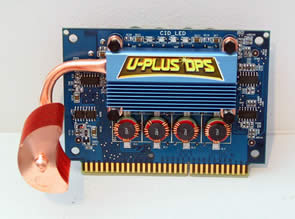
- Universal-Plus Dual Power System 2 (U-Plus D.P.S.)
- An eight-phase power circuit designed to maximize system stability
- Four blue LEDs are mounted on the module to indicate the current load
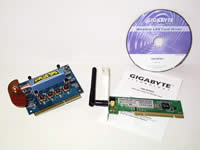
- Wireless LAN card included (Gigabyte GN-WPKG), supporting IEEE 802.11g standard (up to 54 Mbps)
- Dual gigabit LAN connectivity
- Supports both IDE and SATA RAID
- DualBIOS – a backup BIOS helps ensure PC reliability and stability
- Gigabyte ShieldWare
- CPU Intelligent Accelerator 2 (C.I.A. 2) – automatically adjusts CPU performance based on current CPU load
- Memory Intelligent Accelerator 2 (M.I.B. 2) – functions to boost memory performance up to 10% as well as providing a recommended memory module list
- EasyTune 5 – overclocking utility for Windows
- Motherboard Intelligent Tweaker (M.I.T.) – a section of the BIOS configuration where key system tweaking options (CPU clock ratio, C.I.A. 2, voltage adjustments, etc.) are grouped together for easy access
- System Overclock Saver (S.O.S.) – automatically resets BIOS settings to system defaults if an overclocking attempt causes system boot-up errors, eliminating the need to ever clear the CMOS manually
- Gigabyte C.O.M. – a web-based system management tool that allows system hardware information such as CPU, memory, graphics card, etc. to be monitored and controlled via the Internet
- Xpress Recovery – a utility used to back up and restore an OS partition
- Xpress Install – allows user to pick what to install and the tool does the rest (including necessary reboots)
- Cool-Plus Northbridge fan installation is optional
Package Contents:
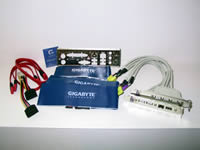
- SATA data cables (2)
- IDE cables (2)
- Floppy cable
- Molex-to-SATA-power Y-adapter
- Rear I/O panel shield
- Case badge
- Expansion modules for USB 2.0 and IEEE 1394b ports
- GigaRAID Function User’s Manual
- Gigabyte GA-8GPNXP Duo User’s Manual
- Hardware Installation Guidebook
- Installation CD
- Drivers
- Norton Internet Security 2004
- EasyTune 5
- Gigabyte C.O.M.
- Gigabyte GN-WPKG PCI WLAN card
- GN-WPKG Installation Guide
- GN-WPKG Wireless LAN Card Driver CD
- U-Plus D.P.S. module
 |
 |
 |
Installation
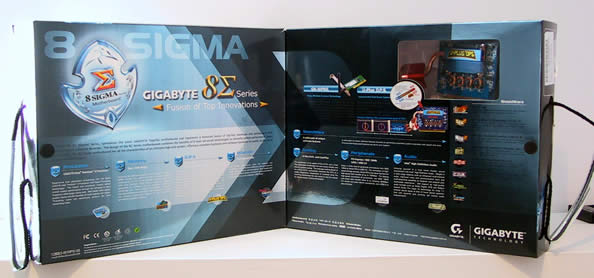
Although I did not use it, I think it is worth noting that the main motherboard box was designed in a way that you could use it to test out the motherboard before installing it. There are perforated push-out flaps with instructions on the box for what to insert in them to complete the “Mini Setup Platform,” as it is called on the box. I have never seen anything like this, and I am not sure if it would be useful to very many people. I will give Gigabyte credit for trying new things, though, but I can’t help but wonder if the unnecessary cost this adds is really worth it. Unfortunately, I have no idea what that cost really is.
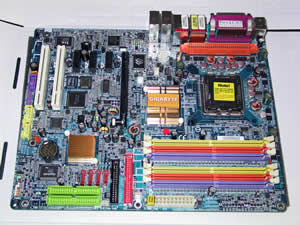
After pondering the usefulness of the “Mini Setup Platform,” I decided to start installing the GA-8GPNXP in a Lian Li PC-6077 mid-tower case. As expected, it fit in the case just fine. In consideration of the fact that many people still own power supplies with a 20-pin power connector, the GA-8GPNXP’s power connector’s 4 “extra” pins are covered with a sticker that should only be removed if a 24-pin power connector is being used. I definitely like to see nice little user-friendly additions like this.
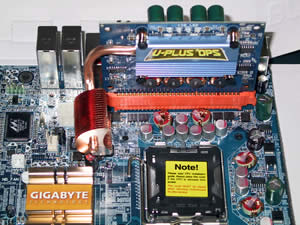
Installing the processor and Intel’s retail cooler was as simple as usual. The only thing I was worried about was the possibility of the U-Plus D.P.S. getting in the way, or the CPU cooler preventing me from installing the D.P.S. add-in board. But Intel’s retail HSF unit did not get in the way of the D.P.S. As you can see below, the heatpipe branches out quite a bit from the unit. It’s a tight sqeeze in there with the CPU cooler, D.P.S. heatpipe and northbridge cooler!
 |
 |
 |
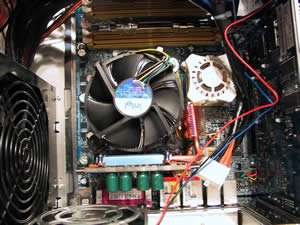 |
The fan on the northbridge is actually an optional installation item. It does not come installed on the northbridge heatsink, but it installs in a snap. This allows people to choose either reduced fan noise or increased cooling when setting up this mainboard.
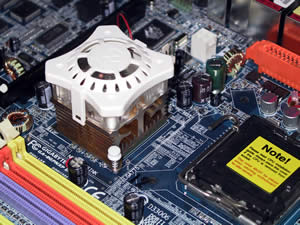
Installing the OS and other software on this system was also a positive experience. After installing Windows XP, I used Gigabyte’s XPress Install to select the drivers I wanted to install, and the tool did the rest, including rebooting as necessary. The only trouble I had with this was an Internet Explorer error after the first reboot. I had to manually restart the process, but after that, it finished without any other snags. I also updated the BIOS to the latest one available, which was F4. I used Gigabyte’s @BIOS program to update it via the Internet, and it worked great.
Even though I don’t have a wireless LAN set up, I wanted to take a look at the GN-WPKG wireless LAN card, since it is part of the GA-8GPNXP Duo package. Installing the card and getting its drivers installed was easy enough. I don’t have any wireless-enabled devices, but I was able to borrow a Centrino-based notebook for a few hours to check out the wireless capabilities of the WPKG. I used the WPKG configuration utility to set up an “Ad hoc” network between the notebook and the PC, and it worked well. I must admit my prior experience with wireless networking has been quite limited, but this seemed easy enough. However, I was not able to figure out how or if I could get my Internet connection (via one of the gigabit LAN controllers) shared with the wireless ad hoc network. Gigabyte’s manual provided on the setup disc does not offer much help beyond setting up a basic wireless LAN (using the more traditional “Infrastructure” network type), and the printed manual offers even less. With a little more time, I think I probably could have made it work, but the borrowed notebook had to go back to its owner. At least I had some experience with the wireless LAN card.
Board Layout
Now let’s take a tour of this nicely laid out mainboard.
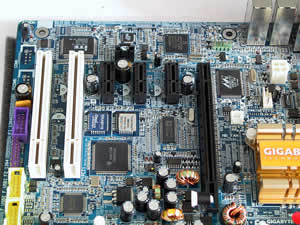
In the upper left picture, you can see the legacy PCI slots and the PCI Express slots. The three smaller ones are x1 slots, and the longer one is an x16 slot for a video card. I was pleased to see that Gigabyte used an x16 slot with an easy clipping mechanism. If you’ve ever had a video card with a large cooler on it and had to deal with the older style clipping mechanism that has an awkward lever on one side, you’ll know why such a small detail is worth pointing out. It’s also worth pointing out that there does not appear to be any capacitors or other components near any of the expansion slots that could cause issues with larger expansion boards. Near the center of the same picture you can see the two BIOS chips that comprise Gigabyte’s DualBIOS technology.
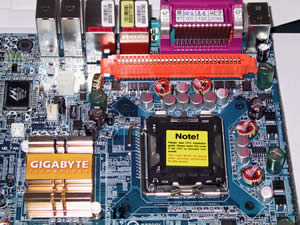
In the upper right picture you can see the orange D.P.S. slot. Gigabyte made the D.P.S. a slot solution that is not required for proper operation and stability of the system. This allows people who want to use an extremely large cooler to opt not to use the D.P.S. In this picture, you can also see two fan connectors located near the northbridge, which has a nice chunk of metal sitting on it to pull heat away from its surface. The little notches on that heatsink are part of what makes the Cool-Plus northbridge fan installation so easy. The optional fan simply snaps right on those notches. The fan power headers are for the CPU fan and for the Cool-Plus fan.
 |
 |
 |
 |
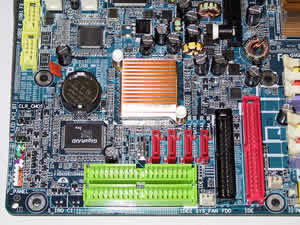
The lower left picture shows off the GA-8GPNXP’s drive connectors. You can see all three IDE connectors and the four SATA connectors, along with the black floppy drive connector. The southbridge heatsink sits right in the middle of this picture.
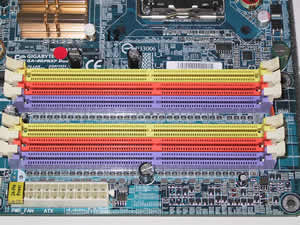
A couple things are worth pointing out in the last picture above. First, the 24-pin power connector, with the 4 “extra” pins nicely covered up for those of us with 20-pin ATX power cables, is located in a place that it is very unlikely that it will get in the way of other cables or devices. Also, you can’t miss the six DIMM slots in this picture. The yellow ones are for DDR2 memory modules and the others are for DDR modules. Only one type of memory can be used at a time, but it is nice to have the versatility that this offers.

The rear I/O panel looks fairly standard for a board sporting the “normal” rear panel ports and Intel High Definition Audio, but there is one very important addition – the coaxial S/PDIF input and output. These will allow you to get digital audio into and out of your system. Sounds like a great idea to me! (Pun intended.)
Performance
Since I recently reviewed Albatron’s PX915P Pro mainboard, I figured this would be a good opportunity to pit two boards based on the same chipset against each other. This could reveal if both companies’ implementations of the chipset are equivalent or if one of the companies seems to have an edge over the other.
I was worried that this might be a little too boring, though, so I added in the GA-8GPNXP Duo scores with the front side bus (FSB) overclocked to 880 MHz, which is a 10% overclock from the default setting. This setting causes the CPU to run at a nice 3.74 GHz. The system actually booted at 3.74 GHz when I first turned it on, and it took me some trial and error to get it to stay at the correct default of 3.4 GHz for the P4 550. It was no bother, though, since the system runs completely stable with the FSB at 880 MHz.
Test System Configuration
- Intel Pentium 4 550 (provided by Monarch Computer Systems)
- Gigabyte GA-8GPNXP
- OCZ EB DDR PC3200 1 GB kit – 2 x 512MB (review)
- Albatron PCX5750 – DirectX 9.0c, ForceWare 61.77
- Hitachi Deskstar 7K250 160GB Serial ATA 7200RPM Hard Drive w/8MB Buffer
- Microsoft Windows XP with Service Pack 1
- Hyperthreading – enabled
PCMark04 (1.2.0)
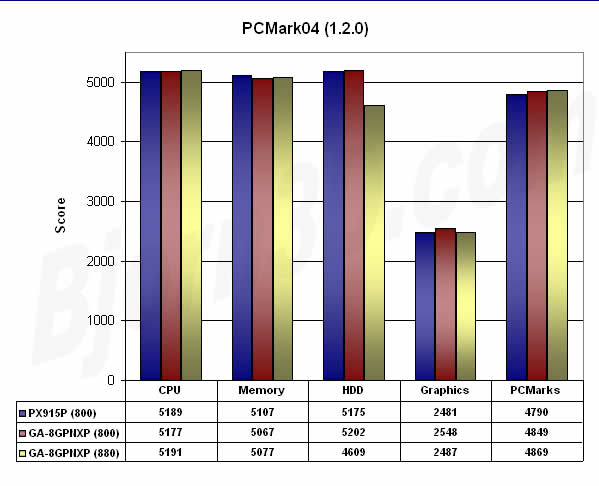
It is perplexig that the HDD score decreased so much when the system was overclocked, but this is not the only benchmark that showed such results. Surprisingly, the Graphics score also went down a little bit.
SiSoftware Sandra 2004 (2004.10.9.133)
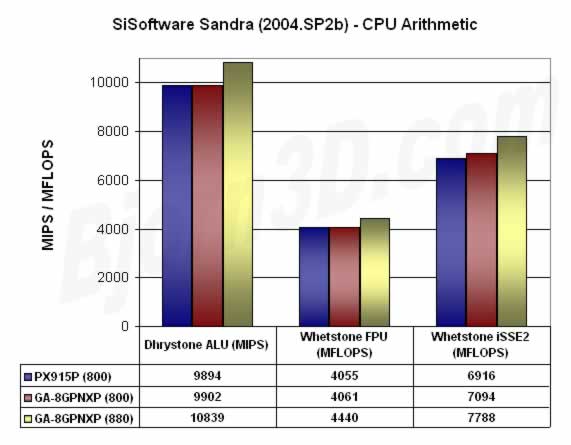
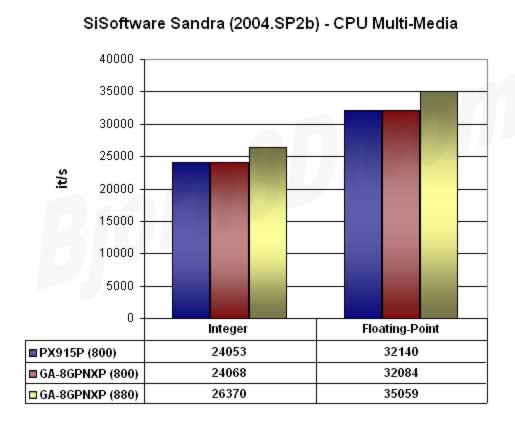
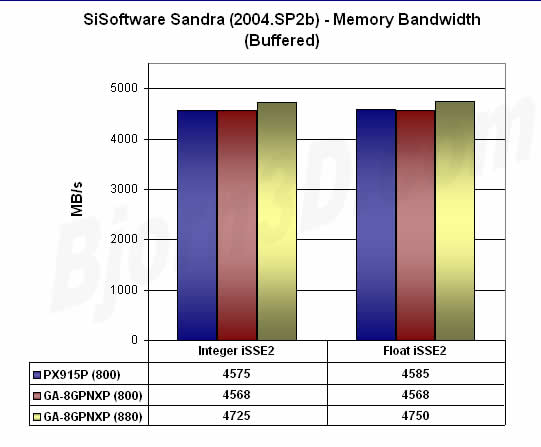
The 10% overclock resulted in the more predictable near 10% increase in nearly all Sandra benchmarks. The Memory Bandwidth marks only increased by around 5%. The Albatron and Gigabyte boards are performing as closely as should be expected.
I also ran the Sandra File System benchmark, and for each system the result was 50 MB/s. The overclocking did not have an adverse effect on the hard drive performance in this test.
SYSmark 2004 (patch 1)
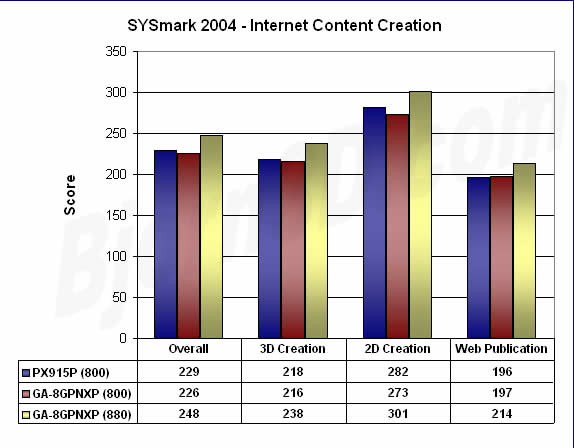

Interestingly, the PX915P enjoys at least a slight lead in most of the SYSmark scores. It even leads the overclocked system in the Communication test in the Office Productivity suite. However, in every other measurement, overclocking helps the GA-8GPNXP take the kind of lead that should be expected.
PassMark PerformanceTest V5.0 (Build 1026)
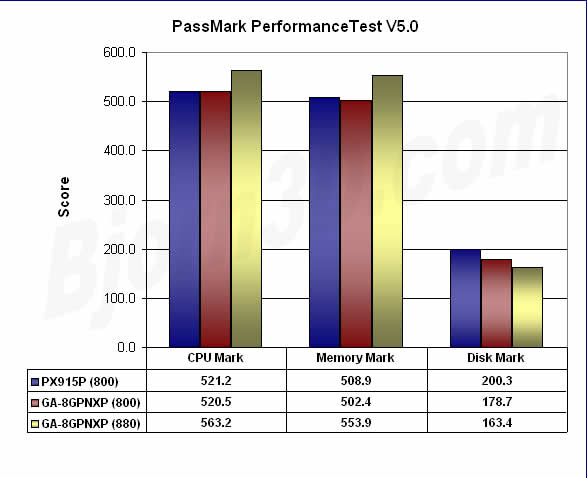
PassMark shows the same odd result that PCMark04 did – the Disk Mark score actually decreased after overclocking. I am still puzzled by this oddity.
AquaMark3
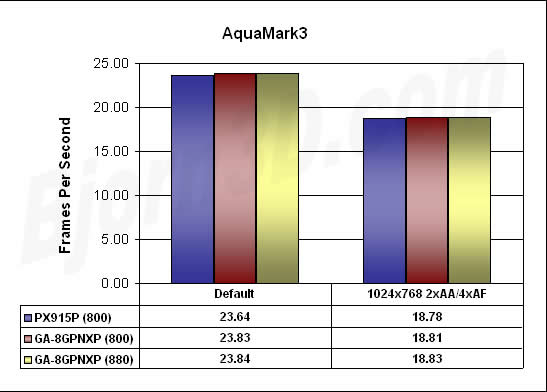
The video card is clearly the bottleneck in this benchmark. At least we know that with such a video card, increased clock speeds have little positive effect on the playability of games based on the engine used in AquaMark3 and probably many other games.
Unreal Tournament 2003 Demo (2206)
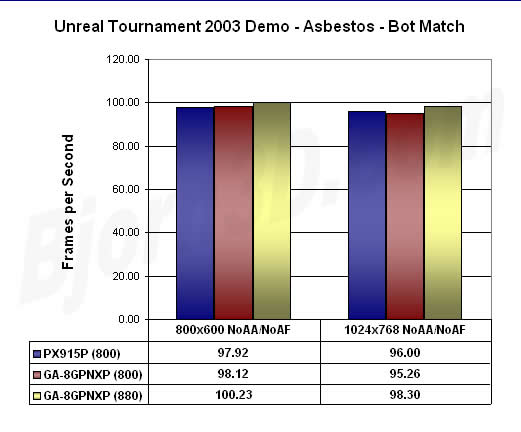
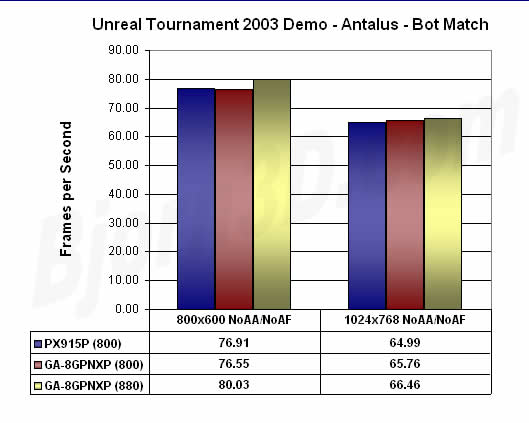
UT2K3 does not really reveal anything spectacular either.
Conclusion
With its 8Sigma series, Gigabyte offers a motherboard package that goes well beyond average, but packages like this usually come at a sizeable price premium. The GA-8GPNXP Duo is no exception. If you are interested in this motherboard, you should expect to pay at least $210 at e-tailers like newegg.com or mwave.com. This makes the GA-8GPNXP Duo one of the most expensive consumer motherboards available.
But as the saying goes, you get what you pay for. Fortunately, that’s a good thing in this case. You would probably be hard pressed to find a more elaborate bundle than the GA-8GPNXP Duo. This mainboard package allows you to enjoy SATA and IDE RAID, DDR or DDR2 memory, and dual gigabit wired LAN and 802.11g wireless connectivity. The U-Plus D.P.S. eight-phase power circuit should provide one of the most stable power subsystems around, and my experience with this mainboard confirms that, especially considering how well the system overclocked without having to increase voltages or add cooling. Speaking of cooling, the optional northbridge cooling fan, Cool-Plus as Gigabyte calls it, is a very nice touch. Making it optional caters to users who want maximum cooling and airflow in their case and to users who want minimal cooling and maximum quiet. I hope to see this in more of Gigabyte’s motherboard packages.
I would definitely recommend the Gigabyte GA-8GPNXP motherboard to anyone looking for an LGA775 mainboard, especially if they are not too sensitive to price. The only people I would not recommend this board to are those who are trying to put together a budget system and those who would not be using it for much more than web surfing and ripping CDs. The GA-8GPNXP Duo seems to be directly targeted at the power user who wants an incredible package that leaves little, if anything, to be desired.
Pros:
+ DDR and DDR2 DIMM slots
+ SATA and PATA RAID
+ Great overclocking features and results
+ Optional northbridge fan is a nice touch
+ Digital audio in and out
+ U-Plus D.P.S. should provide great system stability
Cons:
– All these features and extras don’t come cheap
– A few of the benchmark results were perplexing
– Installing both Cool-Plus and D.P.S. will limit the size of the CPU cooler that can be installed
 Bjorn3D.com Bjorn3d.com – Satisfying Your Daily Tech Cravings Since 1996


