Remote controls for televisions and remote controlled cars have been around for a long time. Just about everyone has used some sort of remote control in their life to simplify a process. Thermaltake has created a remote controlled fan controller that can adjust the speed of up to four fans inside your computer. If this sounds too good to be true, read further to find out for yourself.
Introduction
Ahhhh. The remote control. Found in the hand of many Americans every evening and weekend after a hard work week. This device has brought us comfort and efficiency since its inception, and it doesn’t show any signs of stopping anytime soon. The old style televisions required you to actually get up and walk to the television just to change the channel. How horrible. And forget about that channel return button, you had to turn that knob yourself. Might as well add a remote to your PC right? But what to control. There are already remote controlled TV tuners, so why not a remote controlled fan controler. Thermaltake has created the first fan controller that takes advantage of one of the greatest inventions of all time. The remote control. Sit back, relax, and see how much easier controling the speed of your fans just became thanks to Thermaltakes XTunner.
Features and Specs
Features (Taken from Thermaltake’s website)
- Application for PC
- The first invention (remote control) of wireless fan speed control in the world
- Fully control up to 4 fans at the same time(case fans, CPU cooler or VGA cooler)
- Thermaltake first-class “TRT (Thermaltake Remote Technology) inside
- Long-range Remote Control approx.12m in open space
- Color LED fan speed display. 6 LEDs with 3 different color
- Wide receiving angle
- Efficiency or silence, it’s up to you
- Simple installation and operation
- With convenient key ring holder
Specs (Remote)
- Dimensions: 89.9 x 54.7 x7.7 mm
- Lift Exception: 45000 times
- Rated Temperature: -10°C~60°C
- Rated Frequency: 4MHZ
- Transmit Distance: 12m (open space)
- Battery Voltage: 2.8V~3.2V
Specs (Receiver)
- Device Space: 5.25″ driver device
- Dimension: 148.4 x 42 x 68 mm
- Rated Temperature: 0°C~70°C
- Input Voltage: DC 12V
- Output Voltage: DC 12V
- Output Channel: 4 set
- Max. Current / per channel: 1 Amp
- Rated Frequency: 4MHZ
- Receive Distance: 12m (open space)
- Receive Direction: 45°(+- 22.5°)
Package Contents
- 1 x XTunner unit
- 1 x Remote control with keychain
- 1 x 3pin fan adapter
- 1 x 4pin power adapter
- 3 x 3pin to 4pin fan adapters
|
FIND THE BEST PRICES FOR Thermaltake Accessories AT PRICEGRABBER |
Closer Look
Packaging
The XTunner comes enclosed in a molded plastic container that keeps all hardware secure while being shipped or when hanging on a display rack. One thing that I hate about this type of packaging is that it usually has both sides bonded together, requiring you to cut the package open with a knife. I always end up cutting myself with the sharp edges of plastic, but Thermaltake has decided to use a snap-together design to minimize the effort needed to open their package. This is a great idea that many other manufacturers should consider.
XTunner Unit
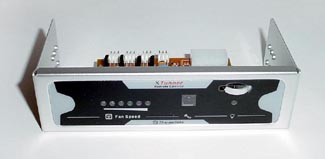
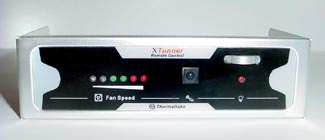
The Xtunner unit is fashioned out of brushed aluminum and features a black accented front which looks very good in both aluminum cases, as well as black cases.
Taking a closer look at the front of the unit you will notice the six LED indicators that are used to show the relative speed of the fans being controlled. Two blue, followed by two green, and then two LED’s are used to decipher what level of adjustment the fans are at. At the lowest setting, the furthest left LED blinks off and on to show that all fans are running at the units slowest speed. At the next setting the blinking LED is solid. Each speed step higher activates another LED until all six are on.
Also on the front of the XTunner unit are the wide-angle IR reciever and “working” light. This working light is solid when the unit is working, and flashes when adjustments are being made to the fan speeds. There is also what Thermaltake calls a “convenient key ring holder” that protrudes from the front of the unit and is used to hang the remote for the XTunner.
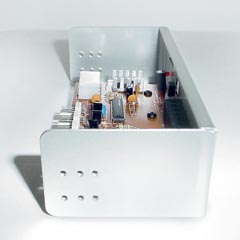
Mounting the XTunner unit in a case is made easy by Thermaltake including six mounting holes on each side to provide many mounting positions to accomidate many case designs.
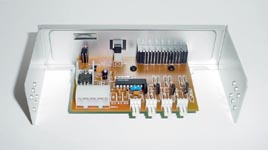
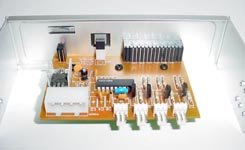
The control board for the XTunner is mounted to the back of the units face plate and is not a marvel of science by any means. The board left out all unnessicary components to keep it as simple as possible. There are four 3pin fan headers at the back of the board for mounting up to four fans. These fans can be CPU heatsink fans, case fans or even watercooling radiator fans. A standard Molex power connector is used to connect the XTunner unit to the powersupply.
Remote Control
Simple. That’s about the only way to describe the remote control unit for the XTunner. Featuring only a “plus” and “minus” button used to increasd and decrease fan speed respectively, this remote is one that anyone can learn to use. The remote is about the size of nine credit cards stacked on top of each other, and is very light weight. On the bottom right of the remote there is a hole for the included keychain to attach to, but I find it hard to belive anyone would want to put this on their keychain because it is such a large item in relation to most items on a keychain. The battery for the remote is replaceable and is easily accessed on the bottom of the remote.
Fan Connections
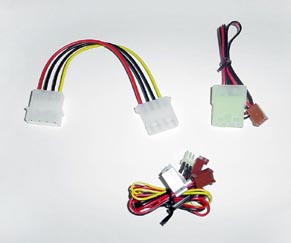
Three 3pin to 4pin fan converters are included to help modify those case fans that use a standard Molex connection. Also included is a fan speed sensor cable that can be ran to the motherboard’s CPU fan header so that it still recieves a signal and functions properly. A four inch Molex power extension is included with the XTunner incase you need a little extra length on a powersupply or fan connection.
|
FIND THE BEST PRICES FOR Thermaltake Accessories AT PRICEGRABBER |
Installation
Installing the XTunner can definitely be a frustrating undertaking if your case is a rat’s nest of wires. Thankfully I am very picky about how my case looks inside and this was not the case for me. Finding all the fan leads to my case fans and routing them to the 5.25 inch bay area was the first step on the way towards remote control bliss. I used all three of the included 3pin to 4pin adapters for my Antec case fans and did not reqire a fourth adapter for my watercooling setup’s secondary radiator fan. Including a fourth 3pin to 4pin adapter would be a nice feature as this would provide an adapter for each fan header on the XTunner unit.
Once all the fans were connected and the XTunner was connected to the power supply, it was time to mount the unit in the case. Thermaltake does not include any mounting screws to my amazement. It is a good thing that I had plenty laying around, but this does not apply to everyone. Not including screws in the packaging is bad business in my mind, but not bad enough to ruin the product. After I rounded up some screws and secured the XTunner to my case I was ready to relax and control my fans without having to lean down to my computer.
Testing
Once the unit was up and running, the first thing I noticed was how much brighter the blue LEDs were than the other LEDs. This is not a glaring flaw by any means, just a noticeable blemish.
Using the remote is very simple, since there are only two buttons. With each button press the speed of the fans increases or decreases, as indicated by the LEDs on the front of the XTunner unit, depending on which button you press.
The remote almost has a 180 degree angle of use and this increases the positions you can be in and still have the unit function properly. I was easily able to contol the XTunner from about 12 feet away without the remote losing any signal strength. Thermaltake claims the remote will work up to 12 meters away. Almost 40 feet seems a little on the extreme side, but if you feel like controling your computer fans from your neighbors house, then feel free to do so.
The only down side I have found with the use of the XTunner is that you have to control all or none of the fans connected to the unit. There is no ability to select individual fans and have them spin at speeds different than the other fans.
On a side note, I was also able to teach my Sony Clie the IR commands from the XTunner’s remote so that I could used the Clie to control the XTunner. The one downside to using the Clie is that the built-in IR on it is not very strong and makes this feature more suitable for other tasks.
Conclusion
Thermaltake has come up with a great product to help you show off your system to your friends, while at the same time making it very convenient for you to adjust the speed of of your system fans. While this ability may not seem like anything more than a gimick by some, I think it definitely has its place in the PC world. A great use for this would be in a home theater PC setup where you could speed up the fans from your couch to keep the system cool when your movie is playing. I know when I get around to building a HTPC that the XTunner will be a great addition to that machine.
Pros
- Great idea and execution of that idea
- Good overall construction
- Large IR angle for maximum usage
Cons
- Slightly large remote control
- No individual fan controlling
- No mounting screws provided
For Thermaltake’s forward thinking and ingenuity, I give the Thermaltake XTunner an 8 out of 10.
|
FIND THE BEST PRICES FOR Thermaltake Accessories AT PRICEGRABBER |
 Bjorn3D.com Bjorn3d.com – Satisfying Your Daily Tech Cravings Since 1996




.JPG)
.JPG)
.JPG)
.JPG)


