When you take a look at all the features included with the AK79G Max, you definitely start to understand the “Max” designation. With Serial ATA, FireWire, USB 2.0, WinBIOS (change BIOS within Windows), EzClock (overclock from within Windows) and many other great features, the AK79G Max is without a doubt one of the most feature-rich nForce2 solutions around. Add this to the fact that it’s a rock solid nForce2 board, and you’ve got yourself an excellent product.
Introduction
AOpen has been creating high performance and high quality products for quite a long time. That makes it no surprise then to see them releasing no less than nine different nForce2 motherboards, especially considering that the nForce2 platform is the current AMD platform of choice and has made plenty of enthusiasts happy. This line up includes the AK79G Max, which has a plethora of innovative and handy features that you won’t find anywhere else, such as WinBIOS, EzClock and Vivid BIOS. It’s definitely a unique and powerful nForce2 solution.
With integrated LAN, graphics and rich audio capabilities, the AK79G Max will make its owner smile about not needing to hassle with installing PCI cards. Of course, many users will want a more robust AGP video card for better graphics performance, but for less hard core gaming fans and those who don’t care to game, this board by itself is a great and simple way to build a system. Just add RAM, case, power supply, processor and hard drive, and you’re set. I find this quite appealing, and any of you who have built a system for your girlfriend, parents or friends probably feel me on that one. Anyway, let’s open the box and see what’s crackin’.
Specifications & Features
Specifications:
Here are the AK79G Max’s specs taken from AOpen’s web site, followed by features also from AOpen.com.
| CPU |
|
| Chipset |
|
| Super I/O |
|
| Clock Gen. |
|
| Main Memory |
|
| Graphics |
|
| IDE |
|
| LAN |
|
| Sound |
|
| USB |
|
| IEEE 1394 |
|
| Slots |
|
| Storage & Back Panel I/O |
|
| On Board Connector |
|
| BIOS |
|
| Form Factor |
|
| Board Size |
|
| Software & Utility |
|
Features:
(additional 80-wire cable included) |
(2nd Flash ROM included) |
There are definitely some cool and innovative features on this board. Here are several that I find intriguing and worth noting. Click the logo in the left hand column to learn more about that feature.
Other great features on this board include onboard sound powered by SoundStorm (considered the best onboard sound solution on the market by many), onboard graphics (GeForce4 MX – also probably the best onboard solution around), onboard Ethernet MAC, IEEE1394 (FireWire) and USB 2.0 support.
Package Contents:
- Easy Installation Guide x 1
- Enhanced Full Pictured Manual x 1
- EzRestore Guide x 1
- Bonus Pack CD disc x 1
- Norton Anti-Virus CD disc x 1
- Floppy Disk cable x 1
- 40-wire IDE cable x 1
- 80-wire ATA133 cable x 1
- Serial ATA cable x 1
- IEEE 1394 cable/bracket x 1
- TV-OUT cable/bracket x 1
- Two ports USB2.0 cable/bracket x 1
- S/PDIF cable/bracket x 1
- Back Panel I/O Shield x 1
| Package Contents (click thumbnail for bigger pic) |
My compliments to AOpen for the nice package. I was impressed with how well it was all packed into the relatively small box. The box is not quite as tall as other mobo boxes I’ve seen, but AOpen still managed to stuff everything in it and still shut the lid. I still can’t quite get it all packed in there correctly in order to close it! 😉 So you get quite a complete package in the box and on the board. Very few users will need a PCI card with this setup, unless of course they want more powerful graphics. The full color easy install manual is a nice touch in this package that I wish more companies would do. Most of what you need to know can be found on the poster-sized guide. I think the black IDE cables is a cool little extra as well.
Installation and Setup
Board Layout:
Before getting into the installation, we should first take a look at the AK79G Max’s physical layout. For the most part everything seems to be layed out logically, and there aren’t any obvious problems. However, upon closer inspection, I found some things that I really don’t like. Please note, though, that I have an engineering sample so this might not be the final retail board layout.
The first thing I noticed that bothered me was how close the power connector is to the floppy connector (which you can see in the second pic below or towards the top of the first pic, above the RAM slots). This is only a minor annoyance, and I don’t consider it a very big issue at all. This will not bother people with smaller hands and/or a lot of room in their case. By the way, the case I installed the AK79G Max into is a Lian-Li PC60USB, so the removable motherboard tray made things more comfortable for me. Not everyone has that luxury though. The second thing that bothered me is how close the FireWire connectors are to the floppy drive connector (which you can also see in those first two images below). There are two cables that connect from the FireWire (IEEE1394) bracket to the board, and the connectors are practically kissing the floppy connector. I’m not sure why they are so far away from where the bracket will be installed (PCI slot area), and I don’t see why they’re positioned so close to the FDD connector. It just makes connecting the FireWire bracket more of a hassle than it should be in my opinion. Obviously this won’t be an issue with someone not interested in using FireWire. Finally, the last complaint I have about the layout is the placement of the CD-in and AUX-in connectors (for CD/DVD drive audio cables). You can see them in the first picture below in the lower right hand corner — the AUX-in connector is green and CD-in is black. Again, it seems that these are in the opposite corner of the one they should be in; they are about as far away from your optical drives as they can be! Plus, if you actually install PCI cards, then the audio cables and cards might get in each other’s way and cause a problem.
| Board Layout (click thumbnail for bigger pic) |
||
 AK79G Max AK79G Max |
 Nice HSF on IGP chip, AGP, RAM slots, power connector, FDD connector, etc. |
 Heatsink on MCP-T chip, IDE connectors, DieHard BIOS chip, etc. |
Enough about what I don’t prefer about the layout. On to what I do like. The first thing I noticed was the nice heatsink and fan combo on the IGP. It’s very cool looking and should do a sufficient job cooling the chip. AOpen didn’t stop there though. They also slapped a nice chunk of metal on the MCP-T chip as well. Nice! I wish more companies would hook the consumer up properly like this! The northbridge and southbridge on any mainboard will get pretty hot, so this is a feature most people can appreciate. Another positive aspect of the layout is the area surrounding the processor socket. AOpen was smart enough to keep most capacitors a good distance away, so it was no problem at all installing my Athlon XP 2100+ and ThermalTake Volcano 9 HSF (which is huge in case you aren’t familiar with it). The last cool thing about the board is the colors. I really like the black PCB and the rest of the coordinated colors, such as the yellow IDE connectors.
Installation and Setup
I have to admit that I was pretty excited to install and set up the AK79G Max, mainly because of all the interesting features like WinBIOS and EzClock. I was very interested in seeing if and how well these Windows-based functions work. Before we can get to those utilities though, we have to get everything installed.
Installing everything was simple and headache-free. I mentioned my issues with the board above so there’s no need in repeating them, but nothing caused an installation problem. Maybe a small hassle here and there, but I’ve never seen a motherboard that doesn’t have at least a couple of those! After getting the motherboard in my case and hooking up the software, I installed Windows XP Professional. After installing XP, I popped in the included driver CD. The CD auto-runs and asks you to choose the motherboard model from a list and your operating system. After making my choices and clicking OK, it installed the nForce drivers. After a reboot, everything was working as expected — onboard ethernet, graphics, etc.
After getting my system up and running, I decided to check out the unique AOpen utilities that are included on the included CD. They can all be installed from the menu that pops up after the CD auto-runs. Each installed quickly and without any problems — nice, simple installations. I have yet to use them extensively, but I got a feel for the following utilities: SilentTek / Hardware Monitor, AOConfig, EzClock, WinBIOS and EzSkin.
SilentTek / Hardware Monitor
The first utility that I installed was the SilentTek / Hardware Monitor Utility. As the name implies, this application provides a way to monitor your system, including fan speeds, system temperature, CPU temperature, voltages and much more. When you try to run the utility the first time, it requires a restart so that it can gather your system information. Overall, I think it’s a pretty handy tool.
| SilentTek / Hardware Monitor (click thumbnail for bigger pic) |
||
 |
||
AOConfig
This utility gives you a quick and easy way to check details about your system. You can see general system, IDE and PCI device info. In the screen shot, you can see the system info page, which provides some useful details about your system.
| AOConfig (click thumbnail for bigger pic) |
||
 |
||
EzClock
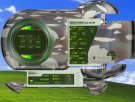
AOpen’s intention with EzClock was to make overclocking and tweaking a little easier and more fun I think. The idea is pretty cool, but I don’t think the user interface quite works as they planned. I am unable to change the FSB value, but I can change the CPU voltage, DIMM voltage and several other system voltages. Current settings for all values are displayed. CPU temp is also displayed in both Celsius and Fahrenheit, which is a nice touch! All of this is viewed and done within Windows too. Overall, it’s a good effort from AOpen, and I can’t wait to see a newer, improved version of this utility.
| EzClock (click thumbnail for bigger pic) |
||
 |
||
WinBIOS
WinBIOS allows you to access the AK79G Max’s BIOS and make changes to it in Windows. Unlike EzClock, after making changes in this Windows-based BIOS, you will have to restart your computer for the changes to take effect. Another decent idea, but since it doesn’t eliminate restarting the PC, it isn’t much different from using the regular BIOS. You can see what WinBIOS looks like in the BIOS section below.
EzSkin
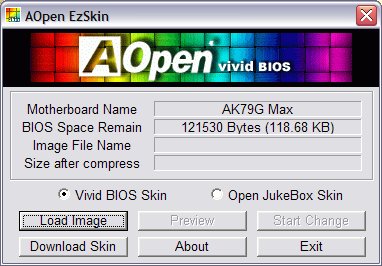
EzSkin is an interesting utility that gives you the ability to change the “skins” of VividBIOS and the JukeBox player. Obviously, this is a “just for the fun of it” type of utility. If you’re sick of the plain old typical BIOS POST screen, you can download skins or make your own and change it. Skins for VividBIOS can be found here and skins for JukeBox can be downloaded here.
BIOS
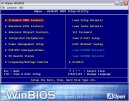
The AK79G Max BIOS is a little different from what I am used to. For example, the FSB, memory frequency and multiplier is listed in the Frequency/Voltage Control menu instead of the Advanced Chipset Features menu. It’s no big deal; it just caught my attention. You can see what the BIOS screens look like by checking out the WinBIOS pictures below.
| AK79G Max BIOS (click thumbnail for bigger pic) |
||||
 Main BIOS Menu Main BIOS Menu |
 Advanced BIOS Features Advanced BIOS Features |
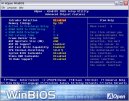 Advanced Chipset Features Advanced Chipset Features |
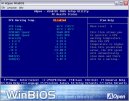 PC Health Status PC Health Status |
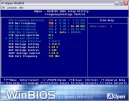 Frequency/Voltage Control Frequency/Voltage Control |
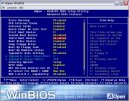
WinBIOS looks very similar to the regular BIOS, but some of the screens are actually slightly different in some ways. As you can see in the picture, the Advanced Chipset Features screen lists the current memory timings. You also have a choice between “Manual” and “By SPD.” Obviously, in order to change the timings to your exact specifications, you must choose “Manual” and then change them as desired. This menu also features the Frame Buffer Size, which your system uses when the integrated graphics are being used. If you don’t intend to use the IGP, you can just disable this option. The CPU health status screen shows CPU and system temp, fan speeds and voltages.
At the Frequency/Voltage Control screen you can change the CPU Bus Frequency by 1 MHz increments (up to 200), but the multiplier was not adjustable with the BIOS version that this board shipped with. The AGP Bus Frequency can also be increased or decreased in 1 MHz increments while the memory frequency is set as a percentage of the CPU Bus Frequency, from 50% to 200%, which means you have to choose 100% to set your system up in synchronous mode. “Auto” is also available. This setting basically just reads the type of RAM you have installed and sets it up as such. For example, when set to “Auto” with Kingston HyperX KHX3500 DDR, the BIOS lists “DDR434” as the resulting speed. CPU voltage is adjustable in 0.025 increments from 1.100 V to 1.825 V, and Vdimm ranges from 2.50 V to 2.70 V, variable in 0.05 increments.
System Peformance
To test the system performance of the AK79G Max, I used SiSoft Sandra 2002 and PCMark2002. I will be comparing how the board performs when using the onboard graphics versus how it performs when a Ti4800SE is installed. The FSB was set to 133 and memory was set up in the BIOS as 133 x 100%, or 266MHz which is of course synchronous.
Test System:
- AOpen AK79G Max nForce2
- AMD Athlon XP 2100+ w/ Thermaltake Volcano 9 HSF
- 512MB Kingston HyperX KHX3500 (2x256MB)
- Gainward GeForce4 Ti4800SE – Ultra/750-8X XP Golden Sample (compared to onboard GF4 MX)
- Maxtor 80GB Ultra Series ATA/133 8MB Buffer
- PlexWriter 12/10/32A CDRW
- NVIDIA Drivers: 41.04 Detonators
Where Are the Comparisons?
The lack of a direct comparison in this review is due to the fact that too much hardware (RAM, graphics card, hard drive) changed in this test system to legitimately compare head-to-head with previous nForce2 boards I reviewed. The good news though is that I will try to keep this as my test sytem for future benchmarking. Comparisons (with a little assumption and thought) can still be made though of course, and here are our other nForce2 mobo reviews for your reference:
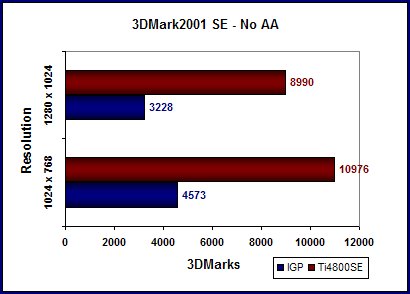
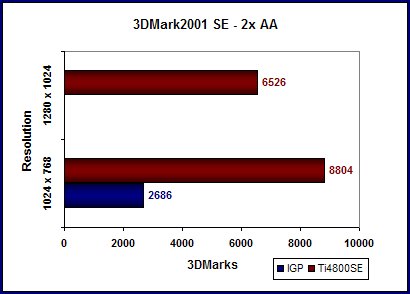
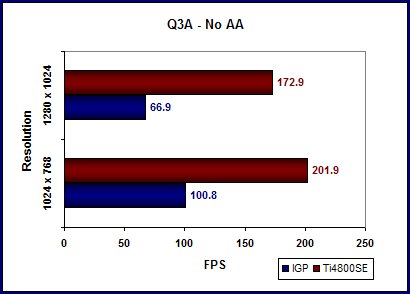
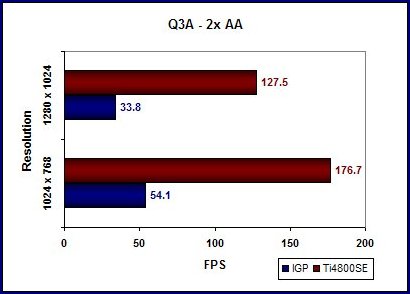
This review does demonstrate how much the integrated graphics can affect system performance though, at least in terms of benchmarks. Also please try to keep in mind that this is an engineering sample board, so it’s not quite what you’d get retail.
SiSoftware Sandra 2002
Futuremark PCMark2002
| PCMark2002 Scores (click thumbnail for bigger pic) |
|||||||||||||
| AK79G Max – Using IGP | AK79G Max – With Ti4800SE | ||||||||||||
|
|
||||||||||||
 |
 |
||||||||||||
Gaming Peformance
I tested the AK79G Max’s gaming performance using Quake 3 Arena’s four demo in Q3Bench and Futuremark’s 3DMark2001 SE. When running these tests, anisotropic filtering was disabled, and performance was set to balanced. I will also note for those unfamiliar with the Gainward Ti4800SE Ultra/750-8X that its clock speed is 275MHz / 550MHz (core / memory).
3DMark2001 SE
Quake 3 Arena
Conclusion
The AOpen AK79G Max performs great and is stable, as can be expected of an nForce2. When you take a look at all the features included with the AK79G Max, you definitely start to understand the “Max” designation. With integrated GeForce4 MX graphics, SoundStorm, Serial ATA, FireWire, USB 2.0, WinBIOS (change BIOS within Windows), EzClock (overclock from within Windows), JukeBox and many other great features, the AK79G Max is without a doubt one of the most feature-rich nForce2 solutions around.
All of the integrated features performed great. The graphics are more than sufficient for the average user. Of course SoundStorm sounds great as usual, and there were no problems with the onboard MAC. The AK79G Max will definitely be a good system-builder type of board — give users everything they want at a decent price (around $130 on Newegg.com as of 4/4/03), without sacrificing quality.
As I mentioned previously, I do have some issues with layout choices that AOpen made, and while the cool utilities are very intriguing and cool at first glance, they could use some polishing. I also don’t really prefer the way the BIOS is set up. Maybe it’s just that I like what I’m used to; I’m not sure.
For its solid performance, great features and excellent package, I’m giving the AOpen AK79G Max an 8.5 out of 10. I’m sure after some tweaking and a BIOS update this board will be even better!
Once again here are our past nForce2 motherboard reviews:
 Bjorn3D.com Bjorn3d.com – Satisfying Your Daily Tech Cravings Since 1996


