The Asus Maximus 3 Extreme LGA 1156 board is so feature rich and full of overclocking goodness that it’s hard to believe that they stuffed all those features on one board.
Introduction
For every platform, a premiere board appears for every vendor. Asus is known for making the end-all and be-all of premier boards. The Asus Maximus 3 Extreme just about goes beyond that stage. When we first received the board, the sheer number of features was overwhelming. What amazed us most was that almost all of the features were practical and useful. Often, the features on a board are more fluff than substance. That’s hardly the case with the Maximus 3 Extreme, these features are practical, easy to use and make it an epic board destined for the motherboard hall of fame.

Based on Asus’s legendary black and red color scheme, the Asus Maximus 3 Extreme promises to be a legendary overclocker; but if that’s all you see in the board, you are overlooking some of the best features.
| Motherboard | Platform | Price |
| Asus Maximus 3 Formula ROG | LGA 1156 | $249 |
| Asus Maximus 3 Gene | LGA 1156 | $233 |
| Asus Maximus Formula | LGA 775 | $329 |
| Asus P7P55D | LGA 1156 | $149 |
| Asus P7P55D Deluxe | LGA 1156 | $169 |
| Asus P7P55D Evo | LGA 1156 | $195 |
Specifications
We’ll warn you right up front that this one of the longest specifications tables we’ve ever built. It’s well worth pouring over, because of the unique specifications on the Maximus 3 Extreme. Because of the length, we are splitting the Features & Specifications page into two separate pages. To draw the eye, we’ve highlighted some of the more interesting features in bold text.
| CPU | Intel® Socket 1156 Core™ i7 Processor/Core™ i5 Processor/Core™ i3 Processor Supports Intel® Turbo Boost Technology |
| Chipset | Intel® P55 Express Chipset |
| Memory | 4xDIMM, Max 16 GB, DDR3 2200(O.C.)/2133(O.C.)/2000(O.C.)/1800(O.C.)/1600/1333/1066 Non-ECC,Un-buffered Dual Channel memory architecture * Hyper DIMM support is subject to the physical characteristics of individual CPUs. * Supports Intel® Extreme Memory Profile (XMP) |
| Expansion Slots | 5 x PCIe 2.0 x16 Supports single at x16, dual at x16, triple at x 16 x16 x8, quad x8, or 5 x8 1 x PCI 2.2 |
| Storage | Intel® P55 Express Chipset built-in 6 xSATA 3.0 Gb/s ports (Gray) Intel Matrix Storage Technology Support RAID 0,1,5,10 JMicron® 363 controllers: – 1 x SATA 3.0 Gb/s port (Black) – 1 x External SATA 3.0 Gb/s port (SATA On-the-Go) Marvell® PCIe SATA 6Gb/s controller – 2 x SATA 6.0 Gb/s ports (Red) |
| LAN | Realtek® RTL8112L Gigabit LAN controller |
| Audio | VIA® VT2020 10-Channel High Definition Audio CODEC – Supports Blu-ray audio layer content protection – Supports 1 Optical S/PDIF out port at back I/O – Supports 1 S/PDIF out header – Supports Jack-detection, Multi-streaming, Front Panel Jack-retasking |
| IEEE 1394 | 2 x 1394a port(s) (1 port onboard, 1 port at back I/O) |
| USB | NEC® USB 3.0 controller – 2 x USB 3.0/2.0 ports (at back I/O) Intel® P55 Express Chipset – 11 USB 2.0 ports (4 ports at mid-board, 7 ports at back I/O, 1 port at back I/O is also for ROG connect) |
| Overclocking Features | ROG Connect RC Bluetooth Extreme Engine Digi+ – 8-phase CPU digital VRM power – 3-phase VTT digital VRM power – 3-phase Memory power – ML Cap for CPU ProbeIt iROG Extreme Tweaker BIOS Flashback Loadline Calibration Intelligent overclocking tools: – 8 O.C. Profile Overclocking Protection: – COP EX (Component Overheat Protection – EX) – Voltiminder LED – ASUS C.P.R.(CPU Parameter Recall) |
| Special Features | CPU Level Up MemOK! Onboard Button: Power / Reset / Clr CMOS (at back IO) ASUS MyLogo3 ASUS Fan Xpert ASUS EZ Flash 2 ASUS CrashFree BIOS 3 ASUS Q-Connector ASUS Q-LED (CPU, DRAM, VGA, Boot Device LED) ASUS Q-Slot ASUS Q-DIMM |
| Back Panel I/O Ports | 1 x External SATA 1 x IEEE 1394a 1 x LAN(RJ45) port 10 -Channel Audio I/O 1 x Clr CMOS switch 1 x PS/2 Keyboard port (purple) 2 x USB 3.0/2.0 ports 7 x USB 2.0 ports (1 port also for ROG 1Connect) 1 x ROG Connect On/Off switch S/PDIF Out (Optical) |
| Internal I/O Connectors |
2 x USB connectors support additional 4 USB 2.0 ports 8 x Fan connectors: 1 x CPU / 1 x PWR / 3 x Chassis / 3 x Optional |
| BIOS | 16 Mb Flash ROM AMI BIOS, PnP, DMI2.0, WfM2.0, SM BIOS 2.5, ACPI2.0a Multi-Language BIOS |
| Manageability | WOL by PME,WOR by PME,PXE |
| Accessories | 1 x RC Bluetooth Card 1 x I/O Shield 1 x Optional Fan 1 x ROG Connect Cable 1 x SLI Cable 1 x 3-way SLI Cable 1 x 2-in-1 ASUS Q-Connector Kit 1 x 2-in-1 SATA 6.0Gb/s Cables 3 x 2-in-1 SATA 3.0Gb/s Signal Cables 1 x 2-port USB2.0 + ESATA Module 1 x Thermal Sensor Cables Pack 1 x Cable Ties Pack 1 x ROG Theme Label 1 x 12-in-1 ROG Cable Label 1 x User’s Manual Bluetooth Module Accessory Card |
| Support Disc | ASUS PC Probe II ASUS AI Suite ASUS Update Kaspersky® Anti-Virus Support DVD: – Drivers and Applications Futuremark® 3DMark® Vantage Advanced Edition ASUS TurboV EVO Utility |
| Form Factor | ATX Form Factor |
| Size | 12 inch x 9.6 inch (30.5 cm x 24.4 cm) |
Features
CPU, Chipset and Graphics features
LGA1156 Intel® Lynnfield Processor Ready
This motherboard supports the latest Intel® Lynnfield processors in LGA1156 package which has memory and PCI Express controller integrated to support 2-channel (4 DIMMs) DDR3 memory and 16 PCI Express 2.0 lanes providing great graphics performance. Intel® Lynnfield processor is one of the most powerful and energy efficient CPU in the world.
Quad-GPU SLI and Quad-GPU CrossFireX Support!
The Asus Maximus 3 Extreme brings you the multi-GPU choice of either SLI™ or CrossFireX. The motherboard features the most powerful Intel P55 platform to optimize PCIe allocation in multiple GPU configurations. Expect a brand-new gaming style you’ve never experienced before!
Intel P55
The Intel® P55 Express Chipset is the latest one-chipset design to support latest 1156 socket Intel® Core™ i7/Core™ i5 Processors. Intel® P55 providing improved performance by utilizing serial point-to-point links, allowing increased bandwidth and stability.
PCIe 2.0
Double Speed; Double Bandwidth
This motherboard supports the latest PCIe 2.0 devices for double speed and bandwidth which enhances system performance.
Memory Features
Dual-Channel DDR3 2000 / 1800 / 1600 / 1333 / 1066 support
The motherboard supports DDR3 memory that features data transfer rates of 2200 (OC) / 2000 (OC) / 1866 / 1600 /1333 / 1066 MHz to meet the higher bandwidth requirements of the latest 3D graphics, multimedia, and Internet applications. The dual-channel DDR3 architecture enlarges the bandwidth of your system memory to boost system performance.
RC Bluetooth
Overwhelm your acknowledgement with wireless overclocking experience!
Still overclocking in the old-fashioned way? Let RC Bluetooth bring you the whole new idea of how to do! Just simply push the button from the Back I/O on the RC Bluetooth card, overclockers can real-time monitor the desktop PC system status & tweak its parameters – such as voltages and frequency on the fly. When users want to use ordinary bluetooth functions, just simply push the button once again & enjoy all the wireless convenience brought from RC Bluetooth.
ROG Connect
Plug and Overclock – Tweak it the hardcore way!
Monitor the status of your desktop PC and tweak its parameters in real-time via a notebook—just like a race car engineer—with ROG Connect. ROG Connect links your main system to a notebook through a USB cable, allowing you to view real-time POST code and hardware status readouts on your notebook, as well as make on-the-fly parameter adjustments at a purely hardware level.
Extreme Engine Digi+
Say hello to the next generation design
Extreme Engine—a next generation dynamic multi-phase power management equipped with high performance digital Voltage Regulator Module (VRM) design. Through digital power management, the board can easily achieve the ultimate performance with adjustable CPU PWM frequency. The FET+ expedite heat dissipation & achieve better electric conduction. ML Cap ensures a stable power supply during overvoltage by lowering Equivalent Series Resistance (ESR), keeping critical components reliable. This means you’ll be able to push your spanking new Intel CPU to the limit, hitting benchmark scores that others only dream of. Extreme Engine balances the need for voltage and the desire for rock solid performance to bring the ultimate user experience.
USB BIOS Flashback
No worry of BIOS crash anytime!
USB BIOS Flashback must be the most convenient way to flash BIOS ever! It allows overclockers to try their BIOS with the simplist way one can imagine. No need to enter the BIOS or the operating system, just plug the thumb drive into the ROG Connect port & push the ROG Connect button for 2 seconds, BIOS would be automatically flashed under standby power. It´s no doubt that USB BIOS Flashback gives overclockers the ultimate convenience!
MemOK!
Any memory is A-OK!
Memory compatibility is among the top concerns when it comes to computer upgrades. Worry no more, MemOK! is the fastest memory booting solution today. This remarkable memory rescue tool requires nothing but a push of a button to patch memory issues and get your system up and running in no time. The technology is able to determine failsafe settings that can dramatically improve system booting success.
iROG
Intelligent multiple control at hand
The iROG is a special IC which enables several ROG highlitghted functions that gives users full disposal of the motherboard at any stage! This design allows advanced user control and management to be processed purely at a hardware level. iROG greatly increases fun during overclocking for PC enthusiasts and it offers system maintainence and management with more control and efficiency.
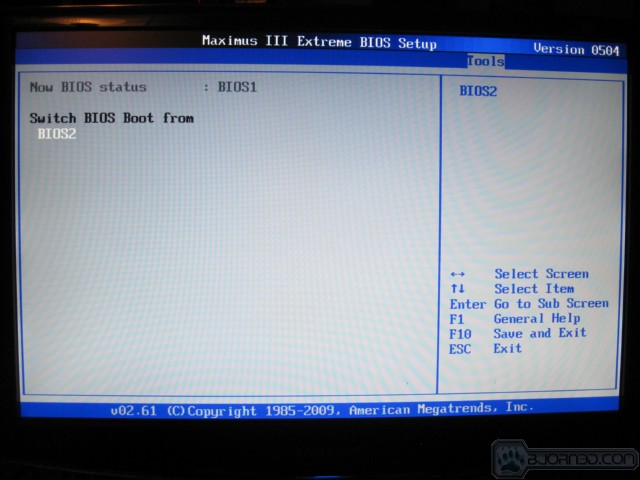
BIOS FlashBack
Two BIOS ROM. Two BIOS settings. Twice the overclocking flexibility.
Overclocker´s prayer to have BIOS flexibility is answered! With the new BIOS Flashback, PC enthusiasts can overclock with even more confidence. BIOS Flashback gives overclockers the ability to save two versions of the BIOS simultaneously. Very much like the “SaveGame” function, one BIOS can be used for the overclocking adventure, while the other BIOS is to be stored with any previous version. BIOS Flashback brings the ultimate convenience to overclockers! By pushing BIOS button, overclockers can easily choose which BIOS ROM they want to save & boot from.
ProbeIt
Get all hands-on with hardware-based overclocking
ProbeIt takes the guesswork out of locating the motherboard´s measurement points, identifying them clearly in the form of 5 sets of detection points so you´ll know exactly where to get quick yet accurate readings using a multitester.
CPU Level Up
A Simple click for instant upgrade
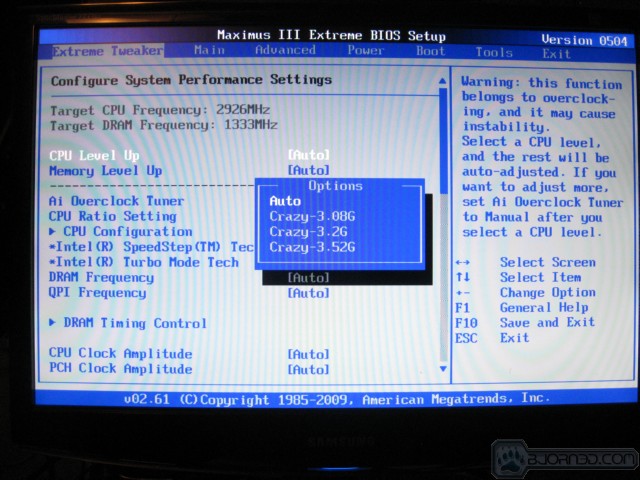
Ever wish that you could have a more expensive CPU? Upgrade your CPU at no additional cost with ROG´s CPU Level Up! Simply pick the processor you wanted to OC to, and the motherboard will do the rest! See the new CPU speed and enjoy that performance instantly. Overclocking is never as easy as this.
Extreme Tweaker
One stop performance tuning shop
Extreme Tweakers is the one stop shop to fine-tune your system to optimal performance. No matter if you´re looking for frequency adjustment, over-voltage options, or memory timing settings, they´re all here!
Voltiminder LED
Friendly reminder on Voltage Settings
In the pursuit of extreme performance, overvoltage adjustment is critical but risky. Acting as the “red zone” of a tachometer, the Voltiminder LED displays the voltage status for CPU, PCH, and Memory in a intuitive color-coded fashion. The voltiminder LED allows quick voltage monitoring for overclockers.
COP EX
Maximum OC with confidence with burn proof protection to chipsets and GPU!
The COP EX allows overclockers to increase chipset voltages without the worries of overheating. It can also be used to monitor and save an overheating GPU. The COP EX allows more freedom and less constraint for maximum performance achievement.
Loadline Calibration
Optimal power boost for extreme CPU overclocking!
Maintaining ample voltage support for the CPU is critical during overclocking. The Loadline Calibration ensures stable and optimal CPU voltage under heavy loading. It helps overclockers enjoy the motherboard´s ultimate OC capabilities and benchmark scores.
Onboard Switch
No more shorting pins or moving jumpers
an easy press during overclock, this exclusive onboard switch allows gamer to effortlessly fine-tune the performance without having to short the pins or moving jumpers!
ASUS Q-Connector
Make connections quick and accurate
The Q-Connector allows you to connect or disconnect chassis front panel cables in one easy step with one complete module. This unique adapter eliminates the trouble of plugging in one cable at a time, making connection quick and accurate.
Q-Fan Plus
Optimized quietness and cooling for more devices!
The Q-Fan function automatically detects temperature and adjusts fan speed accordingly to achieve quiet and efficient cooling.
USB 3.0 Support
10X Faster Date Rates!
Experience ultra-fast data transfers at 4.8Gbps with USB 3.0—the latest connectivity standard. Built to connect easily with next generation components and peripherals, USB 3.0 transfers data 10X faster and is also backward compatible with USB 2.0 components.
SATA 6Gb/s Support
Experience the future of storage!
Supporting next-generation Serial ATA (SATA) storage interface, this motherboard delivers up to 6.0Gb/s data transfer rates. Additionally, get enhanced scalability, faster data retrieval, double the bandwidth of current bus systems
O.C. Profile
Conveniently store or load multiple BIOS settings
Share and distribute favorite overclocking settings. The motherboard features the ASUS O.C. Profile that allows users to conveniently store or load multiple BIOS settings. The BIOS settings can be stored in the CMOS or a separate file, giving users freedom to share and distribute their favorite overclocking settings.
10-channel Audio
Enjoy high-end 10-channel sound system on your PC
The onboard 10-channel HD audio (High Definition Audio, previously codenamed Azalia) CODEC enables high-quality 192KHz/24-bit audio output, jack-sensing feature, retasking functions and multi-streaming technology that simultaneously sends different audio streams to different destinations. This motherboard now adopts the future standard to deliver the most vivid audio enjoyment.
Software Bundled
3DMark® Vantage Advanced Edition
The gamers´ benchmark
3DMarkVantage is the new industry standard PC gaming performance benchmark from Futuremark, newly designed for Windows Vista and DirectX10. It includes two new graphics tests, two new CPU tests, several new feature tests, and support for the latest hardware. 3DMark® Vantage is based on a completely new rendering engine, developed specifically to take full advantage of DirectX10, the new graphics API from Microsoft.
Kaspersky® Anti-Virus
The best protection from viruses and spyware
Kaspersky® Anti-Virus Personal offers premium antivirus protection for individual users and home offices. It is based on advanced antivirus technologies. The product incorporates the Kaspersky® Anti-Virus engine, which is renowned for malicious program detection rates that are among the industry´s highest.
Asus Special Features
The new and improved ROG Connect Via Bluetooth:
This multi-purpose remote management feature was aimed to allow user to gain the full control of system via a remote console, as well as adjusting performance related BIOS parameters on the fly whenever needed without interfering any running operations/applications on the system.
Before we get into ROG Connect with Bluetooth we wanted to let you know that you can’t just use any Bluetooth enabled device. There’s a very specific list of requirements for using ROG Connect Via Bluetooth and if your Bluetooth device doesn’t meet these specifications you can’t use it. You can use any Android 2.0 or later phone or windows mobile 6.1 or 6.5 and newer but Asus has tested these phones specifically.
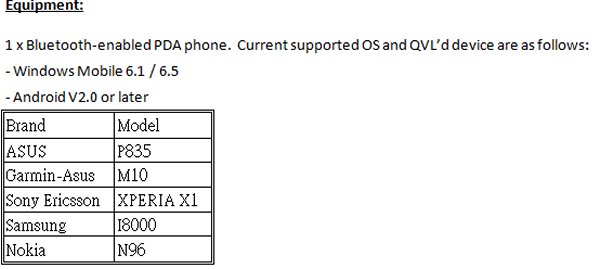
Then of course you will need the Asus Maximus 3 Extreme up and running and you can wirelessly connect and OC from your Bluetooth device. Some may ask why they would want to do that. Say you are into LN2 overclocking and would prefer to stand back away from the LN2 while OCing. ROG Connect Via Bluetooth would allow you to do that. For what it’s worth it’s a cool feature but the number of people receiving any benefit from it will be very limited. We have stock company screen-shots of the program for you but our Bluetooth device doesn’t meet the stiff requirements so we can’t actually test with Bluetooth. We will be testing ROG Connect with a laptop and male to male USB cable a little later.
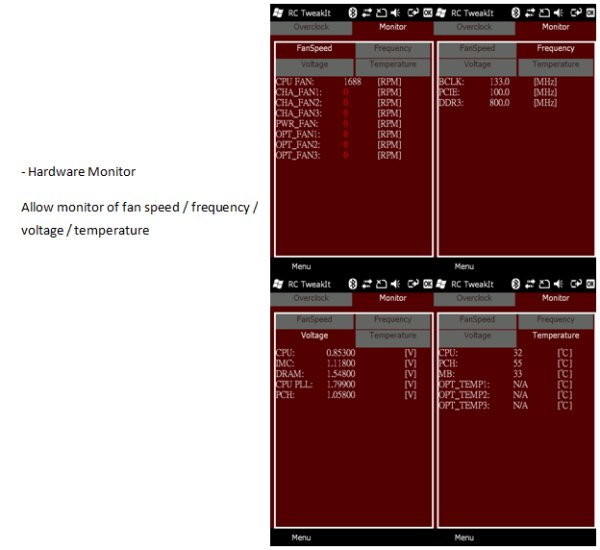
ROG Connect VIA Bluetooth is basically a pocket PC application that allows you to overclock from a hand held Bluetooth device. You can see fan speeds, BCLK, PCI-E frequency settings, and DDR speed. You can also see the CPU, IMC, Dram, CPU Pll, and PCH voltages all on one screen by just selecting the different tabs available. In most cases that’s more information on a hand held device than you have access to at any given time when OCing in BIOS. You can also real time monitor temperatures for the CPU, PCB and Motherboard. There are optional temperature monitors you can tie to thermal sensors that can be attached to the Maximus 3 Extreme.
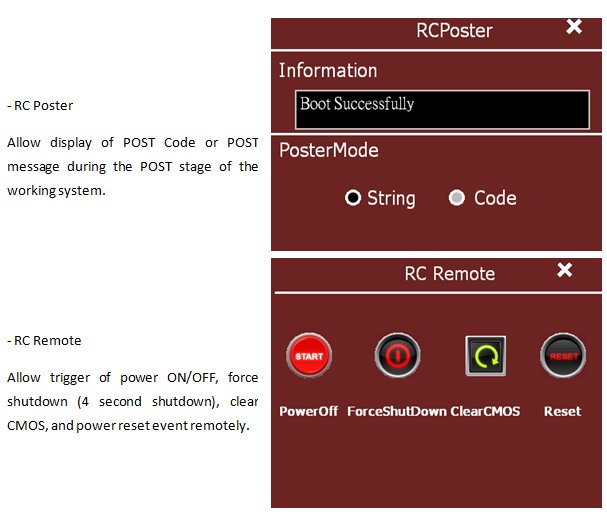
RCPoster you can follow the post codes of the rig to attempt to debug potential boot problems during overclocking. You can also access a full features RC Remote to start up the rig, Force a shut down (takes 4 seconds), clear CMOS and a power reset button. The interesting thing is that you can do it wirelessly without having to lean over a running rig or get up and move around the rig to get to controls. If you haven’t overclocked outside a chassis for extreme overclocking that might not seem like a lot but if you have or have seen extreme overclocking you understand what a jewel of a feature this really is.
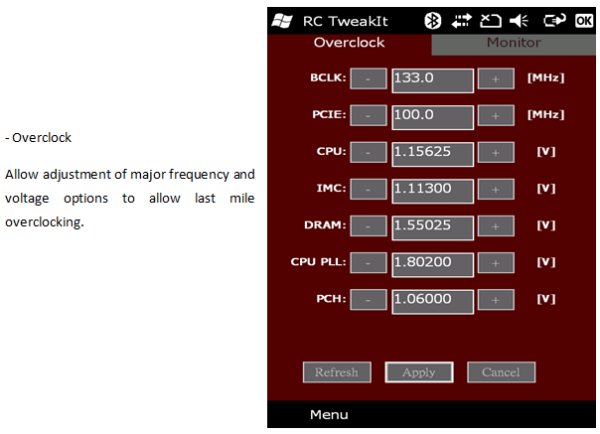
On the OC screen you get a pretty basic OC screen with BCLK and PCI-E settings you can change, noticeably absent are Ram settings and Ram Dividers which can be essential to overclocking. You do get access to the most important OCing voltages and most people would be good with the selection of voltages available. We would suspect that for ultra fine tuning on an expert level you would eventually need to go into BIOS.
RC Connect Via USB Cable
We are going to OC the Asus Maximus 3 Extreme with RC Connect Via USB Cable (or try anyway) a little later in the review but we wanted to give you the cookie cutter info provided by Asus because taking all the screenshots during OCing on two different computers simultaneously might get a little dodgy. Or we might drive a railroad spike in our foreheads from the frustration of trying to get screenshots that make any sense. Hang around and see which happens.
System Requirements For ROG Connect Via Male to Male USB Cable
- Any USB 2.0 enabled system running Microsoft Windows XP or above operating systems.
- Male to male USB cable
- Connect the male to male USB cable between the ROG_Connect port and any USB port on the control terminal system.
- Install TweakIt application on the control terminal system.
- Switch ROG_Connect button to lock state by pressing the ROG_Connect button.
- Execute TweakIt application to establish ROG_Connect connection.
For a control terminal you can use a laptop or desktop. We’ll be doing it from the lab laptop because OCing one desktop with another desktop would be handy for something like an LN2 event. You would be able to show the crowd the on the fly OCing involved but here in the Lab it’s just us our hotpockets and Zena tapes so we are using a Laptop.
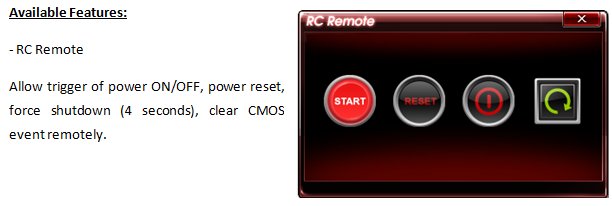
You’ll get remote control of the start button, reset button, power off (4 second delay) and clear CMOS.
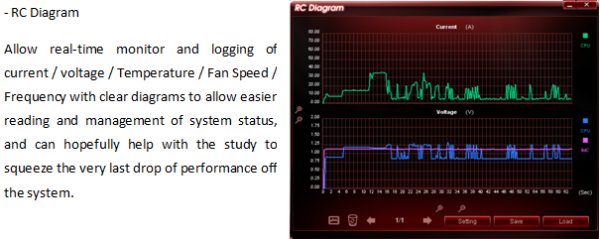
You’ll get real-time monitoring and logging of current/voltage/Temps/Fan speeds/frequency which should help in the end user analyse what’s going on with the rig during OCing.
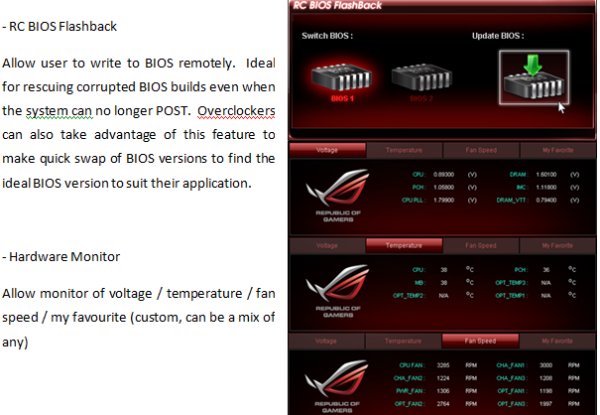
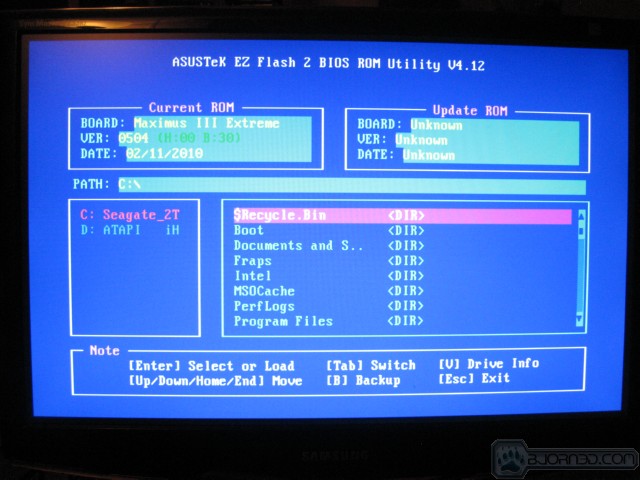
RC BIOS Flashback is an extremely cool feature where you can switch BIOS chips remotely or update BIOS remotely. Personally we still prefer to Flash Asus BIOS using the EZ-flash utility in BIOS but from what we understand you can flash a dead bios back to life using RC BIOS Flashback. Since you have Dual BIOS on the Maximus 3 Extreme if one BIOS gets corrupted you should stop at that point and restore that BIOS prior to continuing your OCing exploits. If you corrupt both BIOS which would be a pretty bonehead stunt you should be able to flash it back to life using RC BIOS Flashback.
You can also get comprehensive monitoring of Voltages, Temps, and fan speed, you can also customize a screen. It would probably serve you better if the monitoring screen were on the actual OCing screen but RC Connect is a work of art in progress.
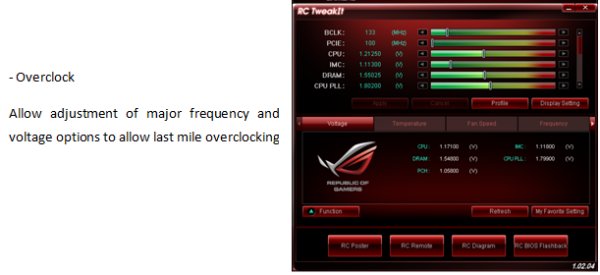
Then you get almost everything you need to do remote overclocking all in one spot. Pretty sweet if it works like advertised. Since we’ve seen it in action at CES we are sure the new version will be even better.
Extreme Engine Digi+:
The implementation of Extreme Engine Digi+ was designed to enable overclockers to push the new generation of CPUs to the limit. The next-generation dynamic multi-phase power management system equipped with high performance ML Caps that ensure a stable power supply during overvoltage by lowering ESR (Equivalent Series Resistance), which successfully delivers the advantage of both analog and digital VRM all in one go, keeping mission-critical components such as the processor, system memory and the Northbridge reliable while maintaining high power efficiency.
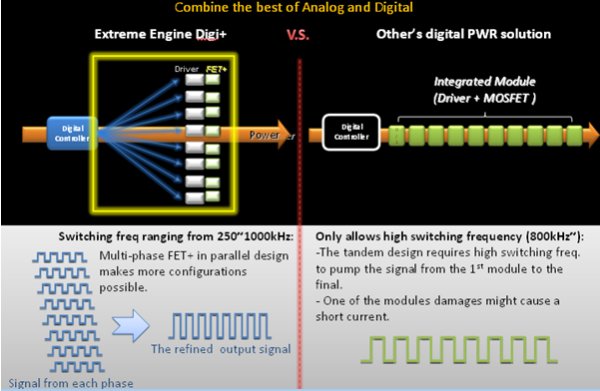
We don’t have much info on Extreme Engine Digi+ but what it does for you is allows for a greater range of frequency switching from 250kHz to 1000kHz while traditional digital designs only allows 800kHz switching. Asus is working on getting us more information on Extreme Engine Digi+ so hopefully we’ll have more for you later
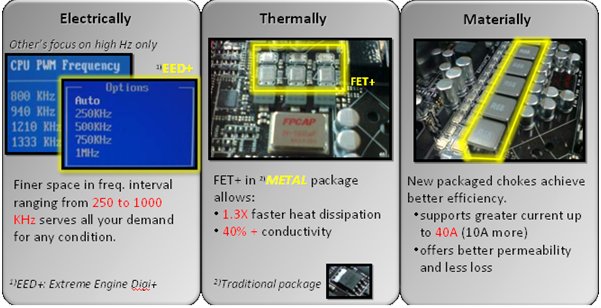
From what we can see Extreme Engine Digi+ allows for the previously mentioned higher frequency range, faster heat dissipation and better conductivity from a parallel design as opposed to a serial design. Digi+ is also capable of providing 10A more than traditional setups with better efficiency and less loss.
Other special design and features
Please note that the rest of the information on this page is direct from Asus and unedited for content.
Almost every motherboard comes with several unique features to add more value to their products. Asus motherboards are no exception, and has offered wide ranges of well known features in the past years. Below are the briefs of highlighted special features on MAXIMUS III EXTREME:
CPU Level UP
The award winning CPU Level UP function has finally made its way to commercial motherboards. Users can now enjoy the quick and easy system boost of system performance by selecting the processor you wish to OC to, and the motherboard will handle the rest! With a verity of selections of CPUs levels to OC to, users are able to experience the performance boost just like having a CPU upgrade.
Ultimate memory compatibility, even under full four DIMM configurations.
It has been a while, since users began to understand the fact that full loading of DIMMs occupying all DIMM slots can indeed affect the overall memory compatibility of the motherboard. Sometimes, under worse conditions, this may even result in not being able to honor its claimed memory specification. Asus believes that, it is about time to move on, and unleash the full potential of the motherboard to all our customers, and hence developed the unique new layout design which largely improves the memory compatibility of high performance DIMMs under full load (i.e. occupying all four DIMM slots).
No need to disconnect AC power before Clear CMOS
You may have been noticed that P55 chipset has a unique characteristic, which powers up automatically when CMOS Clear operation was done while AC power has not been disconnected. This, though all means should not cause too much of a problem, as it is always advisable to disconnect the main power (i.e. AC) before clearing CMOS operation has been performed. However, as this is not general knowledge, there is always a possibility for an unfortunate event to occur if users are unaware of this limitation. ASUS RD team has hence put in the time and effect, and has eventually resolved this limitation once and for all. Give this a try, and you will feel the difference.
Go Button
This is yet another exclusive revolutionary feature from Asus, which allows your motherboard to boot even if there might be some compatibility issues between the motherboard and the memory. All the user has to do, is to simple hold the MemOK! button till the red LED begins to blink to ask motherboard to take the charge of self-memory patching process, and fix the memory compatibility before your very own eyes, till the system finally able to boot up. Once the system completes the system POST, this button will then become the quick and easy OC button, which overclocks your system to your desired settings once been pressed.
ProbeIt
Asus ProbeIt allows users to use their own testing equipments to measure the major power sources on the motherboard, allowing display of the most accurate voltage readings externally without the need to spend time on the guesswork to locate each measuring points.
Q-DIMM
This is yet another innovative feature Asus has added onto this motherboard. In order to avoid the need to remove large graphic cards when changing DIMM modules, ASUS has hence developed the Q-DIMM memory slots, with single sided latch, it does not only avoid the possible conflicts with large graphic cards on the topmost PCIex16 slot, yet makes the memory removal process faster and easier.
Q-Slot
In order to reduce the difficulty of removing large VGA cards from PCI Express slots, while still being able to secure the card in place when been installed, Asus has developed the Universal PCI express slot with auto-lock and easy unlock capability. With the presence of Q-Slot, removing multiple large graphic cards no longer cause headaches no matter how big the cards are.
Q-LED
Users often wonder around don’t know what to do when system fails to boot up properly. Through more experienced trouble shoots system failures with debug tools such as PC speaker and Debug Card, the troubleshooting process is still long and tiring. This is why Q-LED was introduced, to give users the direct indication to where the problem might be, in order to resolve the boot failures faced. All users have to do, is to check which Q-LED stays on when boot failure occurs, and the cause of boot failure may be spotted.
USB 3 & Sata 3
The one and only solution capable of running true USB 3.0 and SATA 6Gb/s at the same time without compromise or multiple steps. MAXIMUS III EXTREME offers the one and only solution on Intel P55 chipset which is capable of offering true USB 3.0 performance and true SATA 6GB/s performance at the same time. While other vendor uses entry level solution which limits the bandwidth of the USB 3.0 controller to half of its Maximum throughput. This is not the case for ASUS. Thanks to our insight, innovation and passion to bring correctly implemented technologies on our boards, we have incorporated a bridge chip. This bridge chip ( PLX ) converts 4 lanes of PCI Express 1.1 into PCI Express 2.0 lanes these lanes are then provided to the USB3.0 and SATa6G controllers enabling high performance for both controllers for even the fastest single SSD drives. MAXIMUS III EXTREME provides a complete solution to deliver complete multi-GPU support, as well as true USB 3.0 and true SATA 6Gb/s at the same time. Ultimately offering a flexible solution that does not have to be adjusted in the bios for different configurations or offer diminished AUTO performance or any other negative performance aspect compared to competitors’ implementations.
We understand that a few vendors have recently scrapped their initial design and now a few boards have hit the market using a method similar to the Asus solution. The USB 3 & Sata 3 paragraph above comes directly from Asus’s website and we don’t make corrections to the actual text.
Maximus 3 Extreme BIOS v.0503
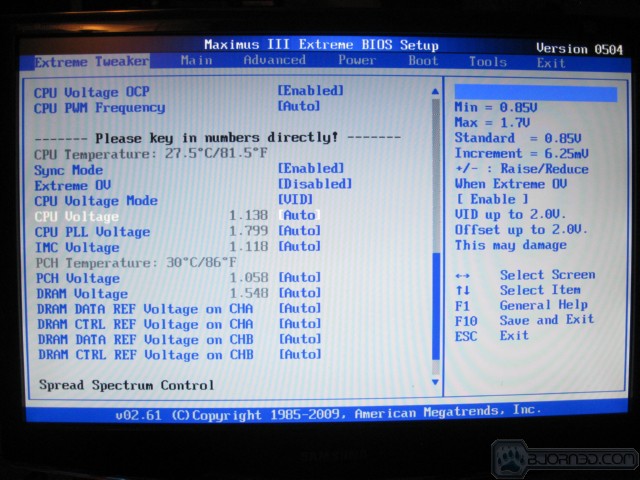
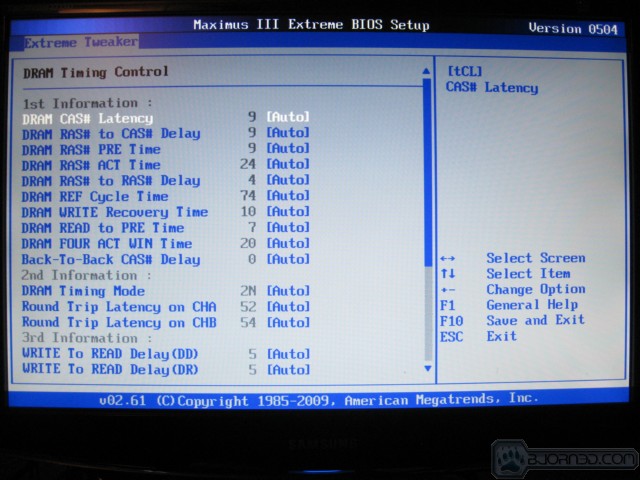
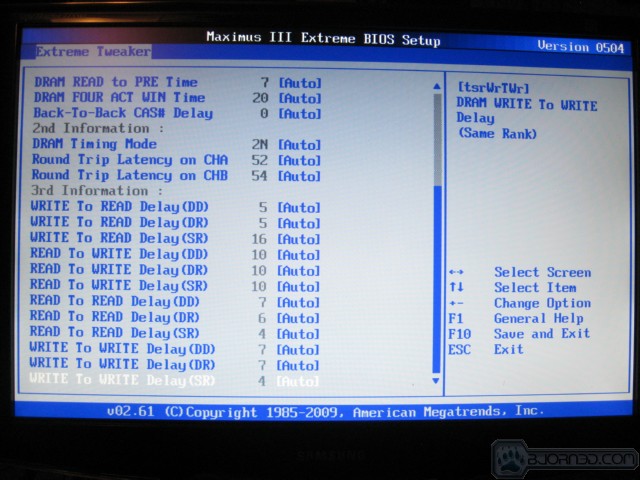
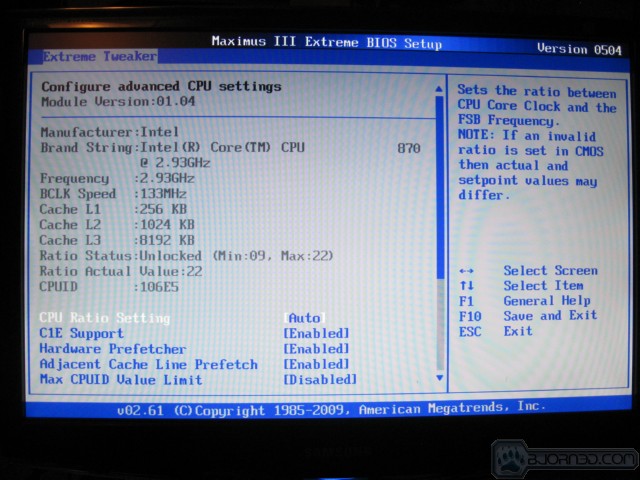
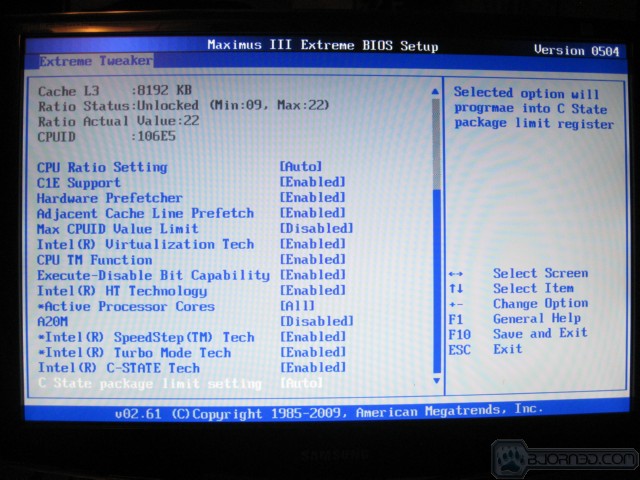
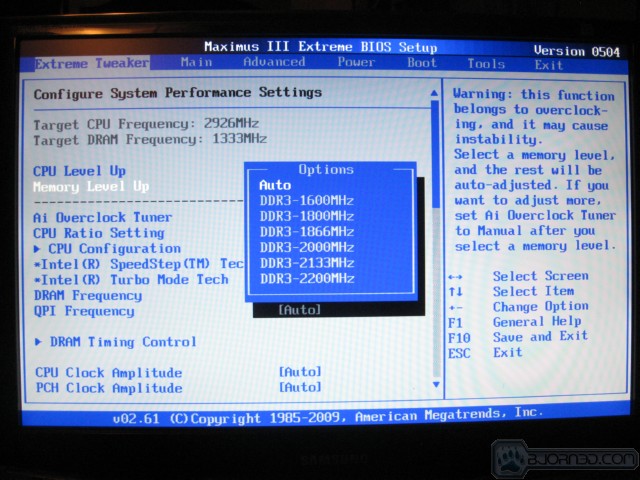
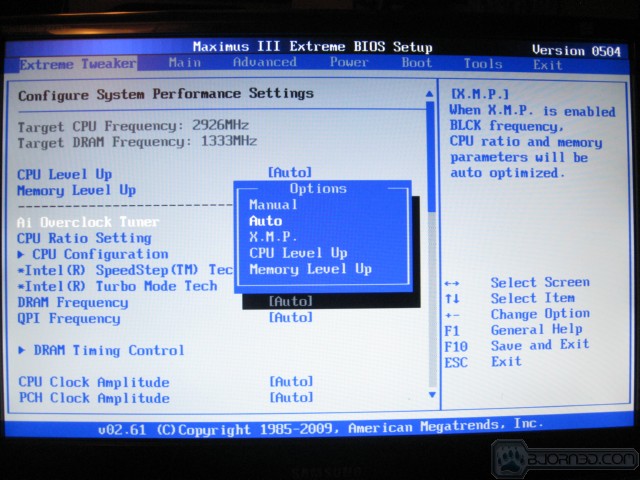
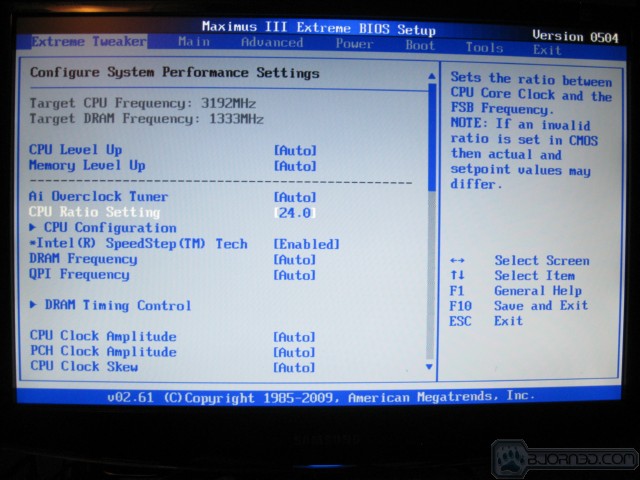
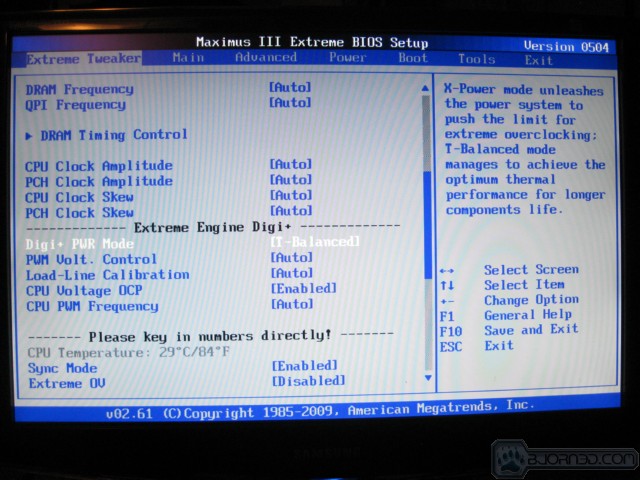
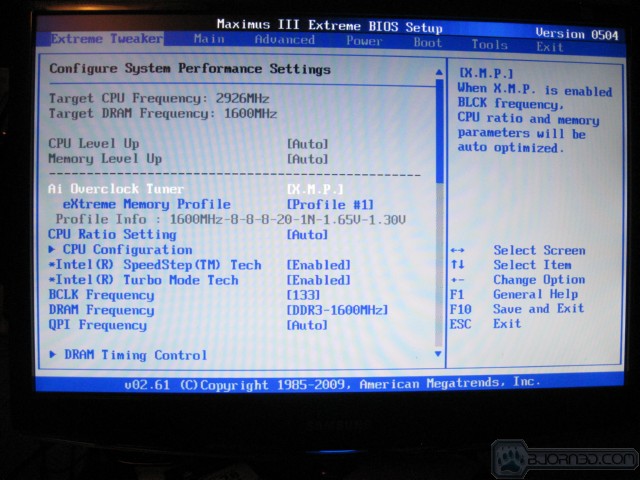
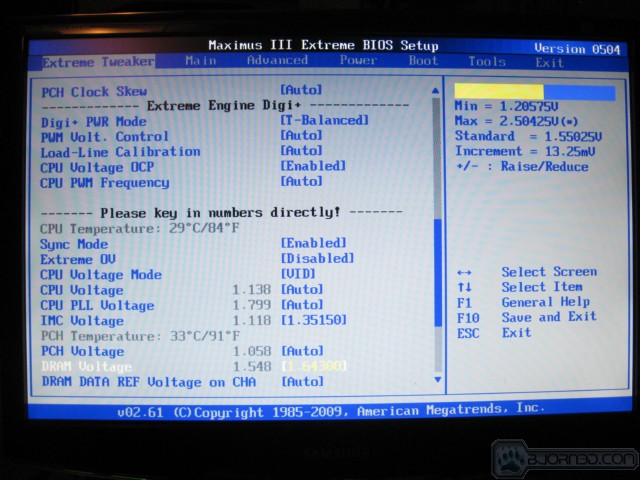
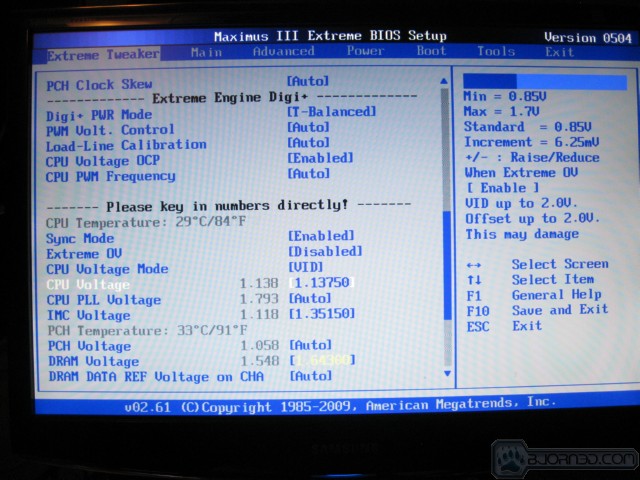
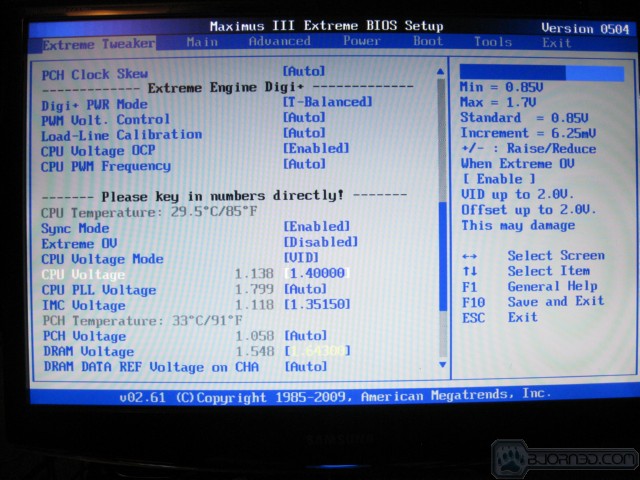
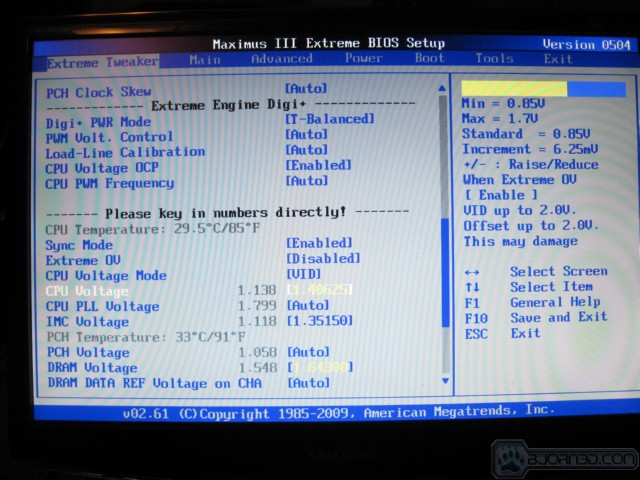
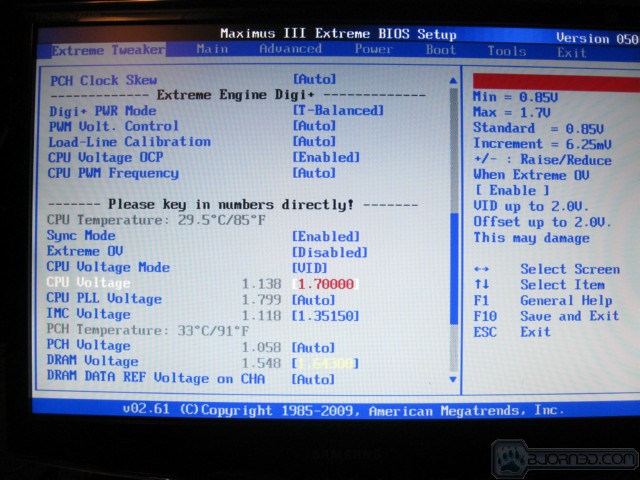
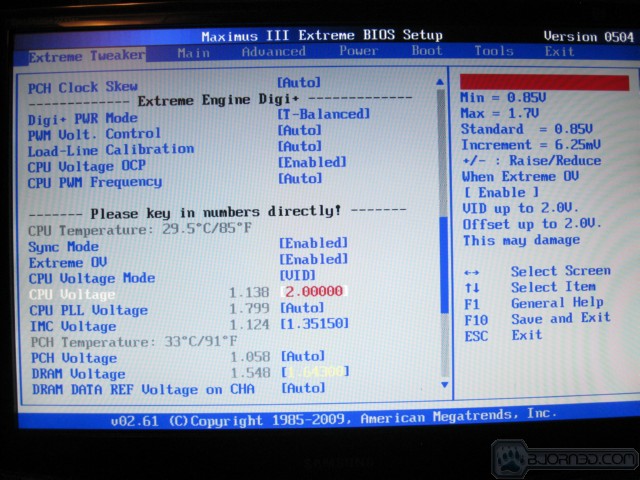
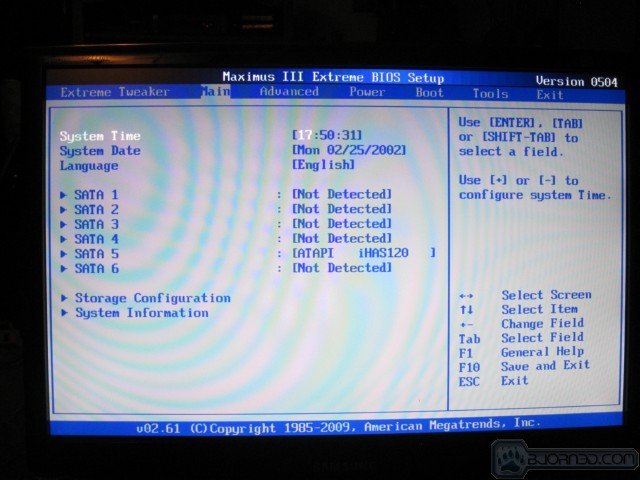
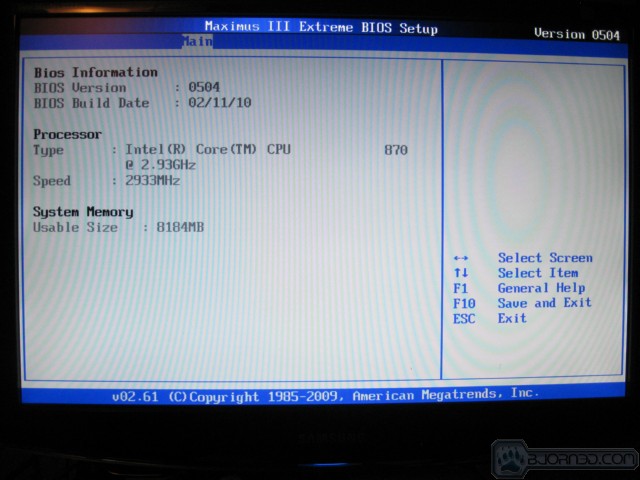
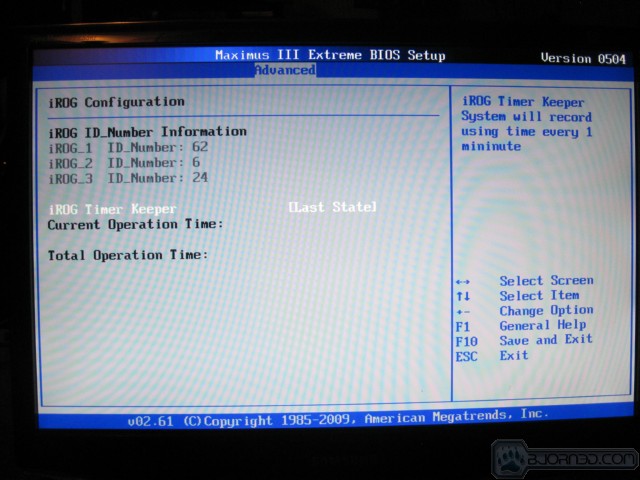
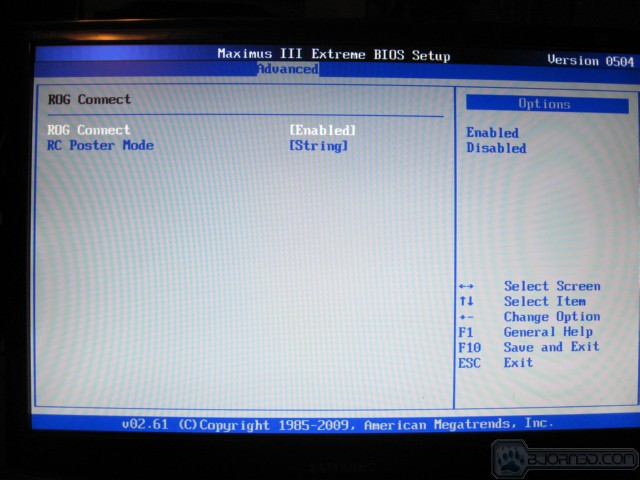
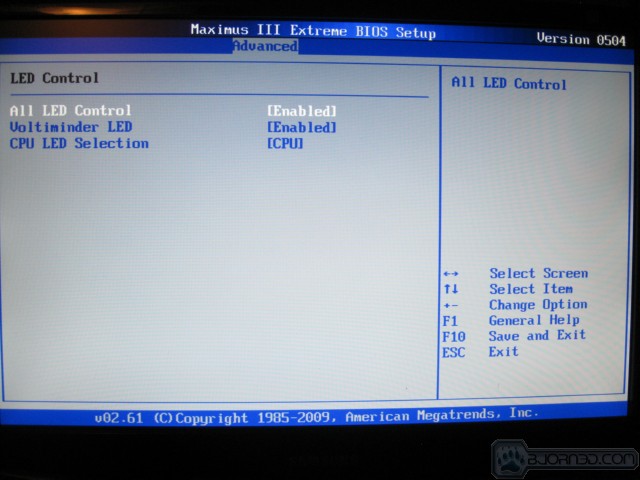
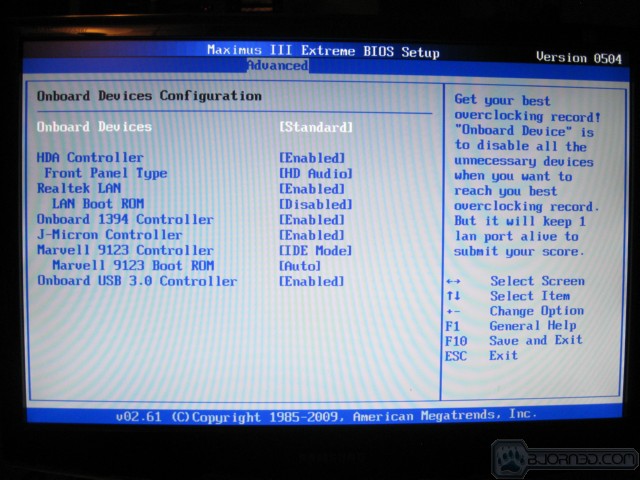
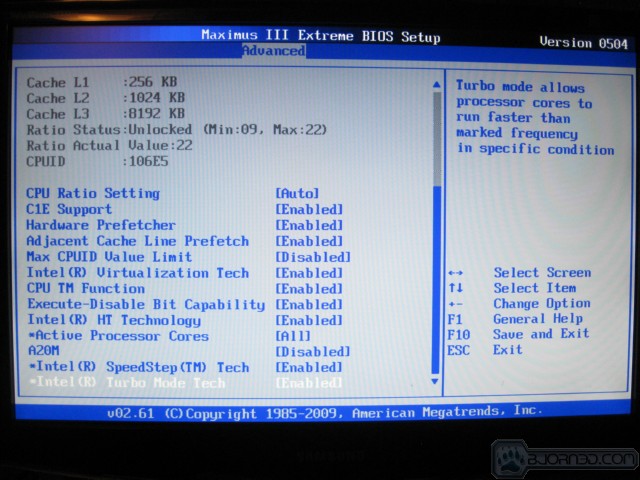
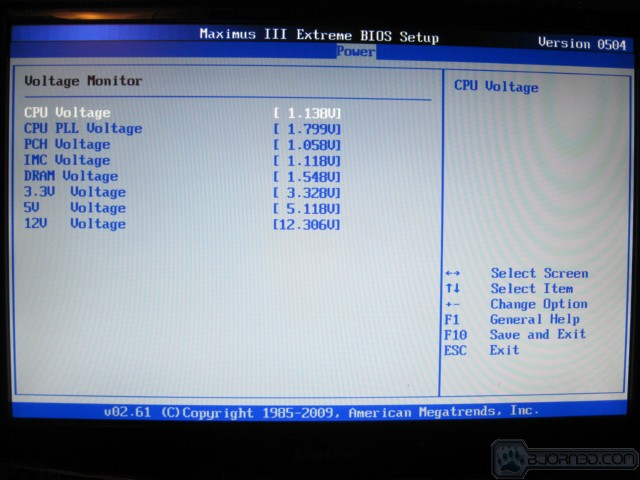
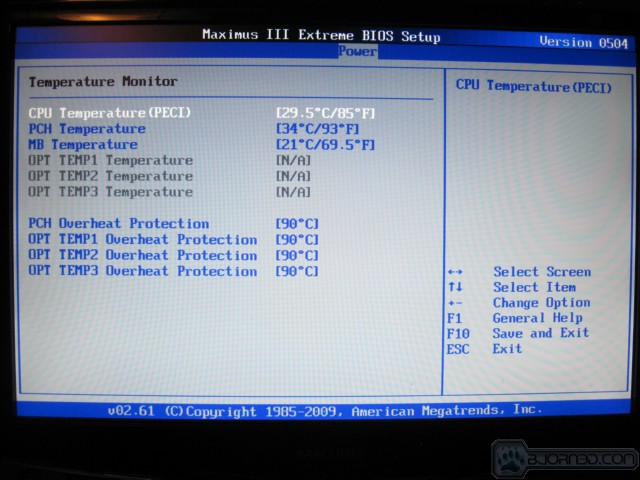
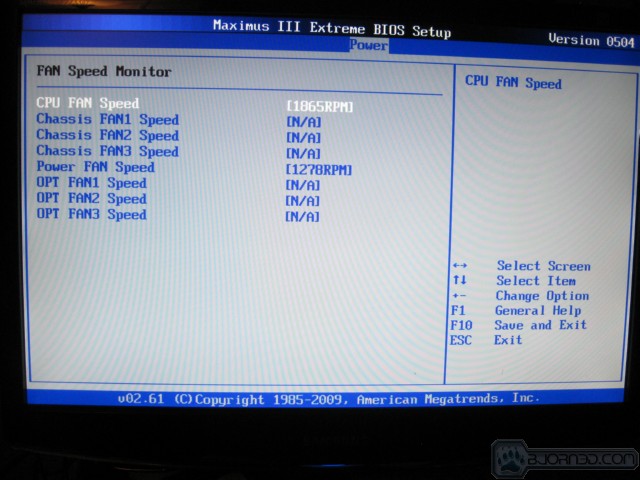
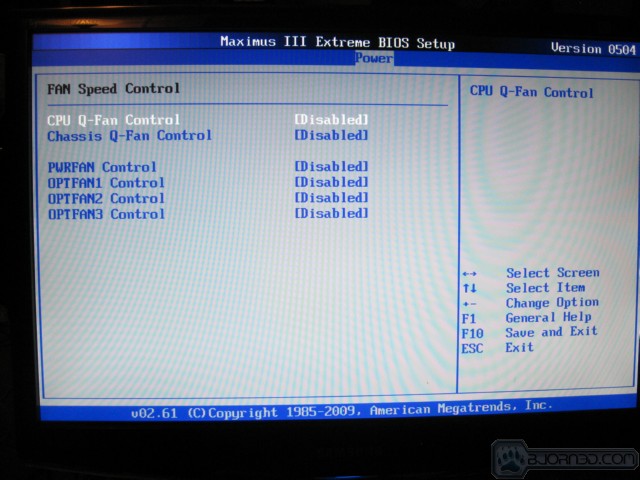
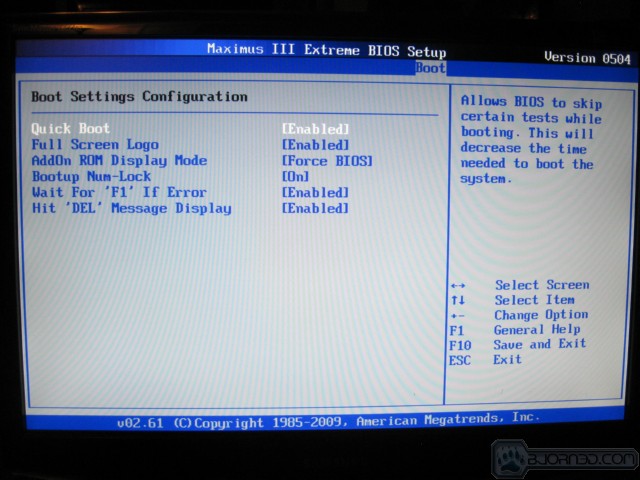
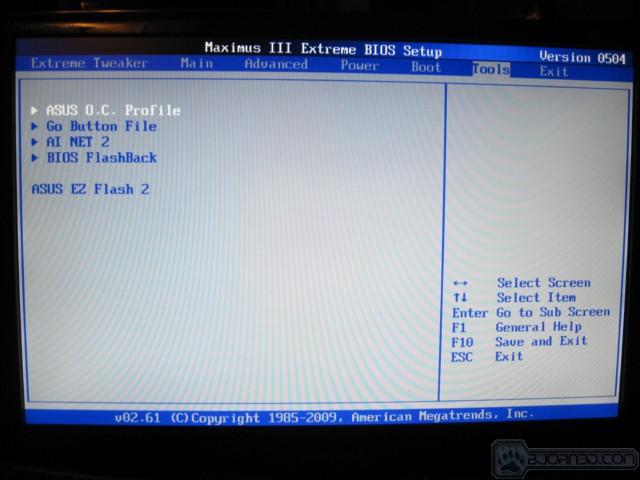
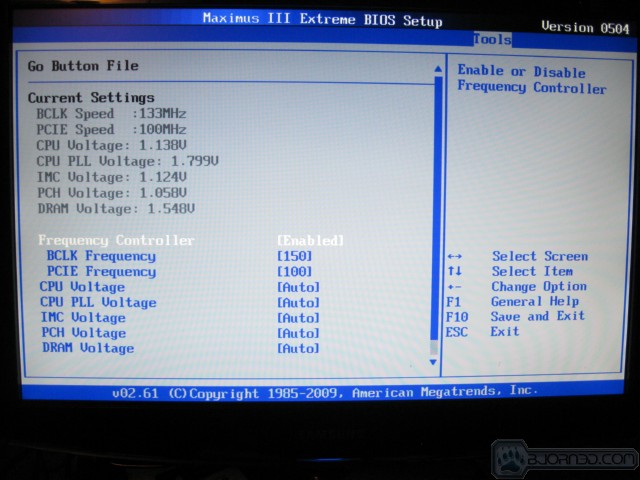
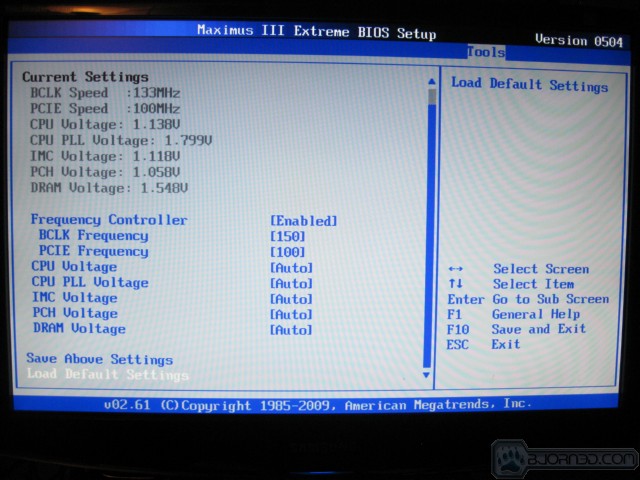
The BIOS on the Asus Maximus 3 Extreme is only on second version at this point and we are sure improvements will be forthcoming. It’s a newly redesigned BIOS so we are doing a lot of screenshots of it. BIOS’s change but an Extreme OCing board lives and dies by it’s BIOS so prepare for more BIOS than you probably want to see.
BIOS shots are pretty self explanatory so we are posting clickable thumbnails that enlarge to bigger images with nothing more than what the screen is below the pairs of images. This helps to prevent such good reporting as “This is the advanced BIOS screen where you do Advanced things.”
Jumping in here for just a second notice the two blue bars on the two shots, and the yellow bar in the shot above those two. Asus put Voltage indicator bars in BIOS, the portion of the bar you see is how much of the voltage capacity of the system you have used. The Blue Bars mean your still in the “Grandma Zone” where it’s as safe as sitting in your easy chair. The Yellow bar means your in the “Your not rocking Dad’s settings anymore” zone. Then later we’ll show you the red bar which we like to call the “Your crazy but we like it zone”. Right under those bars you can also see minimum and Maximus err maximum voltages and the increments each voltage steps up or down in.
Keep in mind this is only the second BIOS for the Maximus 3 Extreme and already it’s one of the best we’ve ever seen so expect anywhere from a 4 – 6% performance increase from future BIOS. So far the 0503 BIOS is so polished you wouldn’t know it was an early BIOS unless Asus told you.
Pictures & Impressions
The Asus Maximus 3 Extreme is a very feature rich board with a lot of hidden details so you can expect a lot of pictures from a board of this magnitude.
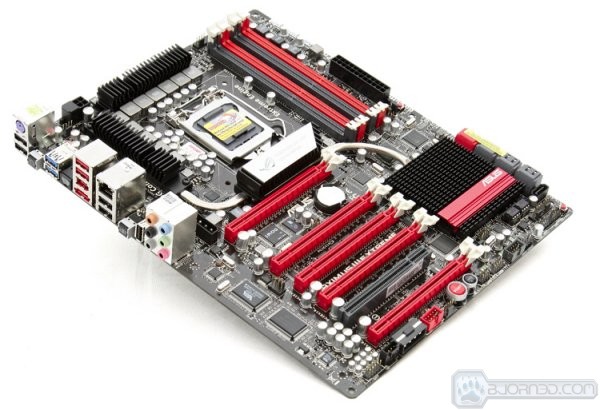
Asus fell back on their traditional ROG board colors and the red and black theme of the board is beyond a doubt eye catching. The one thing we immediately noticed was the onboard sound connectors and the Maximus 3 had an actual sound card included with it. This is the extreme board and geared for overclocking but it is still a ROG board so including a sound card would have made sense. The Maximus 3 Extreme is one level above the Maximus 3 but our first impression is that the onboard sound is a step backwards.
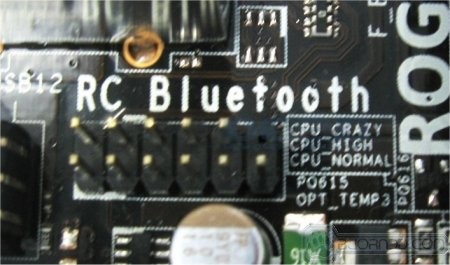
One of the unique features of the Maximus 3 is the RC Bluetooth we covered on a previous page. whatever you do if you are planning on using the Bluetooth feature now or in the future install the module prior to moving the board into the chassis. We had to remove the board from the chassis to get the small Bluetooth module installed without buggering it up.

Here’s the RC Bluetooth module we are talking about and the button and little tab covered in blue plastic need to protrude through the backplate so it needs to be installed prior to mounting the board in the chassis.

We mentioned earlier that the Maximus 3 Extreme has a ROG connect port. Right next to the onboard sound connectors you find the ROG connect USB port and the ROG connect button. Here’s the interesting part, not only do you connect a desktop or laptop to that port for remote overclocking. You can take the board out of the box with no CPU/GPU/Memory installed, connect it to a power supply and flash bios from the ROG connect port with no other hardware connected. All you need is the BIOS you want, a flash drive and the board itself connected to a PSU.
USB BIOS Flashback:
USB BIOS Flashback was designed to be the quick and easy BIOS update / rescue tool working for any USB flash drive. No input of BIOS flash instructions are required to perform the update process.
Usage instructions:
Equipment:
Any USB flash drive partitioned as FAT16 or FAT32.
Preparation:
- Extract the downloaded BIOS image onto your HDD using uncompress utilities such as WinRAR. Or in newer versions of windows right click and extract.
- Rename the extracted BIOS image file to M3E.ROM, and copy it onto the root directory of the pre-prepared USB pen drive.
Then all you do is connect the FAT16 or FAT32 pen drive to the USB port and push the ROG Connect button. To test it we got the initial BIOS from Asus and flashed the BIOS back to the initial BIOS using BIOS Flashback. We installed a CPU and GPU and tossed on some ram and sure enough version 0503 was gone and the initial BIOS was back on the board. From there it was a simple matter of going into BIOS and re-flashing back to 0503 the most current BIOS available at the time of this review.
Now that we’ve told you that Flashing BIOS isn’t something you do for fun and can potentially brick your board. The Maximus 3 has 2 physical BIOS chips and Asus has provided for flashing a dead BIOS back to life but it’s not something you want to play with just to be playing with it. If you don’t know what you are doing get with Asus support or have a professional do your flashing. That would be my ideal job, professional flasher but I’m fairly sure some politician already has that position as they always seem to be showing their a**.

Now that we have the ROG Connect port out of the way here’s our understanding of the ROG setup. The iROG chip in the picture above communicates with the ROG Connect port and RC Connect port depending on which one you are using. You input changes on the Bluetooth device or remote PC and it goes through ROG Connect to the iROG chip which writes those values into BIOS directly making this a software initiated hardware OC. Your actually OCing in BIOS but doing it with a remote terminal. We’ll be testing that feature for our OCing enjoyment later.

We’ll get to the PCI-E slots later but for now trust us there are 5 PCI-E and one PCI. All the PCI-E are 16x size slots. The molex you see in this shot is to provide extra power to the PCI-E slots should you need it. Asus tells us you should only need it in extreme GPU situations. Like stuffing 5 single slot GPU’s on the board, or with heavy triple SLI or CrossFireX. We tested a GTX-295 and two GTX-285’s as well as a 5970 on the board and there was no need for power to the molex with those setups. For extreme GPU setups or extreme GPU overclocking on heavy setups you may need to use the molex connector but we didn’t need it for our review purposes.
To the left of the molex you have a CD/DVD sound connector and a front panel sound connector. We are glad that finally a vendor stopped putting the front panel connector behind the CPU somewhere. It really annoys us when the sound connector is in the middle of the board and the only way to wire it is to string a long gangly wire across a beautiful board. The red port you see is a 1394 port and to the right of that is just one of 8 onboard fan headers. Every header on this board is a 4 pin header so you can control fan speed if you want. That’s another big peeve of ours, a mega expensive flagship board with one 4 pin for the CPU and 4 or 5 three pin headers. Flagship boards deserve 4 pin headers and it’s just cost cutting a few cents to mount 3 pin. Asus went all the way and every fan header supports 4 pin fans kudos Asus.

Staying on the same edge of the board you find a start and reset button which is great for out of the chassis extreme overclocking. We were afraid that someone would sneak in and steal our Maximus 3 Extreme so we mounted it in a Thermaltake Armor Chassis modified to accept a Kensington locking system and chained that sucker down and padlocked the side of the chassis. Face it when you have 9 majorly expensive machines up and running at any given time, and a stack of GPU’s in a gun safe you are potentially a target. Fortunately the lab is manned 24/7 and the fact that we own a gun safe has been enough to deter potential five finger discount customers.
To the right of the reset button you find a couple of well placed USB headers. A lot of the Maximus 3 Extreme is well laid out but if you read the specifications you know that there are a plethora of buttons on this board and in an inside chassis operation some are hard to reach. Get over it and use a pencil eraser if you are in a chassis, most of those buttons including our favorite “LN2 Recovery” named the “Q Button” button are designed for out of the chassis extreme overclocking situations.

Up by the front panel connector you’ll find a BIOS button. Say you’ve just OCed to the max and after rebooting you see garbled characters on the boot screen. Clearing CMOS, removing the battery and all the diagnostic procedures fail to kick the board back to life because you just buggered the BIOS. Push the BIOS button and it switches to the backup BIOS and your good to go. Like we mentioned if you just buggered one BIOS it may be a good idea to re-flash the BIOS before you bugger the backup BIOS. No worries though on this board you should be able to flash it back to life by using the ROG Connect port or RC Connect.
Covering buttons, this board is so covered with buttons and LED’s that it could take on the order of 30 pictures to cover all of them so here’s a list of buttons you’ll find on the board.
- Q Reset Button – When the LN2 Jumper fails push the Q reset button to interrupt power to the CPU to help recover from a frozen CPU.
- Power Button – power on/off
- BIOS Button – switch BIOS chips
- Reset Button – force a restart of the system
- Go Button – formerly the MemOK button, recover from a happy little memory overclocking accident. It will also try and find compatible memory settings if you happen to noob the memory selection.
Again there are so many Diagnostic LED’s on the board that Asus needs to include a wall poster with each LED and function state as well as buttons and locations for easy reference. Instead of putting up another wad of pictures we are going to list those LED’s and if you purchase the board you can track the ones down that you need in the manual. Each LED has 3 display states, Green normal, Yellow high, Red Crazy. So if things start going wrong this board might well look like a traffic light gone horribly wrong. Seriously though once you know the layout the LED’s can give vital clues to what voltages need to be increased or decreased.
For instance one of the things we do is try for a no brainer OC. Just set the CPU multiplier or BCLK higher to get an OC and see what happens to system voltages. So bump the multiplier up or the BCLK and just boot the board. If you see a red LED somewhere shut it down and go into BIOS and check that voltage to be safe. The visual indicator the red LED gives you prompts you into action potentially saving you from frying your board.
Conversely if you are running at 4.3 GHz on a core i7 870 (LGA 1156) and it runs fine until you start stability testing. You might take a peek at the LED’s and see which ones are green indicating a normal voltage state with the CPU running at 4.3 GHz. The Green LED should clue you in to the fact that that particular chip/device might need more voltage to get stability. You can always old school it and fiddle with voltages for hours, or you can learn to take advantage of the tools the Maximus 3 Extreme provides and become a lean mean overclocking machine. That’s the beauty of the Maximus 3 Extreme, a beginner can build the board and get a decent OC out of the gate using CPU level up; then have every tool a hardcore OCer could desire while trying to perfect the art of OCing. Why would a noob want the Maximus 3 Extreme, well if you don’t understand that concept you might as well be browsing a POS computer builders site. It’s better to have the feature and not need it than to need it and not have it.
- CPU LED
- Memory LED
- PCH LED
- DDR LED
- Hard Drive LED
- BIOS LED (2) one for each BIOS
- Go LED (Blinking means MemOK is enabled)
- Q LED Four LED’s , Boot Device, VGA, DRAM and CPU during boot if one or more devices fail for any reason the appropriate LED will remain lit.
- Power LED indicates the power is on. Serves as a reminder to turn the rig off prior to installing or un-installing components. Also indicates sleep and soft off mode.
Between all the buttons and LED’s if you have a nice clear sided chassis with good cable management the board presents itself very well visually. During boot up with LED’s flashing and buttons begging to be pushed all you need is some serious rock music and you have your own laser light show.

On the front left edge of the board you find the six Sata 2 ports (Black) and the two Sata 3 ports (Red). To the left of those ports is an E-Sata port.

Behind the I/O plate sound ports you find yet another Molex. This Molex provides additional power to the CPU for extreme CPU Overclocking and probably only needs to be used for extreme cooling, extreme over volt overclocking. It’s not going to hurt to hook it up but we didn’t need it for review purposes. Toss a tank of LN2 our way and that might change.

Up by the 24 pin main power connector you’ll find voltage measurement ports for real time monitoring of system voltages. Hardware readings of voltages are more accurate than software voltage reading. You can monitor the voltage using RC Connect or old school them with a multimeter. The multimeter will give more reliable results but if the LN2 is flowing you might want to check RC Connect before getting vital digits in the LN2 pour areas. Get a little to much LN2 wafting up to your nose and things can get a little blurry and accidents can happen. During a recent event we dipped a new toothbrush into LN2 for a mere second and pulled it out, flicked it with a finger and the brush shattered into a thousand pieces, That could be your finger or hand LN2 is that cold.
Normal situations the measurement points let you easily measure CPU, PLL, DRAM, IMC and Memory voltages. Ok we hear some of you thinking we can check those in BIOS. Well toss a little supercooled liquid onto a board and super-conductivity comes into play, voltages can increase, become more efficient, resistance decreases so sometimes there is no substitute for checking manually with a voltage meter. We’ve seen probes in every socket marked with tape for fast and easy measurements during several extreme OCing events. It might only give a few seconds advantage but in world class OCing a few seconds might be the winning edge.

The button pictured (red) here is the Q Reset button and interrupts the power to the CPU to help recover from a frozen CPU state during extreme cooling when the CPU literally freezes. The blue USB ports are the USB 3.0 ports driven by the NEC D720200F1 chip you see next to the 3 solid capacitors.

We mentioned the RC Connect Bluetooth header earlier. Immediately to the right of the Lan port you see the RC Bluetooth connectors position and that may give you an idea of why you need to install it prior to going into the chassis. Normally we mount the CPU and Cooler first which makes that a very tight space. Then the height of the pins makes it likely that you will damage the RC Bluetooth card or pins if you try and force the module on after mounting the board.

Things get a little more interesting on the PCI-E Slots, you have 5 properly spaced PCI-E x16 slots so if you are among the few, the proud Triple SLI/CrossfireX owners and have 3 dual slot cards you can run them on this board no problem. From the left slot which is the primary graphics adapter slot on a single card setup you get 16x, Dual card configuration you get 16x 16x, triple card 16x 16x 8x. Just the 16x 16x 8x on the first three slots probably makes this board the graphics solution of choice for the LGA 1156 boards. Now say you want to do a folding farm and use 4 or 5 single slot GPU’s. With four or five slots filled you still get 8x on every slot making the Maximus 3 Extreme not only an Asus flagship OCing board but also a premium Graphics powerhouse for the LGA 1156 platform. Yes the Maximus 3 Extreme brings it all to the table and does everything but serve it up in a Hooters T-Shirt. You also get one PCI slot which if you have a legacy card you might use. Left up to us we would have preferred a sixth PCI-E slot even if it were just a PCI-E 1x slot.

The CPU area is well covered for VRM cooling and solid Ferrite chokes and Asus’s implementation of Extreme Engine Digi+ should provide plenty of rock solid stable power to the CPU and provide more frequencies than traditional VRM/Ferrite choke setups. Like most P55 boards the CPU and ram banks are a little crowded on each other but we managed a TRUE 120 Mux with two 120mm fans and still had room for all 4 ram slots to be populated. Extreme OCing usually mandates 2 Ram sticks only and sometimes 2GB kits are better than 4 GB kits for that purpose, but we like to test with 4 or 8 GB kits and in this case we cranked up an 8GB kit and filled all four ram banks with no problems.

Backing up a little from the CPU area you can really see how clean this layout is. No large roller coaster cooling solutions, no clumsy tall heat sinks, just beauty and functionality that should allow for most commercial cooling solutions to be easily installed.

The Back panel gives you a PS2 port with 2 USB ports under it. Then a reset button with two USB 3.0 ports (Blue) and an optical SPDIF. The red ports (top to bottom) are two USB a 1394 Firewire and an E-Sata. The black ports next to the red ones are a Gigabit Lan port and two more USB ports. Then there’s the ROG Connect Button and ROG Connect USB port and lastly the normal sound ports, normal except the integrated sound is driven by a VIA 2020 10 channel high definition audio codec. We’d still prefer a 7.1 sound card because no matter how you paint it it’s still onboard sound.

In the Bundle with the Maximus 3 Extreme we came across this case badge which for some computers might make a nice window badge but it’s a little gaudy for our tastes. If we want you to know what’s under the hood we’ll tell you. Show up at a LAN party with that badge and you’ll likely scare off the competition.

In the bundle you’ll find a Cable sticker sheet (Not Pictured) a dual and Triple SLI cable, the ROG Connect cable and a nice backplate.

You get a few small cable ties, the Asus Q Connectors, a back panel 2x USB and E-Sata connector, 2 x Sata 3 cables, and 6 x Sata 2 cables. We didn’t receive the 3 thermal probes or the optional cooling fan.
Testing & Methodology
To test the Asus Maximus 3 Extreme we used the same components we used in the Intel i5/i7 review. The only component we switched was the motherboard/Hard Drive and did a fresh load of Windows 7 Ultimate on the test rig. To that end, we’ve included the Intel Extreme board results in the Asus Maximus 3 Extreme review for comparison purposes. Keeping the components the same across a variety of boards will ensure a level playing field for all the motherboards tested.
We did strap a Sata 3 drive on, the Barracuda XT for Sata 3 testing, we also fired up a couple of USB 3.0 drives and ran the normal HD test suite. We left no stone uncovered in testing this epic board.
We’ve expanded our testing suite considerably for P55(A) and will continue to use the same tests across most of the motherboards and CPU’s we test. We run each test a total of at least three times minimum, some tests we run more than 3 times. We average the total of all the tests from each benchmark then report the average here.
The OS we use is Windows 7 Ultimate with all patches and updates applied. We also use the latest drivers available for the motherboard and any devices attached to the computer. We don’t disable a bunch of background tasks or particularly tweak the OS or system for bigger numbers. We do turn off drive indexing and daily defragging. We also turn off Prefetch and Superfetch. This is not an attempt to produce bigger benchmark numbers. Drive indexing and defragging can interfere with testing in that one test might occur without defragging going on and the next test defragging might be active. The same thing goes for drive indexing. We can’t control when defragging and indexing occur precisely enough to guarantee that they won’t interfere with testing, so we turn them off.
Test Rig
| Test Rig “Quadzilla i5” |
|
| Case Type | Thermaltake Armor |
| CPU | Core i7 870 |
| Motherboard |
Asus Maximus 3 Extreme |
| RAM | Kingston HyperX DC DDR3 1600MHz 8 GB Kit Cas 8 |
| CPU Cooler | Thermalright Mux 120 (Dual 120mm Fans) |
| Hard Drives | Crucial 128 GB SSD(MLC/Samsung controller) Seagate Barracda XT Sata 3 Buffalo USB 3.0 External drive Seagate Black Armor PS110 USB 3.0 2.5 inch External drive |
| Optical | Asus BD-Combo Optical Drive |
| GPU(s) | XFX GTX-285 Maxcore |
| Case Fans | 120mm Fan cooling the mosfet CPU area |
| Docking Stations | None |
| Testing PSU | Seasonic 850w |
| Legacy | None |
| Mouse | Razer Lachesis |
| Keyboard | Razer Lycosa |
| Gaming Ear Buds |
Razer Moray |
| Speakers | None |
| Any Attempt Copy This System Configuration May Lead to Bankruptcy |
|
Test Suite
|
Benchmarks |
|
Excel 2007 |
|
Blender |
|
SiSoft SANDRA XII Professional SP2 |
|
Everest Ultimate Edition v. 5.0 |
|
AutoMKV |
|
Cinebench R10 64 bit |
|
WinRar v. 3.71 |
|
POVRay |
|
Pro Show Gold |
|
Stalker Benchmark |
|
Heaven Benchmark |
Hard Drive Test Suite
|
Benchmarks |
|
ATTO |
|
HDTach |
|
Crystal DiskMark |
|
HD Tune Pro |
Everest Ultimate v. 5.30

“EVEREST Ultimate Edition is an industry leading system diagnostics and benchmarking solution for enthusiasts PC users, based on the award-winning EVEREST Technology. During system optimizations and tweaking it provides essential system and overclock information, advanced hardware monitoring and diagnostics capabilities to check the effects of the applied settings. CPU, FPU and memory benchmarks are available to measure the actual system performance and compare it to previous states or other systems. Furthermore, complete software, operating system and security information makes EVEREST Ultimate Edition a comprehensive system diagnostics tool that offers a total of 100 pages of information about your PC.”
CPU AES
This integer benchmark measures CPU performance using AES (a.k.a. Rijndael) data encryption. It utilizes Vincent Rijmen, Antoon Bosselaers and Paulo Barreto’s public domain C code in ECB mode.
CPU AES test uses only the basic x86 instructions, the test consumes 48 MB memory, and it is Hyper Threading, multi-processor (SMP) and multi-core (CMP) aware.
We’ve overclocked the Asus Maximus 3 Extreme to 3.74 GHz for benchmarking. We overclock all the boards in the review to 3.74 GHz to see what effect Ocing has on each board as far as performance gain. What we are looking for is scalability during OCing so we want a level playing field. Later in the Ocing section we’ll get to maximum overclock. We really prefer to present every board running at exactly the same speed with exactly the same OC over benchmarking at the top end speed of the boards. Presenting top end numbers from each OC wouldn’t yield good comparison numbers and for the most part top end overclocks aren’t sustainable without damaging the CPU in short order. We feel like 3.74 GHz is a decent long term sustainable OC most end users can reach and hold without killing their rig.
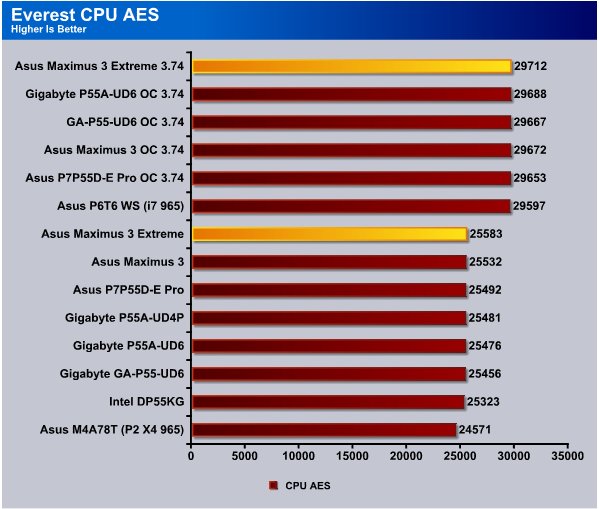
We will tell you right up front you aren’t going to see a clock for clock advantage from any P55 board that amounts to much more than a few points. It’s the same P55 chipset every vendor uses and the biggest differences in boards are the features and overclockability. If you want to see the real difference between the Asus Maximus 3 Extreme and any other board drop back to the Features & Specifications and Asus Special features page and comb through those. As far as useful features the Asus Maximus 3 Extreme is without a doubt the most feature rich board out there for the P55 chipset. Keep in mind we said useful features, a lot of boards have tons of features that maybe 1% of end users actually use. The feature set on the Maximus 3 Extreme is good for everyone from the noobest noob to the hardest core LN2 overclocker making it the most versatile P55 board we’ve seen to date and are ever likely to see. You can bet there’s some poor slob at Asus crying puddles thinking “How the heck am I ever going to top this board”.
As far as performance on the CPU AES test the Asus Maximus 3 Extreme topped the chart in both stock speed and OCed speed.
CPU PhotoWorxx
It performs the following tasks on a very large RGB image:
• Fill
• Flip
• Rotate90R (rotate 90 degrees CW)
• Rotate90L (rotate 90 degrees CCW)
• Random (fill the image with random colored pixels)
• RGB2BW (color to black & white conversion)
• Difference
• Crop
This benchmark stresses the integer arithmetic and multiplication execution units of the CPU and also the memory subsystem.
CPU PhotoWorxx test uses only the basic x86 instructions, and it is Hyper Threading, multi-processor (SMP) and multi-core (CMP) aware.
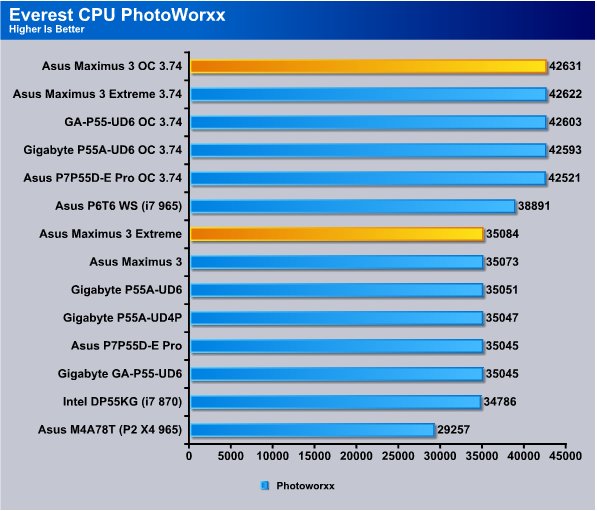
We deliberately highlighted the Asus Maximus 3 in the OC portion of this test and the Maximus 3 Extreme came in just a few points behind it’s older brother. Variances in scores like that can be just minute differences in the test runs. In the Stock speed portion the Maximus 3 Extreme bested it’s older brother by 9 points so you beginning to see how small clock for clock performance really is between boards.
CPU Queen
This simple integer benchmark focuses on the branch prediction capabilities and the misprediction penalties of the CPU. It finds the solutions for the classic “Queens problem” on a 10 by 10 sized chessboard.
CPU Queen test uses integer MMX, SSE2 and SSSE3 optimizations. It consumes less than 1 MB system memory and it is Hyper Threading, multi-processor (SMP) and multi-core (CMP) aware.
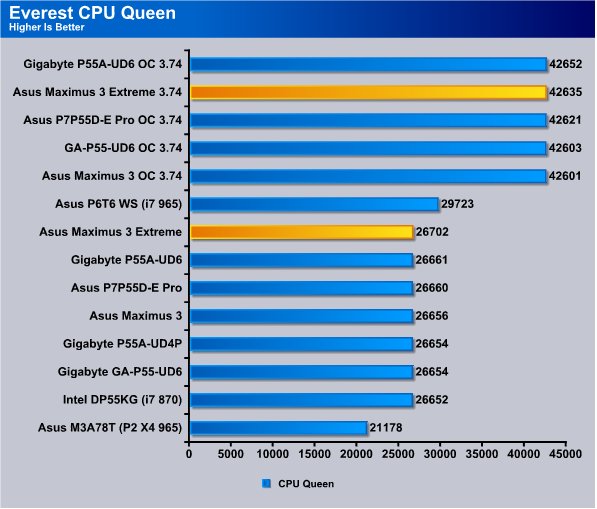
The CPU Queen test see’s the M3E board in first slot at stock speed and second place in the OC portion but again the differences in scores are so small it’s features that will determine the fate of the M3E board and it has enough features to impress even callous reviewers.
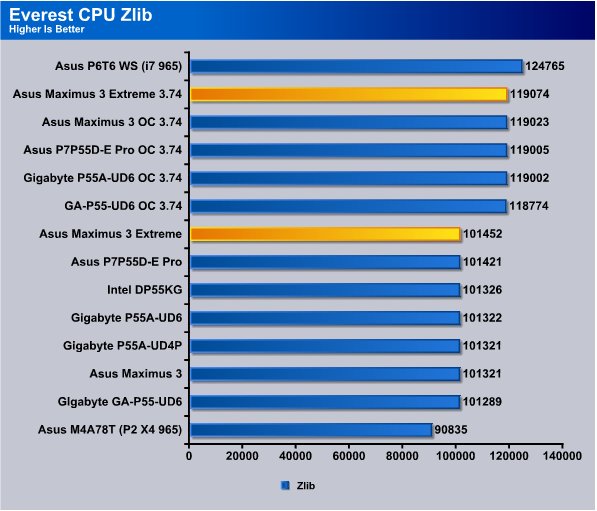
The CPU ZLib test likes the M3E board and it took a 31 point lead on the stock speed test and a 51 point lead in the OCed test.
Everest Ultimate v. 5.30 Memory Suite
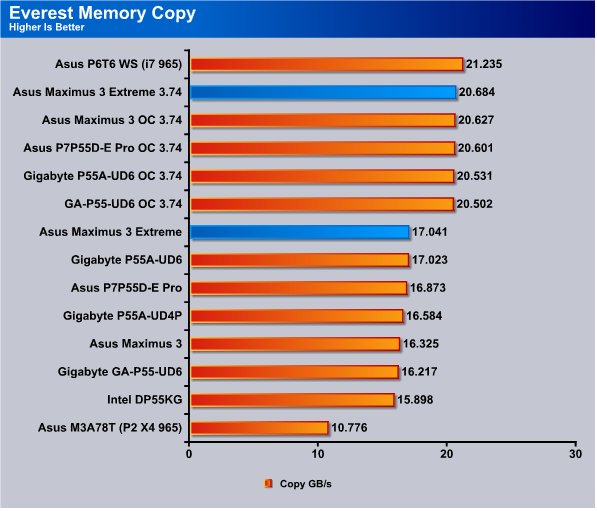
The M3E handles memory very well and our HyperX 8GB kit running at 8-8-8-24 topps the i5 boards in both stock speed and OC speed. We get nice scaling from the Maximus 3 Extreme when we overclocked the CPU.
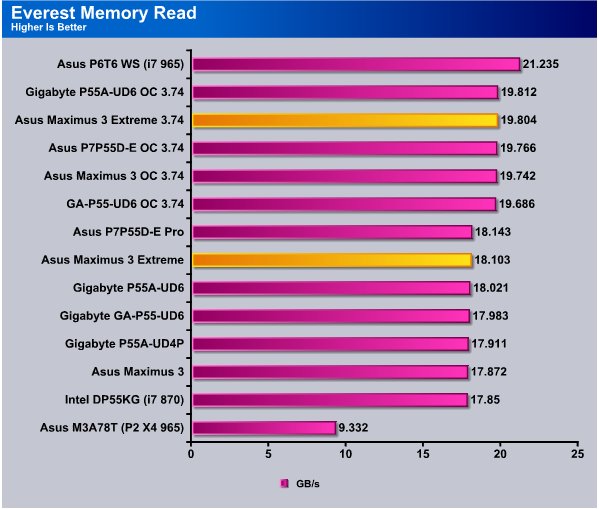
The stock speed portion of the Memory read test the Maximus 3 Extreme came in top position and in second when overclocked. The Gigabyte P55A-UD6 edged it out by a small margain in the overclocked test but we would have to say that the Maximus 3 Extreme’s feature set would make it our OCing enthusiast board of choice. Moving to LN2 or Helium extreme cooling it has features that make it advantageous. For Air cooling which the vast majority of users prefer the M3E board allows for fine tuning the voltages to keep temperatures low.

The memory read test shows the M3E board in second place in both the OCed and stock speed portion but like we said before with differences this small it could be just minute variations in the benchmark runs making the difference.
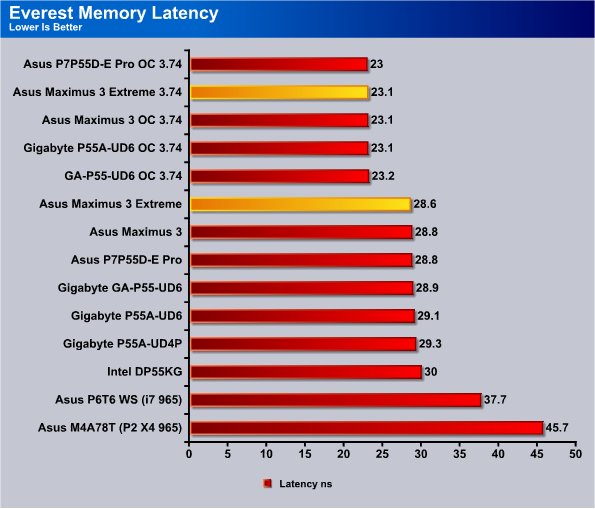
Stock speed on the M3E board we topped the chart on P55 chipsets and came in second in OCing. Keep in mind that this is an early BIOS for the M3E board and you can expect performance to increase as Asus refines the board BIOS. Sometimes you get as much as a 4 – 6% performance increase so when the M3E boards BIOS matures it will be even more of a beast.
Cinebench R. 10.5

“CINEBENCH is a real-world test suite that assesses your computer’s performance capabilities. MAXON CINEBENCH is based on MAXON’s award-winning animation software, CINEMA 4D, which is used extensively by studios and production houses worldwide for 3D content creation. MAXON software has been used in blockbuster movies such as Spider-Man, Star Wars, The Chronicles of Narnia and many more. MAXON CINEBENCH runs several tests on your computer to measure the performance of the main processor and the graphics card under real world circumstances. The benchmark application makes use of up to 16 CPU’s or CPU cores and is available for Windows (32-bit and 64-Bit) and Macintosh (PPC and Intel-based). The resulting values among different operating systems are 100% comparable and therefore very useful with regard to purchasing decision-making. It can also be used as a marketing tool for hardware vendors or simply to compare hardware among colleagues or friends.”
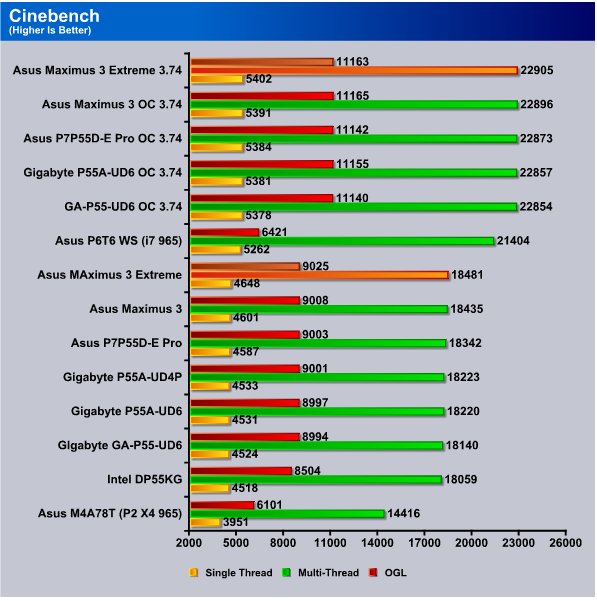
In the Cinebench suite test the Maximus 3 Extreme topped the chart in both the Stock speed and OC speed tests and only the mighty i7 965x (different socket and chipset) managed to best it at stock speed.
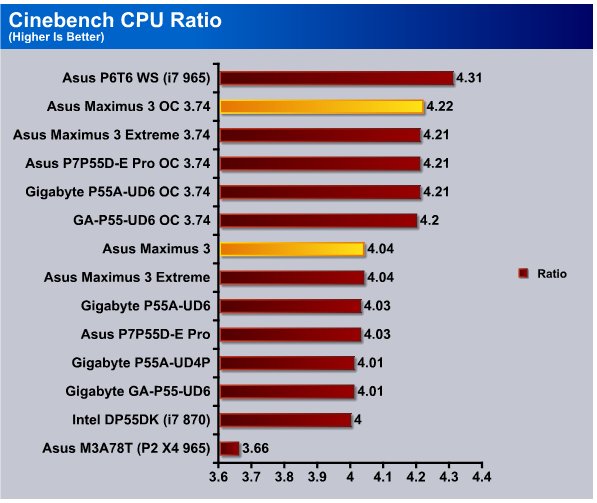
Here again in the OC portion we have highlighted the M3E’s older brother to highlight the small difference between the Maximus 3 and the Maximus 3 Extreme performance wise. The original Maximus 3 has a more mature BIOS and yet it only beat it’s sibling by 0.01 in the CPU ratio test. In the stock speed portion the M3E matched it’s older brother and that speaks well for the immature BIOS M3E.
WinRar v. 3.71

This module in WinRar generates random data, which contains specially introduced redundancy, increasing the load to both the processor and memory. Data is then passed through RAR compression and decompression algorithms, and the output of the decompression algorithm is compared to the source data. If any differences are found, WinRar then reports “Errors found – Yes” in the command window. WinRar displays a size of processed data and compression speed, current and resulting, in kilobytes per second.
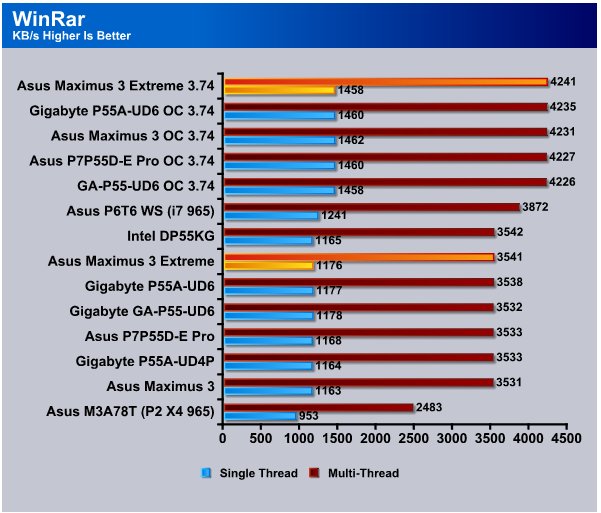
The built in benchmark in WinRar shows the Intel DP55KG one KB/s ahead of the M3E in the single threaded test and 1KB/s ahead in the Multi-threaded test. Overclocked speed the Maximus 3 Extreme was 2KB/s behind the P55A-UD6 single threaded and 6KB/s ahead in the Multi-threaded test.
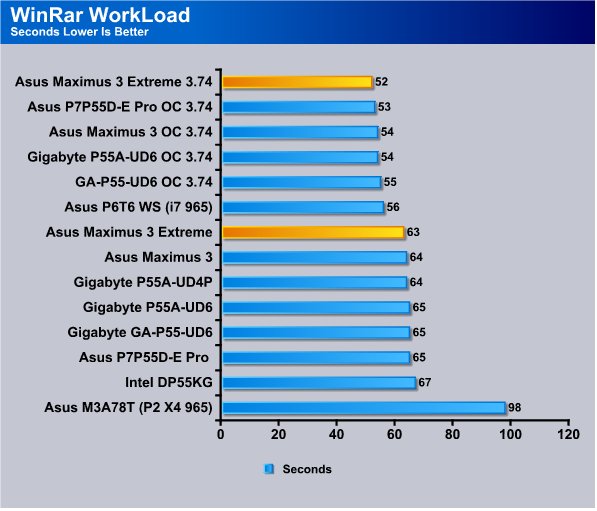
In the WinRar workload test where we take 5 large image files and compress them and record the time in seconds. The Maximus 3 Extreme took the top position in both stock and overclocked speed and is the only P55 board we’ve seen break the 53 second barrier overclocked to 3.74 GHz.
Sisoft Sandra
“SiSoftware Sandra (the System Analyser, Diagnostic and Reporting Assistant) is an information & diagnostic utility. It should provide most of the information (including undocumented) you need to know about your hardware, software and other devices whether hardware or software. It works along the lines of other Windows utilities, however it tries to go beyond them and show you more of what’s really going on. Giving the user the ability to draw comparisons at both a high and low-level. You can get information about the CPU, chipset, video adapter, ports, printers, sound card, memory, network, Windows internals, AGP, PCI, PCI-X, PCIe (PCI Express), database, USB, USB2, 1394/Firewire, etc.”
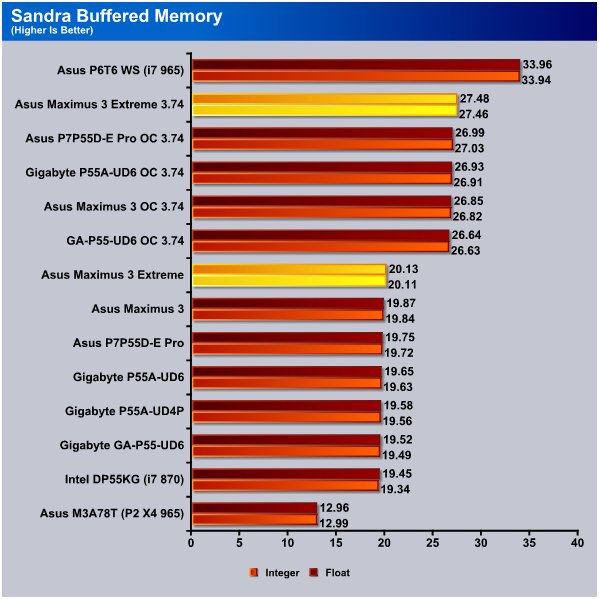
In the Sandra Memory test at stock speed we got 20.13GB/s out of the Maximus 3 Extreme and once again that’s top of the chart for P55 chipset boards. At stock speed the Maximus 3 Extreme topped the chart again and it looks like the Maximus 3 Extreme has some small advantage over most of the P55 boards we’ve looked at.
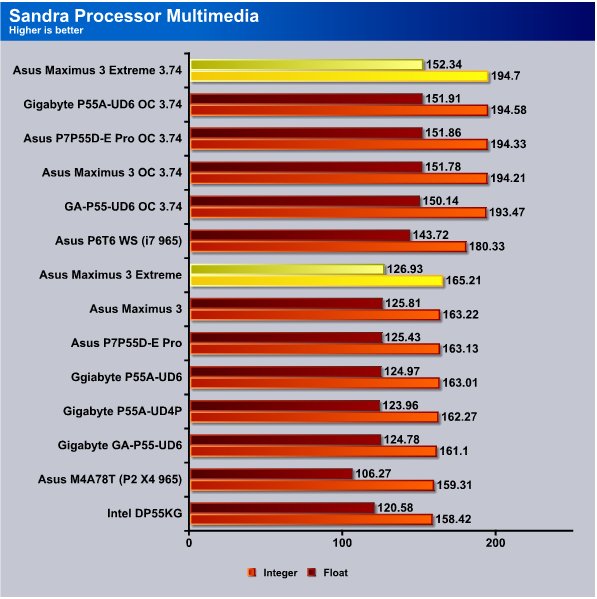
Sandra 2010 CPU Multimedia test liked the Asus Maximus 3 Extreme and the M3E board topped both the stock speed and OC portion.
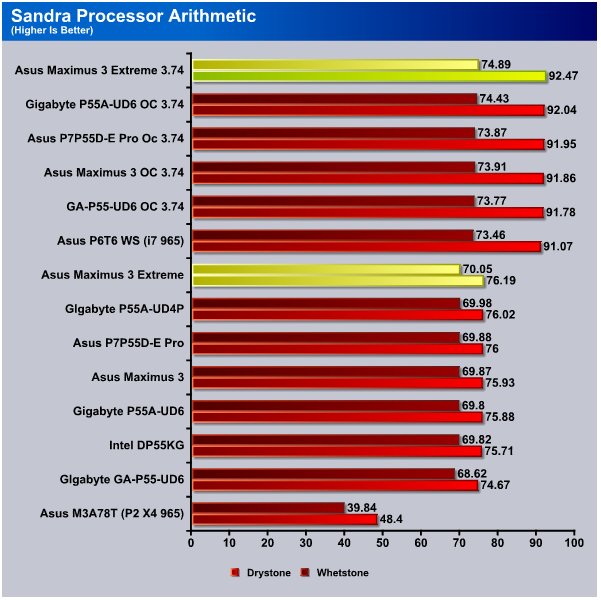
Sandra liked the Maximus 3 Extreme well enough that that the M3E took a clean sweep in Sandra. Topped the chart in every test in this epic benchmark suite.
POV-Ray 3.7 Beta 25

The Persistence of Vision Ray-Tracer was developed from DKBTrace 2.12 (written by David K. Buck and Aaron A. Collins) by a bunch of people (called the POV-Team) in their spare time. It is a high-quality, totally free tool for creating stunning three-dimensional graphics. It is available in official versions for Windows, Mac OS/Mac OS X and i86 Linux. The POV-Ray package includes detailed instructions on using the ray-tracer and creating scenes. Many stunning scenes are included with POV-Ray so you can start creating images immediately when you get the package. These scenes can be modified so you do not have to start from scratch. In addition to the pre-defined scenes, a large library of pre-defined shapes and materials is provided. You can include these shapes and materials in your own scenes by just including the library file name at the top of your scene file, and by using the shape or material name in your scene. Since this is free software feel free to download this version and try it out on your own.
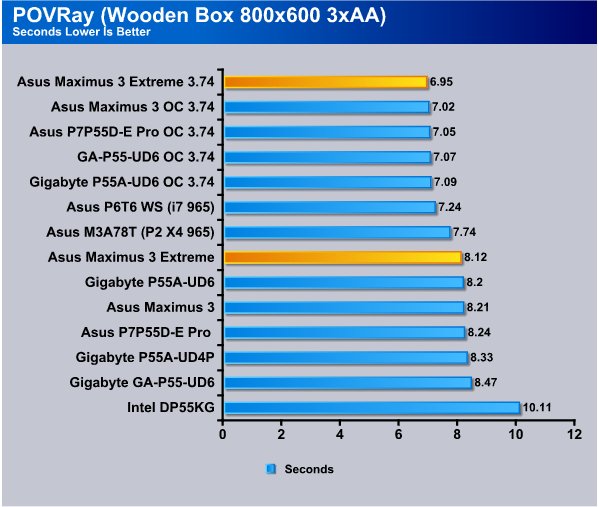
POVRay saw the M3E board on top the pile when we overclocked the CPU and it’s becoming a familiar sight seeing it on top the stock speed test. While the differences between the scores are minimal across the boards we’ve tested is minimal. The Maximus 3 Extreme staying on top the collection that consistently with an early BIOS makes things look very good for the Maximus 3 Extreme.
AutoMKV 0.95c
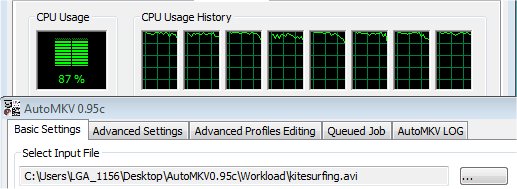
AutoMKV is an application aiming for easy media conversion between various media formats using various third party codecs. With improved internet speed and enhanced computing power, more users are interested in encoding to different media formats for their various multimedia needs. With AutoMKV and x264 codec, a freeware H.264 encoder, users can easily create media files. For more information and to obtain AutoMKV 0.95c and AviSynth* 2.5.7, please visit (http://forum.doom9.org/showthread.php?t=134478). We create a media file using AutoMKV and x264 codec. The input file used in the document is a raw 416 MB 720×480 DV file and the output is a 253MB H.264 media file.
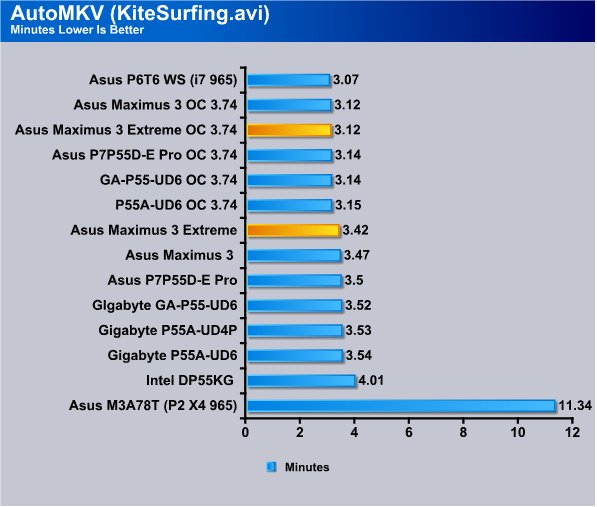
Here again in AutoMKV the Asus Maximus 3 Extreme took top honors at stock speed and tied for top position in the overclocked portion. It tied with it’s older brother the Asus Maximus 3 Formula and we have noticed a little sibling rivalry going on through a lot of testing.
Blender
Blender is a free open source 3D content creation suite that is available for various operating systems. The application is popular among many independent animation studios and game makers. For more information, please visit http://www.blender.org/.
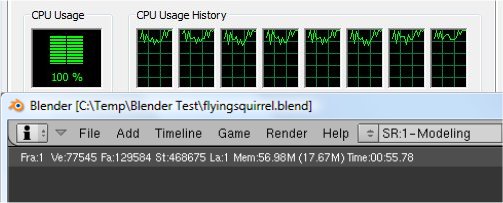
The workload consists of a ~6.9 MB character model of a flying squirrel. Due to time constraints we don’t render the entire image which would be time consuming and rather pointless except to yield larger benchmark numbers. A portion of the image, the right arm is what we render, it’s a large enough portion to show differences in CPU performance, yet small enough that we don’t have to grind through a 45 minute Render waiting for a single result.
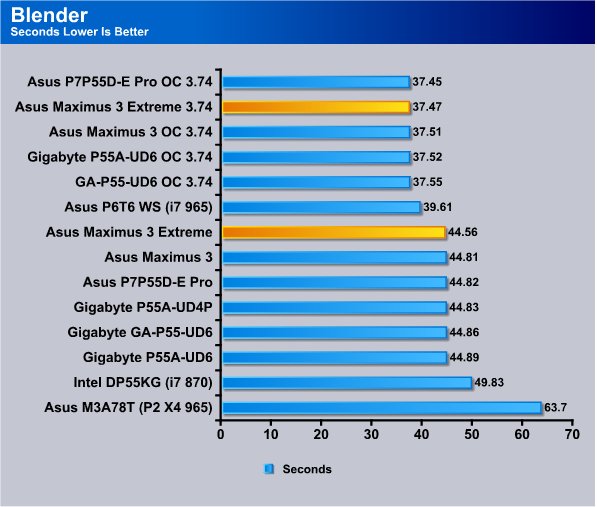
Stock speed the Asus Maximus 3 Extreme took the top spot on the P55 boards but when we went for the OC test it came in a few hundredths of a second behind the Asus P7P55D-E board.
Photodex ProShow Gold 3.2

ProShow Gold allows you to combine videos and photos and music to create slide shows, depending on the end user results can be spectacular. The application allows the end user to share photos and memories with friends in a unique and spectacular way, the different formats supported are, DVD, PC and Web. Still Photos are brought to life by adding motion effects. Supported effects include, Pan, Zoom, and rotate. You can also add captions and over 280 transition effects.
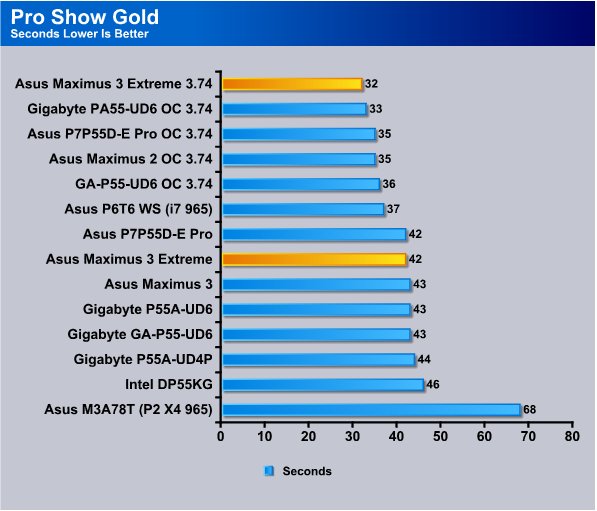
ProShow Gold see’s the Asus P7P55D-E Pro and the Maximus M3E board tied at 42 seconds but wen we applied the OC to the Maximus 3 Extreme it broke the 33 second barrier and came in at 32 seconds. The M3E board is the only P55 board we’ve seen with a faster time than 33 seconds.
Microsoft Excel 2007
Monte Carlo Black-Scholes Option Pricing Test
Microsoft Excel is the widely known and most used spreadsheet application for the manipulation and calculation for number crunching. With Excel you can analyze and share information on small scale or the largest scale you can imagine. We’ve seen spreadsheets in every day use that contain literally tens of thousands of numbers and hundreds of equations. Bjorn3D uses two tests in Excel to determine CPU and Motherboard performance.

This workload calculates the European Put and Call option valuation for Black-Scholes option pricing using Monte Carlo simulation. It simulates the calculations performed when a spreadsheet with input parameters is updated and must recalculate the option valuation. In this scenario we execute approximately 300,000 iterations of Monte Carlo simulation. In addition, the workload uses Excel lookup functions to compare the put price from the model with the historical market price for 50,000 rows to understand the convergence. The input file is a 70.1 MB spreadsheet.
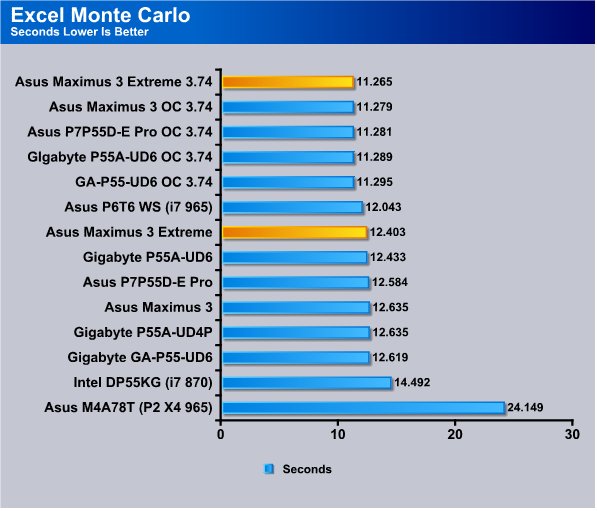
The Asus Maximus 3 Extreme has been at or close to the top of the chart in most tests this far and the Excel Monte Carlo test is no exception and the M3E tops both the stock speed and OC test in this one.
Big Number Crunch
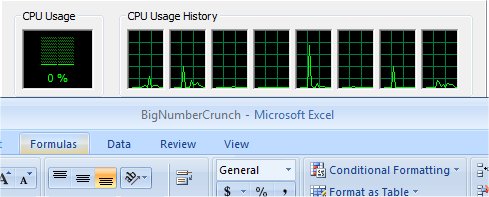
This workload is from a 6.2 MB spreadsheet and executes about 28,000 sets of calculations. It uses the most common calculations in Excel, addition, subtraction, division, rounding and Square Root. It also analyzes statistical functions such as Min, Max Median, and Average. The calculations are done after the spreadsheet with a large data set is updated with new values and must recalculate a large number of data points.
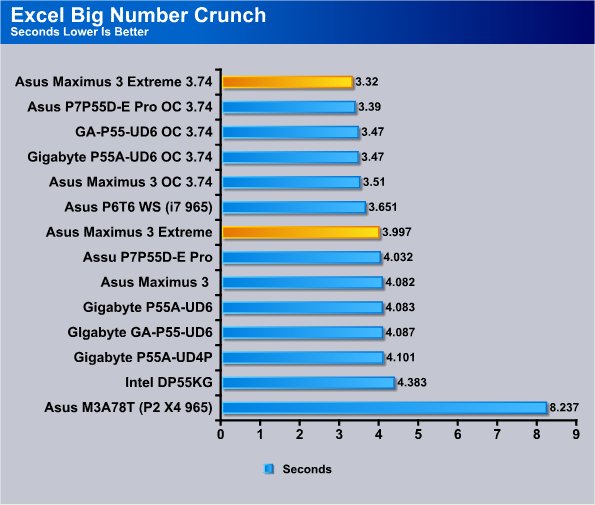
Here again in the Excel Big Number Crunch the Asus Maximus 3 Extreme came out on top the pile in both the OC and stock CPU speed tests.
3DMark Vantage
For complete information on 3DMark Vantage Please follow this Link:
www.futuremark.com/benchmarks/3dmarkvantage/features/
The newest video benchmark from the gang at Futuremark. This utility is still a synthetic benchmark, but one that more closely reflects real world gaming performance. While it is not a perfect replacement for actual game benchmarks, it has its uses. We tested our cards at the ‘Performance’ setting.
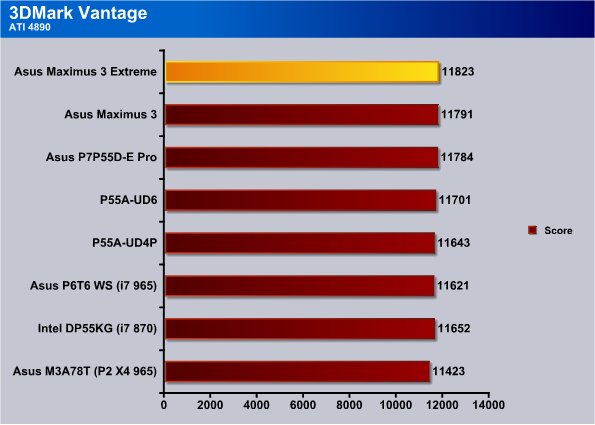
We switched out to an ATI 4890 because that’s what we have the motherboard testing data on and the Maximus 3 Extreme came out on top again by just a few points.
Sata 3 Testing
The Asus solution to Sata and USB 3.0 is to pull the bandwidth without taking any away from the PCI-E slots and in our humble opinion the best solution for GPU enthusiasts. The problem presented in testing it is how do you justify testing and charting an interface based on a different designs against each other. Then a lot of vendors are copying the Asus design and incorporating a PLX chip or a chip like Asus’s PLX chip to combine the non-PCI-E bandwidth to provide the interfaces (USB 3.0 and Sata 3). Asus was of course the technology leader in that area and vendors can paint it any way they like (Spin Doctoring) but we will always believe they saw a good thing and in some form copied it.
The other problem we are seeing with Sata 3 testing is that vendors are re-designing the method they use to provide the bandwidth from. We would end up with charts that try and show, in a fair manner, 3 or 4 different designs and a couple of redesigns. To that end we are posting screen shots of the benchmarks and waiting until the vendors finalize designs before we attempt to start a set of charts.
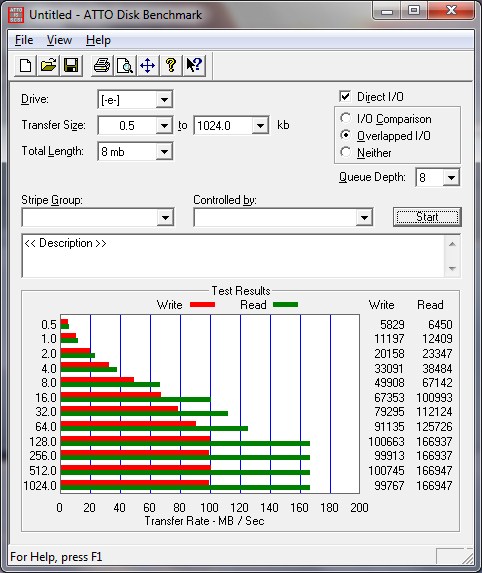
Running the Seagate Barracuda XT when we hit the 32kb mark things started getting fast. We saw a 79.295 MB/s write and 112.124 MB/s Read at the 32kb point and it just got faster from there. Things leveled out a little bit when we hit 128kb and we were seeing 100MB/s (ish) for write speeds and read speeds were astronomical for a platter drive and hit 166.947MB/s.
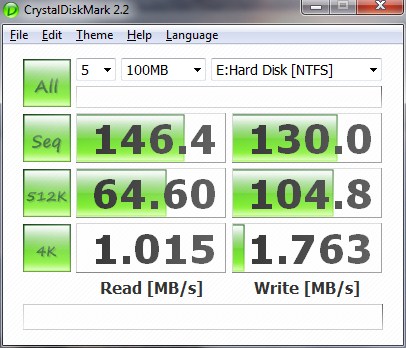
Crystal DiskMark and the Barracuda XT are old friends by now having run the XT on several boards. CDM sees the XT running at 1.015MB/s Read and 1.763 MB/s Write on the 4k test. Keep in mind the 4k test is the most brutal platter drive test we’ve ever seen and consists of small 4k blocks written or read over and over.
The 512k test on the M3E with the XT saw 64.60MB/s Read and 104.8 MB.s write and that’s pretty good for any board we’ve seen and better than a lot of the Sata 3 solutions we’ve seen.
Things get really fast in the sequential test and the read hit 146.4MB/s and 130MB/s and speeds like that would make a guy think twice about moving to a SSD.
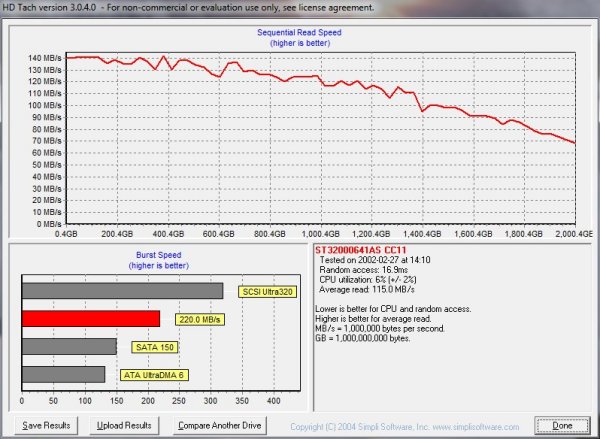
HDTach was a little rough on the Barracuda XT and Maximus 3 Extreme combo and the burst speed hit 220MB/s while the average read speed was 115 MB/s. CPU usage was a little higher than we like to see but that reading on HDTach (and other utilities) isn’t the most accurate. It’s hard to believe that a HD can drive the i7 870 hyperthreaded quad to 6%. We checked and re-ran the test several times but always got a 5 – 6% CPU usage report.
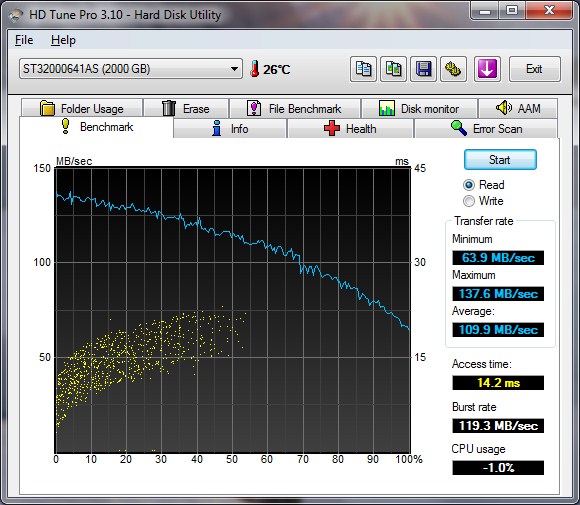
HD Tune Pro reads across the entire platter of the HD and as the read head nears the end of the platter (the slowest part) we see the Barracuda XT/ME3 combo hitting a minimum speed of 63.9MB/s. Maximum speed read at 137.6 MB/s and it averaged out to 109.9 MB/s. Access time was 14.2 ms but with the ms access time pattern on the chart hitting halfway through the platter we aren’t sure how much stock to put in that. The burst rate read at 119.3 MB/s and we have the feeling HD Tune Pro might need an update to deal with Sata 3 properly.
USB 3.0 HD Testing
The same thing goes for USB 3.0 testing as Sata 3 testing, the interface bandwidth situation is being redesigned by various vendors as we type and charting results would be a nightmare across the different designs and board vendors. Until the vendors get the interface bandwidth figured out we are dong screenshots of the benchmarks.
Buffalo 3.5 inch External HD Enclosure 1TB
The Buffalo USB 3.0 External HD is a Sata 2 drive in a USB 3.0 enclosure and is 1TB in size. That’s two 500GB platters (one physical platter two sides) and has been our baseline drive for USB 3.0 testing. The Buffalo drive runs faster than our Seagate Black Armor drive but it has a 3 1/2 inch drive in the enclosure where the Black Armor is a pocket drive and has a 2.5 inch form factor. Two different designs, one desktop and one road warrior.

USB 3.0 has been a big story of late and provides amazing bandwidth in a universal format that has been producing unbelievable speed via external enclosures. Current platter drives won’t saturate the bandwidth USB 3.0 offers and we seriously doubt that any current USB 3.0 SSD enclosure will do it full justice.
Like usual things start out slow on the small transfers (Up to 32kb) and we range from 5.115MB/s to 86.353 MB/s write (at 16kb/s) and 87.978MB/s Read. When we hit 32kb/s we break the 100MB/s barrier and things just get faster from there. Speeds level out at 128kb/s and we were hitting an amazing 130.289 MB/s write and 182.722MB/s read. Imagine that an external USB 3.0 enclosure running a Sata 2 drive exceeding the speed of an internal Sata 3 drive. Pretty impressive if you ask us. We’ve seen SSD’s that cost much more that won’t read at 180MB/s and cost much more than the Buffalo External enclosure.
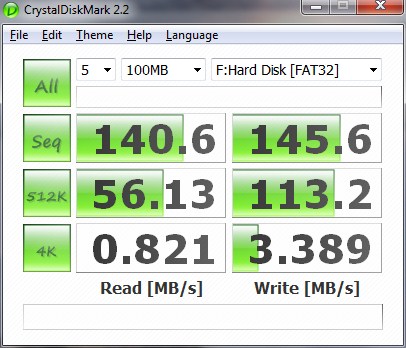
Crystal DiskMark hit’s all drives hard at the 4K level and the Asus Maximus 3 Extreme/Buffalo drive combo is no exception to that hard rule. We got a 0.821 MB/s read and 3.389 MB/s Write.
The 512K test sees speeds picking up and the M3E/Buffalo combo hits 56.13 MB/s Read and 113.2 MB/s write which is already well past double the speed most USB 2.0 interfaces offer. Yes we are well aware of the theoretical limits of USB 2.0 but we are acutely aware of the reality and have tested some of the fastest USB 2.0 devices available. The fastest most expensive USB 2.0 devices are lucky to hit 30 MB/s and most often run more in the 25MB/s range and that’s across a wide variety of products tested. USB 3.0 takes that lack luster performance and slams it to the ground and thus far operates at the speed of the drive in the enclosure. USB 3.0 isn’t limited by narrow bandwidth. USB 3.0 is what 1394 Firewire should have been and we are glad to see a fast universal interface change the face of computing in our time.
When we hit the Sequential test we got above 140 MB/s in both read and write and with speeds like that you could run an operating system from USB 3.0 enclosures and not tell the difference between a normal internal platter drive and a USB 3.0 enclosure. That says a lot for the interface and the Maximus 3 Extreme.
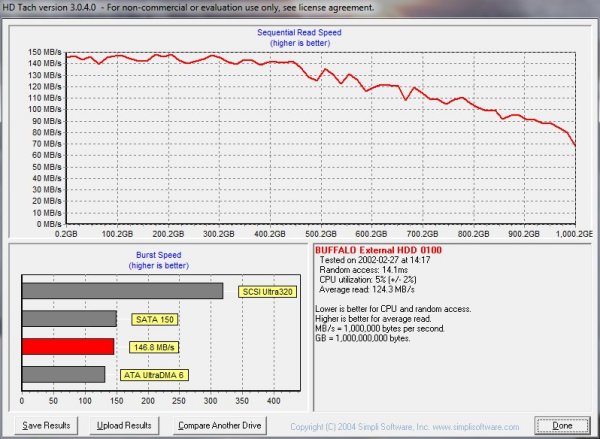
In HDTach we got a burst rate of 146.8 MB/s and an average read speed of 124.3 MB/s which is about 4 – 5 times as fast as most USB 2.0 devices. Not much to complain about on HDTach. Speeds are as high as a lot of internal drives and we get an access time of 14ms which is comparable to internal drive speeds and access time.
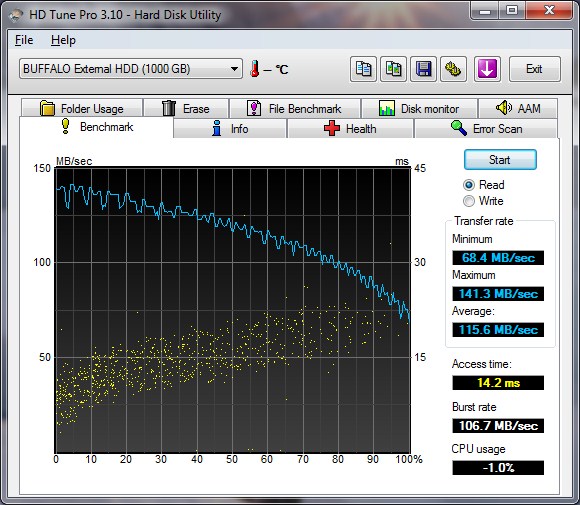
HDTune Pro reads across the entire platter and we saw a minimum speed of 68.4 MB/s with the Maximum speed hitting 141.3 MB/s and the average speed came in at 115.6 MB/s. The access time is at 14.2 ms and the burst rate is 106.7 MB/s but we don’t really think CPU usage is -1% .
Seagate Black Armor PS110 2.5 inch External HD 500GB
The Seagate Black Armor is PS110 we have is actually a Laptop upgrade kit with an expansion slot USB 3.0 card to upgrade laptops but it works just as well on desktops that have native USB 3.0. The drive itself of course, if we don’t tell you that some one will write in and say “How did you get the USB 3.0 Expansion slot adapter to work on a desktop”. We didn’t we hooked the PS110 directly to the native USB 3.0 port and went for the gusto.
Being a USB 3.0 2.5 inch form factor and designed for the dedicated road warrior it’s not as fast as our Buffalo USB 3.0 3.5 inch external enclosure but the two devices are designed for different purposes. The Black Armor is for portable storage and the Buffalo sits on your desk and stays at home.
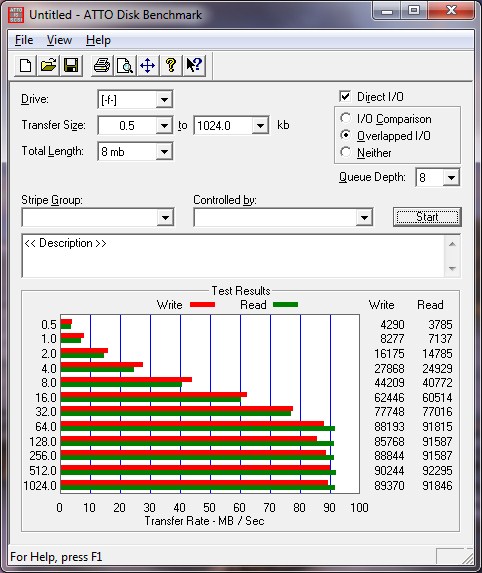
Things start out slow in ATTO with the small reads and writes which is normal and the PS110/M3E combo starts hitting it’s stride at 32kb transfer sizes. At 32 kb we see 77.748 MB/s write and 77.016 MB/s Read. Beyond the 32kb transfer size the speeds almost level out and run in the 85MB/s to 92 MB/s range and for portable USB 3.0 devices in a 2.5 inch form factor, with a platter drive, that’s pretty respectable. It doesn’t, of course challenge the bandwidth of the USB 3.0 interface.
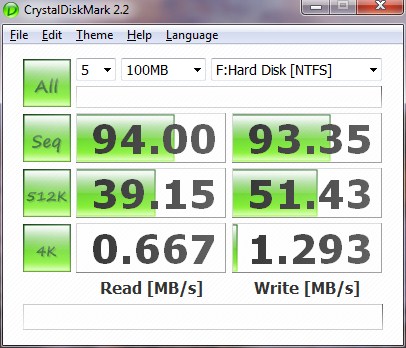
In Crystal DiskMark we got a 0.667 MB/s read and 1.293 MB/s on the 4k test which is without a doubt brutal on most drives. When we got to the 512k test we saw a speed of 39.15 MB/s Read and 51.43 MB/s Write but the Black Armor/Maximus 3 Extreme team exceeded 93 MB/s in sequential testing and for portable storage that’s pretty fast compared with what we had to live with on USB 2.0 devices.
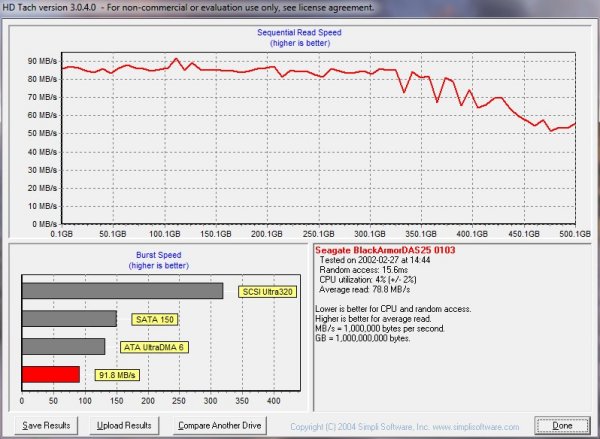
In HDTach the Maximus 3 Extreme/Black Armor PS110 hit 78.8 MB/s average speed and the burst rate hit 91.8 MB/s. Given the external nature of the 2.5 inch platter drive we’ve seen lots of “Laptop” drives run slower than that running on an internal interface.
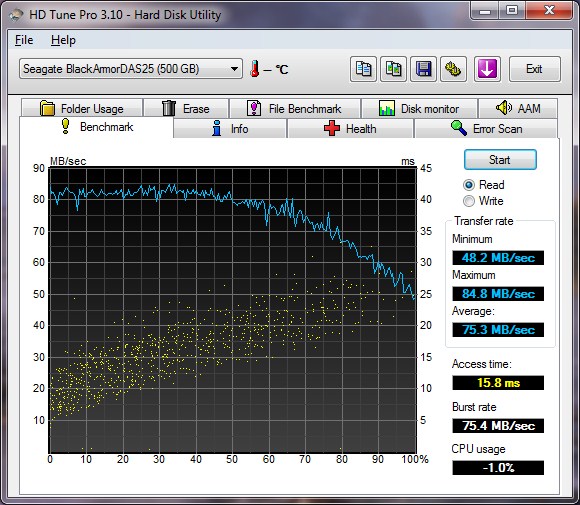
HD Tune Pro saw a minimum speed of 48.2 MB/s with a Maximum speed of 84.8 MB/s and an average speed of 75.3 MB/s. Not as good as what we got from the Buffalo USB 3.0 External but the limitation on both as far as the Asus Maximus 3 Extreme is concerned is the speed of the drives because the drives can’t saturate the bandwidth USB 3.0 offers.
RC Tweakit Overclocking
Yes you read it right we are overclocking the i7 870 on the Maximus 3 Extreme using ROG Connect via a Male to Male USB cable and the remote overclocking tool RC Tweakit. To that end cut us a little slack we got an awesome final OC on the Maximus 3 Extreme using RC Tweakit but trying to get screenshots off two different rigs accurately while being climbed by a small dog begging attention was quite a challenge. So if the presentation isn’t perfect it’s hard to see around a small ball of fur attempting to climb you like a tree.
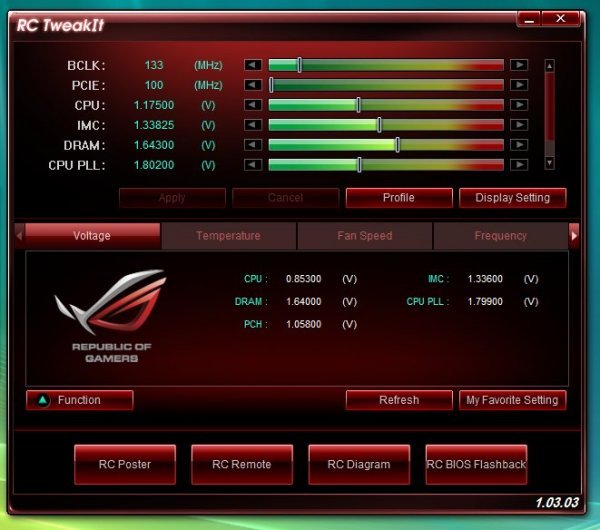
These are early shots of RC Tweakit and we aren’t actually OCing at this point just doing screen shots prior to OCing. All the controls are slider type but have buttons for increasing values by one notch at a time on both sides. You can see that RC Tweakit picked up the correct setting we already had on the rig from the moment we connected. Notice we have Turbo enabled and the CPU is idling at 0.853v and the Dram is at 1.64v (our 1600MHz voltage).
You get what you need for basic OCing but there are a few features noticeably absent. Since we are on the LGA 1156 platform, PCH Voltage is missing, on LGA 1366 it would be IOH voltage. DRAM Multiplier is missing, CPU Multiplier control is missing and a CPU Speed in MHz or GHz would have been nice. Also somewhere up there around the BCLK setting a “CPU speed will be” indicator would be nice.
Keep in mind Asus is actively working on RC Tweakit and thus far has incorporated a lot of functionality from feedback from reviewers and end users. With just a little more tweaking on Tweakit it should be a fully functional practical remote overclocker.
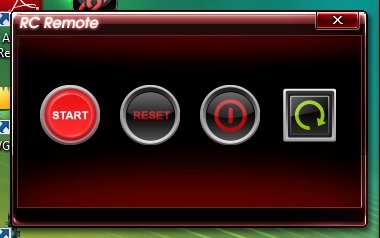
You’ll also find RC Remote for starting up the rig, doing a reset, force power off, and clear CMOS button and believe us we tested every button and they all work like a charm.
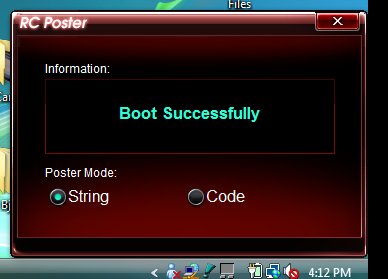
RC Poster reads what’s going on during boot and displays it on screen so you can see where the rig faulted at if you happen to get a failed boot. That’s a handy feature but it will report Boot Successful prior to getting to the Windows OS screen. Notice the little battery icon at the bottom below RC Poster and you know we were on the lab laptop.
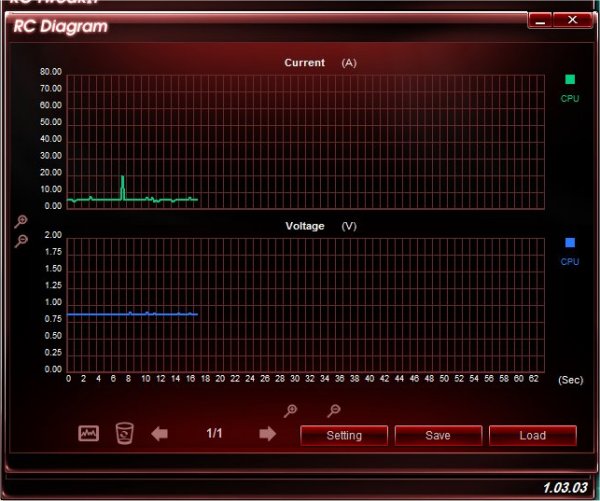
RC Diagram can be customized to show you up to 3 different real time readings. We chose CPU Current (Amps), CPU Voltage (Volts) and (Not pictured) CPU temperature.
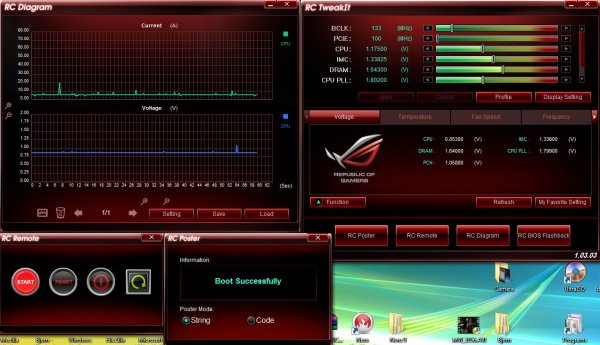
We pushed everything together on the Laptops screen like a console for easy access and we were ready to start RC Tweakit OCing.
Before we go there however lets cover the install. All we did was connect the included male to male USB cable to the laptop and desktop then installed RC Tweakit on the laptop. Once the install was finished we pushed the button on the back of the chassis next to the ROG Connect port and fired up RC Tweakit. We immediately got a message that we were connected and RC Tweakit picked up the settings we had entered into BIOS automatically.
Stock CPU-Z Shots
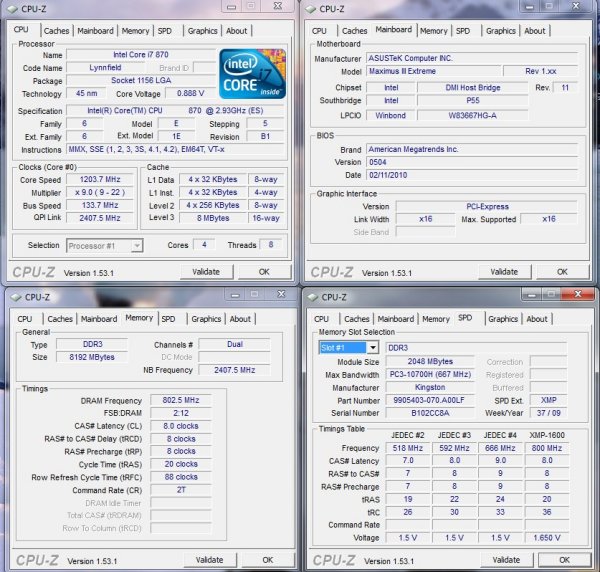
In this CPU-Z shot you see the stock CPU-Z shot with turbo enabled and power savings features turned on. All we did was enable the XMP profile on our HyperX 1600 MHz kit and left everything else alone.
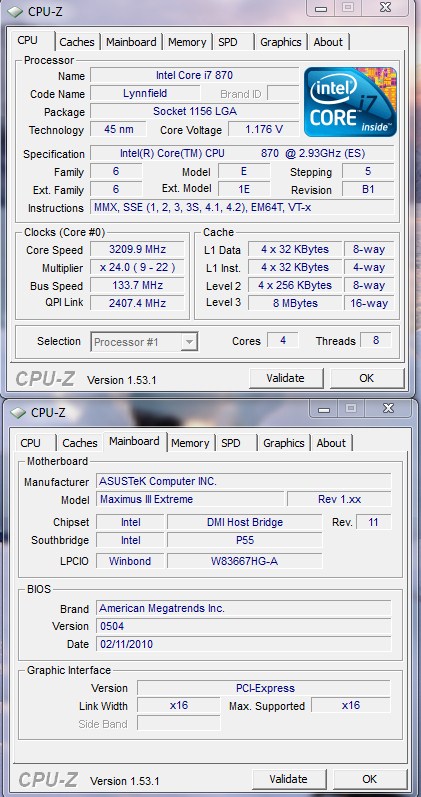
We closed down the excess CPU-Z screens and loaded Prime 95 to get our load shot and you can see that the Maximus 3 Extreme has the i7 870 in Turbo at 3.2 GHz. We decided that for our purposes today taking Turbo out of the equation was probably the best idea. We want to know what RC Tweakit is doing every second without Turbo butting in and giving us a mild OC of it’s own accord. Normally you can BIOS OC with turbo enabled and it works fine for us. Some people prefer OCing with Turbo off. Since we are using RC Tweakit we are turning it off and going from there.
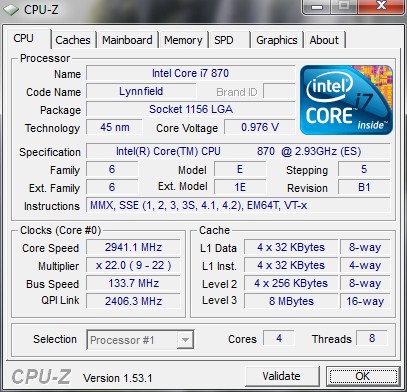
We went into BIOS and turned Turbo off and this is our starting point for the overclock. Please note that XMP is still enabled and we will adjust the ram multiplier as needed manually in BIOS. Our 1600MHz kit of HyperX is good at 1.64v at 8-8-8-24 without changing it up to above 1800 MHz so we’ll adjust on the fly.
RC Tweakit Overclocking P.2
Now that we have the stage set with the CPU-Z shots lets jump right into overclocking. We realize there are a lot of methods of overclocking and we have our own special brand. If your method happens to be different please don’t flood my email with a bunch of “You should have” E-Mail. I’ve been overclocking since the 8088 hit the desktop at 8 MHz and overclocked it to 12 MHz using a wire wrap on the bottom of the board to jump the speed from 8 MHz to 12 MHz so I have a decent amount of clocking experience.
If you happen to have less OCing experience you might want to follow this as a loose guide to baby stepping the OC up in increments. If you have more experience and great CPU cooling like I do then maybe you will be able to go in leaps and bounds like I do. Every other OC or so I run Prime 95 for 4 or 5 minutes to check the OC then move on to the next level. At some point when I’ve reached the OC I want and the 4 or 5 minute Prime 95 test is showing acceptable temperature levels I run Prime 95 for a while. Then let it cool down then run PCMark Vantage a full run and if it passes that it’s moderately stable. At that point I run the rig for a few days gaming, working on reviews, doing normal every day computing things. If I experience a problem I back up and solve it. Using that method on a daily basis for more years than I’ll admit I attain a stable overclock about 99% of the time without ever having to adjust it farther. If you have another method feel free to detail it in the forum thread about the Maximus 3 Extreme. I will tell you right upfront the odd several hundred E-Mails I get that the subject line says Maximus 3 Extreme OC I’m clicking delete or sending a stock E-Mail with the threads location. Either way you’ll end up in the Maximus 3 Extremes forum thread about the OC so save the trees and head on over there and please leave my in-box alone. The several hundred E-Mails I deal with on a daily basis are enough of a chore without a flood of E-Mails telling me how to OC.
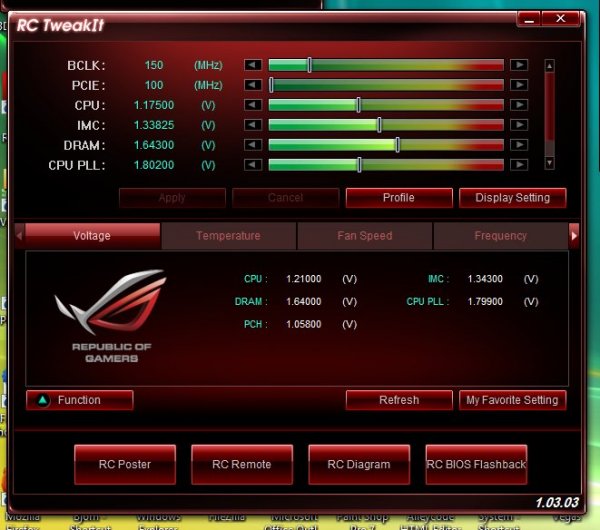
Being new to RC TweakIt I started out by jumping the BCLK to 150 and clicked apply.
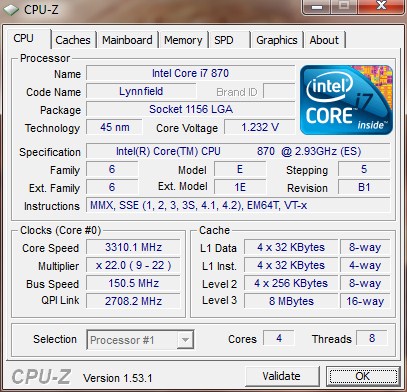
I was rewarded with an OC to 3.31 GHz making no other changes to the settings and it passed 5 minutes Prime 95 with no problems.
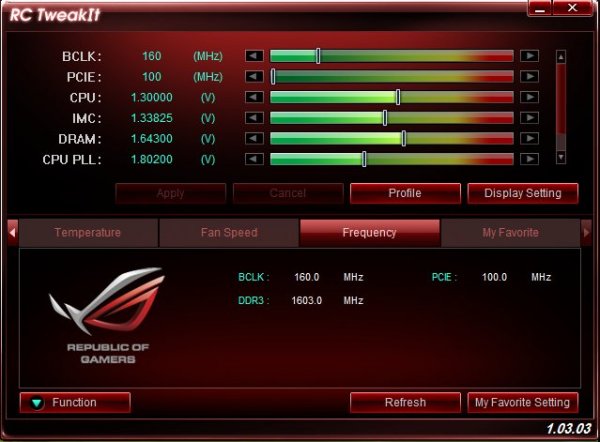
I upped the CPU voltage to 1.3v to keep things moving along at a nice pace and jumped the BCLK to 160 and clicked apply.
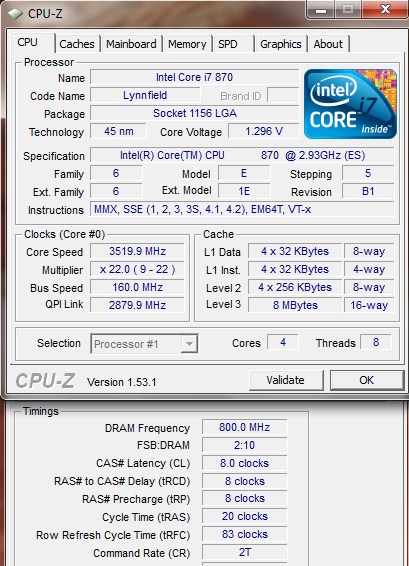
I promptly got a stable OC to 3.51 GHz with the 160 BCLK and vdroop on the CPU voltage to 1.296v so vdroop on the board is pretty minimal. I did have to make a pit stop in BIOS to cut a memory divider because at this point I was up around 1800 MHz and needed to drop the memory OC to focus on CPU Overclocking.
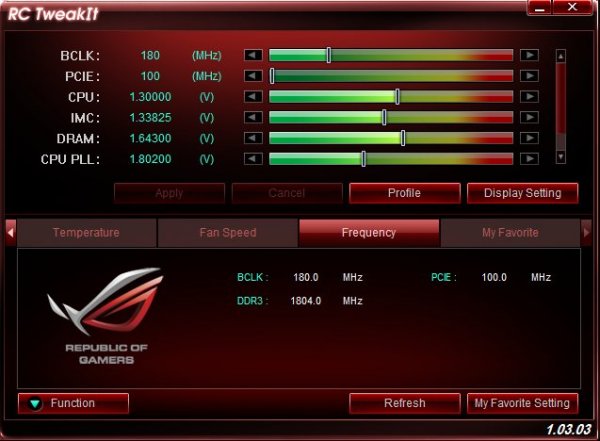
Things had been going pretty well so I jumped the BCLK up to 180 and clicked apply. At that point the rig locked up and I forced a reboot using RC Remote and upped the IOH (in BIOS) to the 1.2v range. Then I let the machine boot and got the following CPU-Z shot.
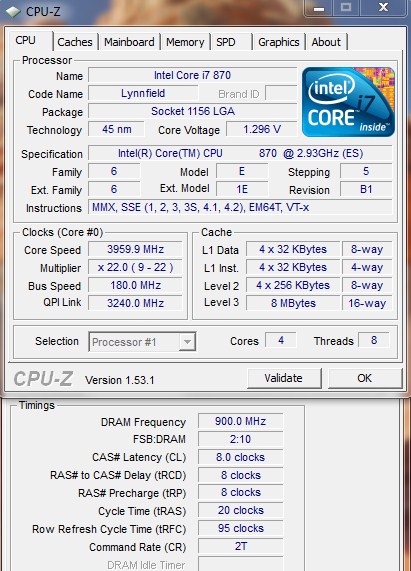
Got a nice OC to 3.95 GHz and ran prime 95 for 5 or 6 minutes and it was stable. The memory is running at 1800 MHz again so I need to drop back into BIOS and adjust the multiplier to keep the memory in the correct range. Keep in mind when overclocking using the BCLK method, CPU speed is king, and memory speed is like the kings third cousin. It might get to sit at the OCing table if it works with the OC otherwise settle for the memory speed you can get because CPU speed is and always will be king in that realm.
OK now you got the idea what I’m doing. Upping the BCLK, upping the CPU voltage, upping the IOH voltage, cutting dividers on the ram to keep it close to 1600 MHz. Lets skip a few RC TweakIt screens and do a couple of CPU-Z result shots. Give me a break the dog I mentioned on the previous page was trying to climb me like an old growth giant pine tree.
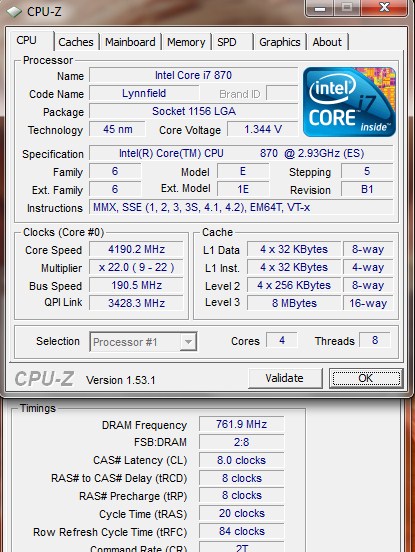
Increased BCLK to 190 and increased CPU voltage to 1.35v and hit 4.19 GHz without changing anything else. Notice the ram is at 1522 – 1524 MHz so I don’t need to adjust that yet. Passed Prime 95 for 5 minutes but things were starting to get a little toasty on the CPU, I setup one of my trade secrets and fired up a 5000 BTU air conditioner connected to a dryer heat outlet hose and put it close to the CPU cooler. The cool air is flowing over the CPU cooler intake fan. It’s not a long term solution to extra headroom but it will do for the 20 or 30 minutes I need to reach the final OC. If you try that do not let the PC cool down keep it running at all costs. Cooling down the rig then firing it up with a chilled CPU cooler you may get condensation. Those little drops of water you get on a glass of ice tea on a hot summer day. Water and computers don’t mix so keep the rig running and keep an eye on moisture buildup.
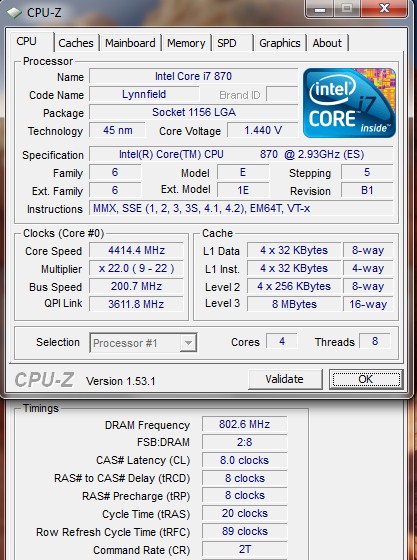
We were reaching the point of diminishing returns and to reach 4.4 GHz I had to bump the CPU voltage to 1.45 to finish out. I could have gotten away with 1.4 (Ish) but I wanted to go one step past 4.4 GHz so I stepped it up to 1.45v which is beyond what Intel says is safe. My ram was running at 1604 MHz so I’m right where I wanted to be at this point. Great CPU OC, Prime 95 stable for 10 minutes but temperatures need monitoring closely. Notice that I’m holding a 200 BCLK at this point.
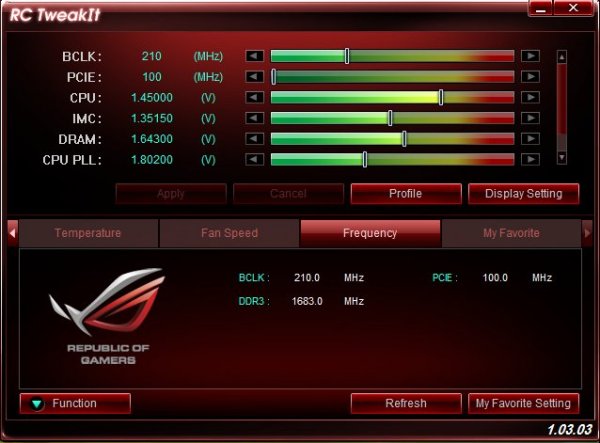
I made a pit stop in BIOS and upped the IOH voltage to 1.24v then let the machine boot with the previous 200 BCLK settings. Once I got the rig booted I bumped the BCLK to 210 kept the CPU voltage at 1.45v and said a little computer prayer the OCing deities whispered in my ear years ago and clicked apply.
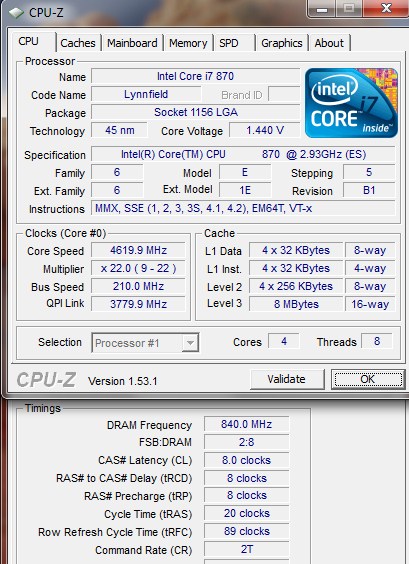
I was immediately rewarded with 4.61 almost 4.62 GHz with a BCLK of 210 and the RAM running at 1680 MHz and it passed light Prime 95 testing for about 5 minutes. Why light testing? remember I had to put the Air Conditioner to it a few steps back, well things were getting quite toasty by this time and there’s no need to cook parts. Especially $500+ dollar CPU’s.
Is it safe to run at this speed and voltage, no it’s not. Will you fry your rig running at this speed for extended periods, probably, well it’s beyond probably at this point. If you run your rig at this speed and CPU voltage for extended periods you will kill it prematurely. With an Air Conditioner that blows extremely cold air, modified by an Air Conditioning specialist that owes me about 600 favors, a dryer heat outlet hose heavily insulated blowing refrigerated air across the CPU it was spiking above 70°C. If you fry your CPU trying what I just did we don’t want to hear about it. If your worried about rig longevity back up to the 190 BCLK CPU-Z shot and keep the CPU at or under 1.35v.Most of the 870’s I’ve had hands on will run about 4.2 GHz on a good board with good ran at 1.35v. Do I run my 870 at 4.2 GHz 24/7, no I don’t. I run the i7 870 at 3.74 24/7 and increase CPU speed for reviews and benchmark record runs when needed.
The Asus Maximus 3 Extreme will drive your CPU to the edge and if you want Extreme it can drive it past the edge. That’s why they call it the Maximus Extreme. Need a little LN2 action and want to hit 5+ GHz for a few moments in the sun basking in unheard of speeds? The Maximus 3 Extreme will do it for you.
Is this the highest BCLK we hit, no it’s not, we were a little North of 210 BCLK with a lower CPU multiplier. Is this the highest OC we got, it’s the highest we tried for. The Maximus 3 Extreme has more to give it’s just a matter of wanting it and how bad you want it. We tend to be limited by time and 2 – 3 weeks with a board just isn’t enough time to Photograph it, break it in, OC it to the Max and code a review. Given time and skilled hands there really is no way to tell how far you can go on this board. We can tell you it’s our preferred LGA 1156 test bed because it will do everything we need it to do and more…..
Conclusion
When we received the Asus Maximus 3 Extreme we had high expectations for it, and the Maximus 3 Extreme surpassed them. We like the layout on the board and the fact that Asus designed it to cover multiple use scenarios. By that we mean it’s not just a stripped-down, tricked-out overclockers board. They gave it more bandwidth on the PCI-E slots and you can get 16x 16x 8x running triple GPU’s in SLI/Crossfire. You can run 5 GPU’s and still get 8x speed on all of them.
You can start out not knowing how to OC and use CPU level up, get a nice performance boost, then move into manual overclocking and keep the same board. You can overclock it remotely with a Bluetooth or a desktop/laptop and recover from an LN2 CPU freeze with the Q Reset button. If you have memory woes you can use the OK button to have the board try and find a good setting to run the memory at.
There’s a lot to love about the Maximus 3 Extreme board. Maximum overclocking, maximum features, and maximum bragging rights. Put your CPU on the Maximus 3 Extreme and the only limitation you have is your overclocking experience. That says a lot for the Maximus 3 Extreme.
| OUR VERDICT: Asus Maximus 3 Extreme | ||||||||||||||||||
|
||||||||||||||||||
|
Summary: The Asus Maximus 3 Extreme really goes beyond extreme and provides every feature a hardcore overclocker could possibly want. It also provides 16x16x8x bandwidth for GPU enthusiasts. The board is well laid out considering it packs so many features on one ATX board. What impressed us, after we fell in love with the overclockability, is that an inexperienced Overclocker can do well on this board with minimal effort. The Asus Maximus 3 Extreme is a dream overclocker board, but you can live that dream. We should warn you though that if you live that dream you might not want to wake up from it.
|
| Motherboard | Platform | Price |
| Asus Maximus 3 Formula ROG | LGA 1156 | $249 |
| Asus Maximus 3 Gene | LGA 1156 | $233 |
| Asus Maximus Formula | LGA 775 | $329 |
| Asus P7P55D | LGA 1156 | $149 |
| Asus P7P55D Deluxe | LGA 1156 | $169 |
| Asus P7P55D Evo | LGA 1156 | $195 |
 Bjorn3D.com Bjorn3d.com – Satisfying Your Daily Tech Cravings Since 1996


