Corsair’s continuation of enigineering excellence is the COOL by Corsair. Check out our review of the next iteration of water coolers from Corsair that follows in the footsteps of the Hydrocool.
Introduction
Today, we take a look at the COOL by Corsair water cooling kit. This is Corsair’s second water cooler after the very successul Hydrocool, and we are going to see if the new COOL is going to be just as successful.
Features & Specifications
Features
- Complete kit for all modern socket types
- Easy and quick system fill
- Universal radiator mounting with RadBox
- Incredibly small pump
- Pluggable system for chipset and video card cooling
Specifications
| CPU Block | Material | Copper base + aluminum top |
| Design | 240 pin base | |
| Pump | Dimensions | 2.5″ x 2.5″ |
| Max pressure | 22 PSI | |
| Noise | 15 dBA | |
| Radiator | Dimensions | 120mm |
| Material | Aluminum | |
| Fan size | 120mm | |
| Fan Connector | 4-pin Molex | |
| Reservoir | Size | Fits 5 -1/4″ drive bay |
| Capacity | 0.3 liters | |
| Tubing | Dimensions | 3/8 inch ID x 7 feet |
| Material | Flex vynil | |
| Coolant | Volume | 250ml Corsair additive + water to fill |
| Color | Green | |
| Campatibility | Supported sockets | AMD: 939/754/Socket A Intel: 870/670/570/478 |
| Supported Video Cards | ALL ATi and nVidia* | |
| Supported cases | Any tower |
Package Contents
- High performance pump
- High flow reservoir
- 120mm low-restriction radiator
- 120mm low noise high-flow fan
- 240-pin copper CPU block
- Custom retention mechanisms
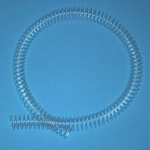
- High-flow, low-restriction tubing
- Corsair’s specially formulated coolant
 |
 |
 |
 |
 |
 |
 |
Installation
Installation was very straightforward and simple with this system. An installation manual is included that has large, color pictures, so it easy to follow. A CD is also provided with a more detailed PDF of how the system is installed with different socket types.
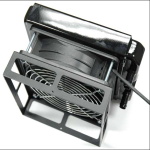
I had really hoped to be able to install the radiator inside my system, but it was too wide for an Antec P160 and caused the fan to interfere with the CPU block tubing. A radbox is provided to help with mounting to the rear of the case. The Radbox is nice because you can mount it to different sized rear fan ports, but it does add a lot of depth to the case.
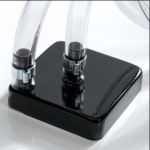
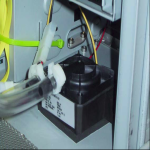
Most impressive with this system is the pump made by Delphi. At the size of a flip phone, it can placed almost anywhere in the case and does not take up a bunch of space like most pumps. This pump is also very quiet. The only way I could tell it was running was to see water moving in the reservoir. The pump also comes with a couple ways to mount it. There is a sticky pad and two places on the side that look like they can be used to screw it in place. In this case, the pump was placed under all drives on the bottom of the case and even without the pad, it doesn’t make a sound.
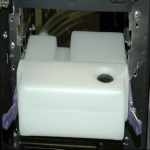
The reservoir presents the only issue with the system — mounting in a 5 1/4″ drive bay. It has a large fill hole on the top front, but the drain cap is in the rear. This is not ideal because it requires extra tubing and clutters up the interior of the case.
Finally, the water blocks and hold downs will fit any modern AMD or Intel system, and the type of block can be specified when ordered. This particular unit came with both blocks and all the different hold downs. Although the interior of the block is not accessible, the arrangement of the barbs indicates the blocks use a spiral pattern and according the specs has a pinned base. While not a big issue, I personally do not like to have hoses already affixed to the block as they are with this kit. The clips used are not easy to remove nor easy to replace. This should assure the user that there will be no leaks at the block, though.
Other than the normal measuring and tube cutting, this install went smoothly, and filling the system for the first time was a snap. Included with the kits are nice locking clamps that hold well, are simple to tighten and are hard to remove. With the reservoir mounted in the top 5 1/4″ bay, the system fills easily as the coolant fills most of the system before even starting it. I did have to top off the reservoir after the initial, but it has been good the last couple months, and I see no needed maintenance in the near future, which is excellent.
Testing Results
Basic System Specs
- AMD Athlon 3200+ (2GHz, 1MB L2 Cache)
- Leadtek Winfast K8N
- AMD Opteron 165 Dual Core (2.5GHz, 1MB L2 Cache)
- DFI LanParty UT SLI
Testing Equipment and Methodology
To measure the CPU temperature, I used the diode reading as reported by the Winbond chip using the nVidia nTune application, which was real handy, because I could log the temperature every 30 seconds to see the trend. To measure the fan speed, I used SpeedFan, which reads from the Winbond. The onboard readings have been known to be slightly off, and I was unable to find information for this particular board, so as far as I know the readings are correct. To measure the water temperature, I used an Oregon Scientific digital thermometer with a temperature probe from Lowe’s. I simply stuck the end of the probe into the reservoir on quiet side of the baffle. The testing methodology was very straightforward. At each fan setting, I waited 15 minutes for the temperature to stabilize before taking a reading. To generate heat on the CPU, I used Stress Prime 2004. Now, on to the results.
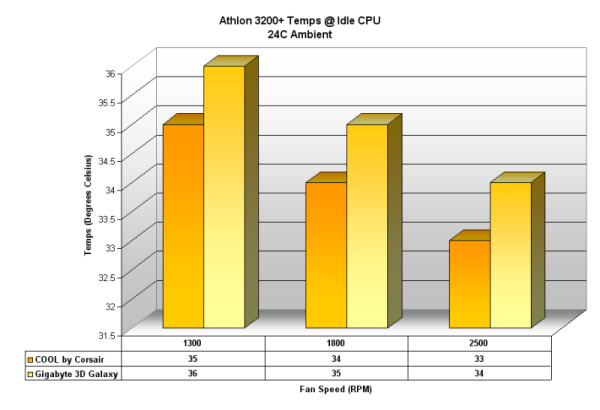
Most notable in these numbers is the way the Corsair cools with more airflow through the radiator. I believe the Corsair block to be more efficient than the Gigabyte, but the Corsair radiator is smaller, not as thick, meaning less surface area to dissipate heat.
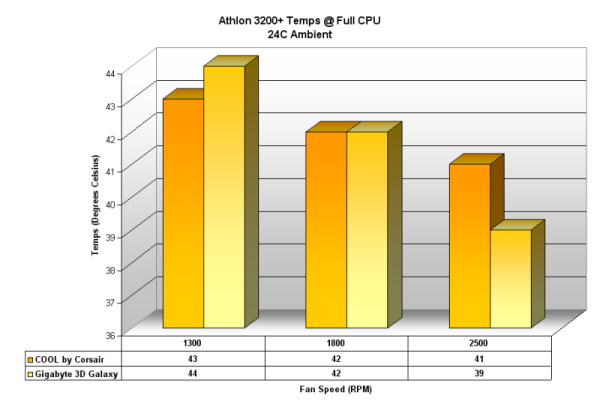
There seems to be a data inconsistency here with the Corsair running slightly cooler with the lowest fan speed. What is shown, again, is that the Corsair does not decrease temps as quickly as the Gigabyte as the fan speed is increased.
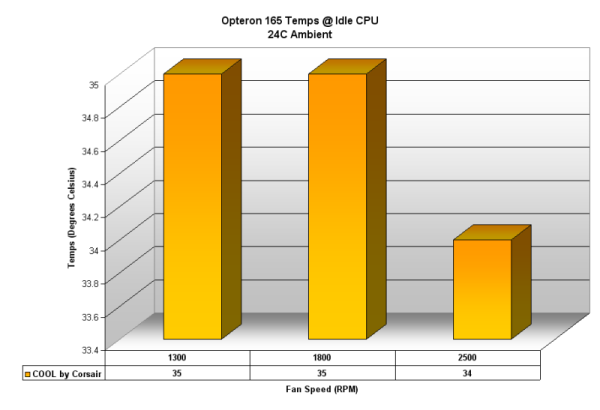
The Corsair cools the Opteron 165 with each core at 2.5 GHz just like the 3200+. This is slightly surprising due to Opteron running a slightly lower voltage.
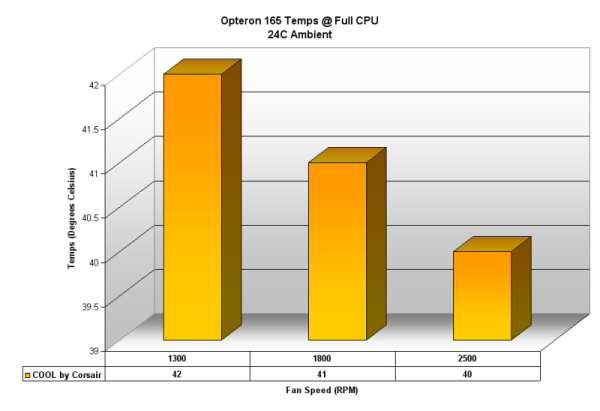
The results here do make sense when compared to the 3200+ results. Although the opteron is overclocked, the voltage is lower than the 3200+ and does not produce as much heat.
Conclusion
Corsair’s COOL Water Cooling System is definitely a good performer and does not miss a beat when scaling up to top end processors. With installation ease and no maintenance, this kit is certainly one to buy. Chipset and GPU blocks can also be added to this system to make it a perfect choice for the enthusiast looking to completely cool a system.
- Easy Installation
- Easy to fill
- Good temps at little noise
- Expandable
- Small space saving pump
- Large water blocks
- No easy system drain
- Radiator is too small
- Externally mounted radiator is bulky
 Bjorn3D.com Bjorn3d.com – Satisfying Your Daily Tech Cravings Since 1996
